The W Trek in Torres Del Paine : The ultimate Travel Guide
Discover the beauty of the W Trek in Torres Del Paine with our ultimate guide, covering top tips and must-see highlights.
Embarking on the iconic W Trek in Torres del Paine promises breathtaking landscapes, unparalleled adventure, and a journey through one of the world’s most stunning national parks. This ultimate travel guide is designed to meet all your needs, whether you’re a seasoned hiker or a first-time visitor to Patagonia. Discover essential tips, route details, packing advice, and insights into weather conditions to ensure you have an unforgettable trek. Dive into the expert insights that will empower you to plan and execute the perfect hiking expedition through this majestic part of Chile. Get ready to explore the heart of Torres del Paine with confidence and ease.
Essentials
What is the W Trek and Why Hike It
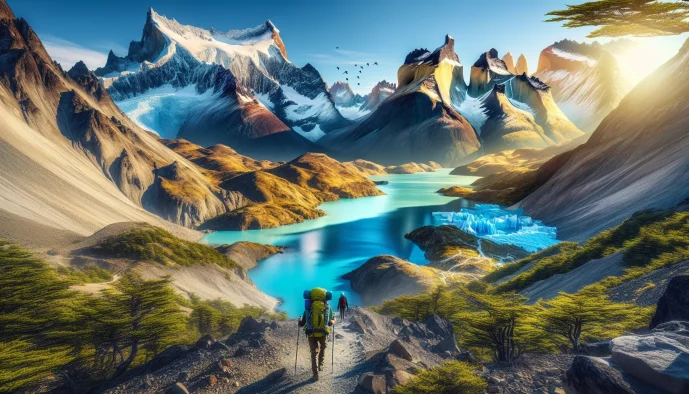
Nestled at the southern tip of the Americas, the W Trek in Torres del Paine National Park is one of the world’s most celebrated hiking routes. It’s a journey through a landscape so dramatic it feels otherworldly, a place where jagged granite spires pierce the sky and glaciers spill into turquoise lakes. This trek offers a condensed yet profound immersion into the wild heart of Patagonia, making it an achievable goal for dedicated hikers and a lifelong memory for all who complete it.
An Overview of Torres del Paine National Park
Located in the Magallanes Region of Chilean Patagonia, Torres del Paine National Park is a crown jewel of the Chilean park system. Its global significance was recognized in 1978 when it was designated a UNESCO Biosphere Reserve, protecting its unique and fragile ecosystem. The park is a breathtaking tapestry of extremes: the iconic granite pillars of the Paine Massif, vast and ancient glaciers like Glacier Grey, windswept pampas, and lakes colored in impossible shades of blue and green. This convergence of geological and glacial forces creates a trekking environment unlike any other on Earth.
The “W” Explained
The trek earns its straightforward name from the shape it carves on a map. The route isn’t a simple loop or a linear path; instead, it ventures up and back down three distinct valleys, forming a clear “W” shape. These three legs allow hikers to explore the park’s most spectacular sights without needing to complete the full, more strenuous “O” Circuit. The three valleys are:
- The Ascencio Valley, leading to the base of the Torres del Paine (The Towers).
- The Francés Valley (French Valley), a stunning amphitheater of granite peaks.
- The Grey Valley, which runs alongside Lago Grey to the face of the immense Grey Glacier.
Typically completed in four or five days, the W Trek covers approximately 80 kilometers (about 50 miles) of varied and often challenging terrain.
Key Highlights of the Trek
While every step of the journey offers remarkable scenery, the W Trek is defined by its three monumental highlights, each forming the pinnacle of a day’s hike.
Mirador Base de las Torres (The Towers): This is the postcard image of Patagonia. After a demanding final ascent over a glacial moraine, you are rewarded with the awe-inspiring sight of three colossal granite towers rising vertically above a milky-turquoise glacial lake. It is the trek’s most iconic and powerful moment.
Valle Francés (The French Valley): The central arm of the “W” leads into a natural cirque surrounded by towering granite walls and hanging glaciers. From the viewpoint, you can watch and hear the thunderous sound of ice calving from the Paine Grande massif, a raw and humbling display of nature’s power.
Glacier Grey and Lago Grey: The westernmost leg of the trek culminates at the face of Glacier Grey. This massive river of ancient, compressed ice stretches to the horizon, its deeply crevassed blue surface calving icebergs into the shimmering waters of Lago Grey. The scale is immense, offering a profound connection to the planet’s glacial history.
Is the W Trek Right for You?
The W Trek is widely considered a moderate to challenging hike. While it doesn’t involve technical climbing, the daily distances, significant elevation changes, and notoriously unpredictable Patagonian weather demand a solid level of physical fitness. Days can be long, often involving 8-10 hours of walking on uneven, rocky paths.
A good baseline of fitness is essential. You should be comfortable walking for several hours at a time, often uphill, while carrying a daypack. Prior multi-day hiking experience is highly recommended, as it prepares you for the physical and mental demands of being on the trail day after day. This trek appeals directly to avid nature lovers, landscape photographers seeking to capture dramatic light and scenery, and adventure seekers looking to experience one of the planet’s great wilderness hikes.
Planning Your W Trek Adventure
The success of a trip to Torres del Paine hinges on meticulous planning. Due to its remote location and immense popularity, logistics cannot be left to chance. From choosing the right season to booking accommodations months ahead, this section will guide you through the essential steps to transform your dream trek into a well-executed reality.
Best Time to Hike the W Trek
Patagonia’s weather is famously unpredictable, but choosing the right season can significantly shape your experience on the trail. Each period offers a distinct balance of weather conditions, crowd levels, and natural beauty.
Summer (December – February)
This is the Patagonian summer and the peak trekking season. You can expect the warmest temperatures and the most hours of daylight, which provides ample time for hiking and photography. However, this is also when the trails are most crowded, accommodations are at their most expensive, and the infamous Patagonian winds are at their strongest. While the weather is generally at its best, be prepared for anything, as sunshine can turn to rain or even snow in a matter of minutes.
Shoulder Seasons (October – November & March – April)
Many experienced trekkers consider the shoulder months to be the ideal time to visit. In spring (October-November), you’ll witness the park come alive with blooming wildflowers. In autumn (March-April), the landscape is painted in stunning hues of red, orange, and yellow. The primary advantages are fewer crowds and lower prices compared to the summer peak. The trade-off is more volatile weather, with a higher chance of cold days and precipitation, but the potential for serene trails and unique photographic opportunities is immense.
Winter (May – September)
Hiking the W Trek in winter is a serious undertaking reserved for experienced trekkers. Most services are closed, and conditions can be harsh, with heavy snow and freezing temperatures. It is mandatory to hike with a certified guide during this period. The reward for braving the elements is unparalleled solitude; you will have vast, snow-covered landscapes almost entirely to yourself, offering a completely different and profoundly peaceful perspective of the park.
How Far in Advance to Book
The popularity of the W Trek has created a highly competitive booking environment. Accommodations, particularly the beds in refugios, are limited and sell out incredibly fast. This is not a trip you can plan at the last minute.
- The Booking Frenzy: Each year, thousands of trekkers from around the world compete for a small number of beds and campsites along the route. Once the booking systems for the two main concessionaires (Las Torres Patagonia and Vertice Patagonia) open, typically in late spring or early summer in the northern hemisphere, the most desirable dates for peak season can be fully booked within days or even hours.
- Recommended Booking Window: To secure your preferred dates and accommodations, you should plan to book everything 6 to 9 months in advance. For travel during the peak months of December, January, or February, aiming for the 9-month mark is a wise strategy.
- What to Book First: Your on-trail accommodations (refugios or campsites) are the absolute first thing you must book. Your entire itinerary depends on securing a logical sequence of overnight stays. Once your trek dates are confirmed, you can then proceed to book flights, bus tickets, and pre/post-trek lodging in Puerto Natales.
Getting to Torres del Paine
Reaching this remote corner of the world is a journey in itself, typically involving a long-haul flight followed by ground transportation to the park’s doorstep.
Flying into Patagonia
The two primary airports serving Torres del Paine are in Chile. Your choice often depends on flight availability and cost.
- Punta Arenas (PUQ): Presidente Carlos Ibáñez del Campo International Airport is the larger of the two gateways. It receives more frequent flights from Santiago (SCL) on airlines like LATAM and Sky Airline. From Punta Arenas, it’s a scenic 3-hour bus ride to Puerto Natales.
- Puerto Natales (PNT): Teniente Julio Gallardo Airport is much smaller and closer to the park, but it operates seasonally with fewer flights, primarily during the high season. Flying directly here can save you the bus journey from Punta Arenas.
Getting to the Park from Puerto Natales
Puerto Natales is the charming hub town where nearly all trekkers base themselves before and after their hike. From here, regular bus services provide access to the park.
- Bus Services: Several companies, such as Bus-Sur and Buses Pacheco, run daily routes from the Puerto Natales bus terminal to the park. The journey takes approximately two hours. Buses stop at the main park entrances: Laguna Amarga (the starting point for the east-to-west route) and Pudeto (where you catch the catamaran to Paine Grande for the west-to-east route).
- Park Entrance Fee: All visitors must pay a park entrance fee administered by CONAF (Chile’s National Forest Corporation). You will be required to disembark the bus at an entrance, watch a short informational video, and pay the fee (it’s often recommended to purchase this online in advance to speed up the process). Once paid, you re-board your bus to continue to your final drop-off point.
Choosing Your Direction: East to West vs. West to East
The “W” can be hiked in either direction. There is no right or wrong way, as each has its own set of advantages and considerations.
East to West (The Classic Route
This is the most popular direction, starting at Hotel Las Torres and ending at Paine Grande (with an exit via the catamaran).
Pros: You build anticipation throughout the trek, saving the most famous highlight, the Mirador Base de las Torres, for the grand finale on the last full day of hiking (or the first, depending on how you structure it). The views of Glacier Grey unfold before you as you approach it.
Cons: The final ascent to the Towers viewpoint is physically demanding. Tackling it on your last day with tired legs can be tough. Furthermore, if the weather is poor on that specific day, you might miss the iconic view you’ve been working towards all week.
West to East
This route begins with the catamaran ride across Lago Pehoé to Paine Grande and finishes at the Hotel Las Torres sector.
Pros: You tackle the challenging hike to the Base de las Torres on your first day with fresh legs. This direction often feels slightly less crowded on the trail itself. Some hikers also prefer having the prevailing Patagonian wind, which blows from the west, at their backs for parts of the journey.
Cons: The primary drawback is that you are hiking away from Glacier Grey, meaning you have to turn around to appreciate its most dramatic views. The grand finale is a less dramatic walk out of the park from the Chileno or Central sector.
Accommodation and Trekking Styles
One of the first major decisions you’ll make when planning your W Trek is how you want to experience it. Will you go it alone, carrying your own gear and setting your own pace? Or will you opt for the convenience of a guided tour? This choice will influence everything from your budget to your nightly accommodation.
Guided Tour vs. Independent Trekking
There is no right or wrong answer here; the best choice depends entirely on your experience, budget, and travel style. Both options offer a fantastic way to see the park.
Guided Tours
Opting for a guided tour means placing all the complex logistics in the hands of experts. They handle accommodation bookings, transportation, and often meals, leaving you free to simply walk and absorb the scenery.
- Pros: All logistics are managed for you, including the often-frustrating booking process. You benefit from the local knowledge of a guide who can share insights about flora, fauna, and geology. It’s a great option for solo travelers looking for company or those new to multi-day trekking.
- Cons: This is the most expensive way to experience the W Trek. You’ll be on a fixed schedule with a group, offering less flexibility to linger at a viewpoint or change your itinerary.
Independent Trekking
Hiking independently provides the ultimate freedom and is the classic way many backpackers approach the W. It requires significant advance planning but offers a deeply rewarding experience.
- Pros: You have complete control over your pace and itinerary. It is significantly more budget-friendly than a guided tour. The sense of accomplishment from planning and executing the trek yourself is immense.
- Cons: You are responsible for everything. This includes navigating the complex booking systems for accommodation, arranging all transport, carrying your gear, and cooking your own food if you self-cater.
Accommodation Options on the Trail
Whether you hike with a guide or independently, you’ll be staying in a mix of refugios (mountain huts) and campsites strategically placed along the trail. These are run by two different private companies, which is a key detail for booking.
Refugios (Mountain Huts)
Think of refugios as rustic mountain hostels. They offer a warm bed, hot meals, and a social atmosphere after a long day of hiking. They are the most comfortable—and most expensive—option on the trail.
- What to expect: Accommodations are in shared dormitories with bunk beds (bedding is usually provided). Bathrooms are also shared and typically have hot water, though it can be intermittent. There are heated common areas where you can relax, eat, and meet other hikers.
- The two companies: The eastern side of the ‘W’ (Central, Chileno, Cuernos) is operated by Las Torres Patagonia. The western side (Paine Grande, Grey) is run by Vertice Patagonia.
- Meal Plans: You can book just a bed (“cama simple”) or opt for “full board” (“pensión completa”), which includes dinner, breakfast, and a packed lunch for the next day’s hike. This is a convenient but costly option that saves you from carrying cooking equipment and food.
Camping
Camping gets you closer to nature and is the most economical way to trek the W. There are paid private campsites and a few free public ones, though the latter come with caveats.
- Paid Campsites: Located adjacent to the refugios, these sites are also run by Las Torres Patagonia and Vertice Patagonia. They offer access to the refugio’s bathrooms (with hot showers) and often have dedicated cooking shelters. You can book just a tent platform or rent a full camping kit (tent, sleeping bag, mat) directly from them.
- Free CONAF Campsites: These government-run campsites (like Campamento Italiano) are very basic, offering a pit toilet and a small shelter. They must be booked in advance and spots are extremely limited. Note that these campsites are frequently closed for maintenance or environmental reasons, so it is critical to check the official CONAF website for their current status before planning your itinerary around them.
- Renting vs. Bringing Gear: Renting gear on-site is convenient and saves you from carrying it from home, but it adds to the overall cost. Bringing your own gear is cheaper if you already own it, but you’ll have to manage the extra weight and luggage. You can also rent high-quality equipment in Puerto Natales.
How to Book Everything
Booking the W Trek independently is a rite of passage for many. It can be a puzzle, but with patience, it’s entirely achievable.
The primary challenge is that you must book accommodations through two separate websites: Las Torres Patagonia for the eastern sector and Vertice Patagonia for the western sector. This means you’ll need to open both websites and coordinate your dates to create a continuous route. Availability often dictates a trekker’s final itinerary.
Here’s a simplified approach:
- Decide on your preferred dates and direction (East to West or West to East).
- Map out your ideal nightly stops (e.g., Day 1: Chileno, Day 2: Cuernos, etc.).
- Open both the Las Torres and Vertice booking portals in separate browser tabs.
- Check for availability at each location for your desired dates, starting with the most popular and hard-to-book spots like Chileno or Francés.
- Book your nights on one site, then quickly book the corresponding nights on the other before they disappear.
If this process sounds too daunting, several third-party booking agencies (like Torres Hike) can simplify it. For a fee, these services will book all the separate components of your trek on your behalf, delivering a single, confirmed itinerary.
The Classic 5-Day W Trek Itinerary (East to West)
This itinerary follows the most popular direction, from east to west. It tackles the trek’s most iconic viewpoint on the very first day, allowing you to spend the rest of the journey hiking through diverse valleys and towards the magnificent Grey Glacier. Each day offers a completely different landscape, showcasing the incredible variety of Torres del Paine.
Day 1: The Towers Await
Your adventure begins before you even set foot on the trail. An early morning bus from Puerto Natales takes you to the park entrance at Laguna Amarga, where you’ll register and pay your entrance fee. From there, a shuttle takes you to the trailhead at Hotel Las Torres, the starting point for the eastern leg of the W. The day’s goal is the famous Mirador Base de las Torres, the postcard view of the park. The trail is a steady ascent through valley and forest before the final, challenging one-hour scramble up a steep moraine field. The reward at the top is nothing short of breathtaking: three colossal granite towers piercing the sky above a serene, turquoise glacial lake.
- Route: Puerto Natales → Park Entrance → Hike to Mirador Base Las Torres → Overnight at Central or Chileno
- Distance: ~22 km / 13.7 miles (round trip from Central)
- Time: 8-10 hours
- Highlights: The final, leg-burning climb is immediately forgotten when you witness the iconic view of the Torres del Paine. It’s a challenging but immensely rewarding first day.
Day 2: Along the Shores of Lake Nordenskjöld
After the intensity of Day 1, the second day offers a welcome change of pace. The trail meanders along the northern shore of the brilliantly blue Lago Nordenskjöld. This section is characterized by rolling hills rather than major ascents, offering constant, stunning views across the water to the south. To your right, the jagged, black-tipped peaks of Los Cuernos (“The Horns”) dominate the skyline, providing a dramatic backdrop for the entire hike. It’s a day for appreciating the grand scale of the Patagonian landscape as you make your way to the heart of the W.
- Route: Central/Chileno → Refugio Los Cuernos or Francés
- Distance: ~11-14 km / 7-9 miles (depending on start/end point)
- Time: 4-5 hours
- Highlights: The vibrant color of the lake against the imposing presence of Los Cuernos. This is a fantastic day for photography.
Day 3: The Heart of the W – The French Valley
Today you’ll conquer the middle prong of the “W” by venturing into the spectacular Valle Francés. After a short hike from your refugio, you’ll reach Campamento Italiano, where you can drop off your large backpack and continue with only a small daypack. The trail ascends into a natural amphitheater of towering granite peaks. As you climb, you’ll be surrounded by hanging glaciers clinging to the mountainsides. The thunderous crack and rumble of the Francés Glacier calving is a common sound here, a powerful reminder of nature’s force. The hike culminates at Mirador Britanico, which offers a 360-degree panorama of the park’s most dramatic rock formations. Afterwards, you’ll descend and continue on to your overnight stop at Paine Grande.
- Route: Cuernos/Francés → Campamento Italiano → Mirador Britanico (optional but recommended) → Paine Grande
- Distance: ~20 km / 12.5 miles
- Time: 8-10 hours
- Highlights: The awe-inspiring granite cirque of the French Valley and the visceral sound of distant icefalls echoing through the valley.
Day 4: Face to Face with Glacier Grey
Leaving the shores of Lago Pehoé behind, today’s hike takes you north along the edge of Lago Grey. The trail climbs and descends through areas of forest that were affected by past fires, with the skeletal remains of lenga trees creating an eerie but beautiful landscape. After a couple of hours, you’ll reach the first viewpoint, where you get your initial, breathtaking glimpse of Glacier Grey. The immense river of ice stretches back to the Southern Patagonian Ice Field, and the lake below is often dotted with surreal blue icebergs that have calved from its face. The trail continues with ever-improving views until you reach Refugio Grey, located on the lake’s shore.
- Route: Paine Grande → Mirador Grey → Refugio Grey
- Distance: ~11 km / 7 miles
- Time: 3.5-4 hours
- Highlights: The first reveal of the massive Grey Glacier is a true “wow” moment. Watching icebergs float serenely in the milky grey water is mesmerizing.
- Optional Add-ons: For those with extra time and energy, this is the place to book an ice hiking or kayaking excursion for an up-close encounter with the glacier.
Day 5: The Final Stretch and Exit
Your last day on the trail involves retracing your steps from Refugio Grey back to Paine Grande. This gives you one final opportunity to soak in the views of the glacier and the lake, which can look completely different in the morning light. The hike is familiar, but the perspective looking south is new. Upon arrival at Paine Grande, you’ll board the catamaran for a scenic 30-minute journey across the turquoise waters of Lago Pehoé to Pudeto. This boat ride is a highlight in itself, offering a final, panoramic view of the Paine Massif you just spent five days exploring. At Pudeto, you’ll connect with your pre-booked bus for the return journey to Puerto Natales, filled with memories and a well-earned sense of accomplishment.
- Route: Refugio Grey → Paine Grande → Catamaran to Pudeto → Bus to Puerto Natales
- Distance: ~11 km / 7 miles
- Time: 3.5-4 hours
- Highlights: A final look at the glacier and the spectacular catamaran ride across Lago Pehoé, which serves as a victory lap with unforgettable views.
Essential Packing List for the W Trek
Packing for Patagonia is a strategic exercise in preparing for all possibilities. The weather is famously unpredictable, and having the right gear is not just about comfort—it’s about safety. The key is to pack light but smart, focusing on versatile layers and waterproof protection. Below is a comprehensive checklist to guide your packing process.
Clothing: The Layering System is Key
The concept of layering is your best defense against the volatile Patagonian climate. It allows you to add or remove clothing to perfectly regulate your body temperature as conditions change throughout the day. Avoid cotton, as it absorbs moisture and stays wet, leading to chills.
- Base Layers: These are your next-to-skin layers. Pack two sets of moisture-wicking tops and bottoms. Merino wool is an excellent choice for its warmth, breathability, and natural odor resistance.
- Mid Layers: This is your insulation. A fleece jacket or a lightweight down (or synthetic) puffy jacket provides essential warmth. You can wear this over your base layer on cool mornings or under your shell in cold, wet conditions.
- Outer Shell: This is arguably your most important piece of clothing. A high-quality, fully waterproof and windproof jacket and a pair of matching pants are non-negotiable. They will protect you from both rain and the powerful Patagonian winds.
- Hiking Trousers/Shorts: One or two pairs of durable, quick-drying hiking pants are ideal. Convertible pants can offer flexibility. Some hikers also appreciate shorts for warmer, calmer moments, but be prepared for sun and wind exposure.
- Hiking Socks: Pack at least three to four pairs of quality wool or synthetic hiking socks. Dry socks are crucial for preventing blisters and keeping your feet warm.
Footwear
Your feet will carry you over 50 miles of varied terrain, so investing in proper footwear is critical. Protect them, and they’ll protect you.
- Hiking Boots: Choose a pair of waterproof hiking boots with good ankle support. Most importantly, they must be well broken-in before you arrive in Patagonia. A new pair of boots is a recipe for painful blisters.
- Camp Shoes: After a long day of hiking, your feet will thank you for a change of shoes. Pack a pair of lightweight sneakers, sandals, or Crocs to wear around the refugios and campsites in the evening.
Gear and Equipment
The right equipment will make your trek more comfortable, efficient, and safe. Focus on gear that is lightweight yet durable.
- Backpack: A 40-50 liter backpack is generally sufficient for the W Trek, especially if you are not carrying a tent and full cooking gear. Ensure it has a comfortable hip belt and an integrated or separate rain cover.
- Trekking Poles: Highly recommended. Poles significantly reduce the strain on your knees during steep ascents and descents, provide stability on uneven ground, and help you navigate river crossings and windy sections.
- Reusable Water Bottle or Hydration Bladder: You can refill your water directly from the numerous glacial streams along the trail. A 1.5 to 2-liter capacity is usually adequate.
- Headlamp: Essential for navigating around campsites or refugios after dark and for any potential pre-dawn starts. Don’t forget to pack extra batteries.
- Power Bank: Electricity is limited and often only available for a few hours in the refugios. A portable power bank is the best way to keep your phone and camera charged.
Health and Safety
While the W Trek is a well-trodden path, you are still in a remote wilderness area. Being prepared for minor injuries and health issues is essential.
- Personal First-Aid Kit: Your kit should include antiseptic wipes, bandages, pain relievers, and any personal medications. Most importantly, pack comprehensive blister treatment, such as Moleskin or Compeed.
- Sun Protection: The Patagonian sun can be incredibly strong, even on cloudy days. Pack high-SPF sunscreen, SPF lip balm, a wide-brimmed hat or cap, and sunglasses.
- Personal Medications: Be sure to bring an adequate supply of any prescription medications you require, as they will not be available in the park.
For Self-Caterers
If you opt to cook your own meals to save money, you’ll need a lightweight and efficient cooking setup.
- Stove and Fuel: A small, lightweight backpacking stove is essential. Ensure you purchase a compatible fuel canister in Puerto Natales, as you cannot fly with them. Don’t forget a lighter or waterproof matches.
- Cookware: A single lightweight pot, a spork or other utensil, and an insulated mug are typically all you need.
- Biodegradable Soap: For washing your pot and utensils away from water sources.
- Food: Plan high-calorie, lightweight meals. Good options include dehydrated backpacking meals, instant oatmeal, pasta, couscous, nuts, dried fruit, and energy bars.
Budget, Costs, and Money-Saving Tips
A trek through Torres del Paine is an unforgettable experience, but it does require careful financial planning. Costs can vary dramatically depending on your travel style, from a spartan backpacking trip to a fully-catered guided tour. Understanding the primary expenses will help you create a realistic budget for your adventure.
A Breakdown of Major Expenses
Your total expenditure for the W Trek will be composed of several key elements. Here’s what you need to account for when planning your budget.
- Park Entrance Fees: All visitors must pay an entrance fee to CONAF (Chile’s National Forest Corporation). The fee is valid for the duration of your trek. For foreign adults, expect to pay around $49 USD for a stay of more than three days. Chilean nationals pay a significantly lower rate. It’s wise to check the official CONAF website for the most current pricing and payment options, as policies can change.
- Transportation: Getting to and around the park is a significant cost. This includes your flight into Punta Arenas (PUQ) or Puerto Natales (PNT), the bus from the airport to Puerto Natales, the round-trip bus from Puerto Natales to the park entrances (Laguna Amarga or Pudeto), and the one-way catamaran ticket across Lago Pehoé (typically from Paine Grande to Pudeto at the end of the trek).
- Accommodation: This will likely be your largest daily expense on the trail. Prices differ substantially between a basic campsite and a bed in a refugio. A dorm bed can cost over $100 USD per night, while a simple campsite pitch might be around $25-35 USD. Renting a pre-pitched tent with a sleeping bag and mat is a mid-range option that costs more than bringing your own gear.
- Food: The choice between self-catering and purchasing meals at the refugios will have a massive impact on your budget. A full-board package (dinner, breakfast, and a packed lunch) at a refugio can cost upwards of $90 USD per person, per day. In contrast, carrying and cooking your own food is far more economical, though it requires more planning and a heavier pack.
- Gear Rental: If you don’t own all the necessary equipment, you can rent high-quality gear in Puerto Natales. Common rentals include tents, sleeping bags, sleeping pads, trekking poles, and cooking stoves. While convenient, renting a full set of gear for five days can add a considerable amount to your total cost.
Sample Budgets for Different Travel Styles
To give you a clearer idea, here are three potential budget scenarios for a 5-day trek, excluding international flights and pre/post-trek expenses in Puerto Natales.
The Budget Backpacker
This traveler prioritizes savings above all else. They will camp every night in their own tent, cook all their own meals purchased at a supermarket in Puerto Natales, and use public transport. They book everything independently many months in advance to secure the cheapest campsites.
- Estimated Daily Cost on Trail: $50 – $80 USD per person.
The Mid-Range Trekker
This hiker seeks a balance between comfort and cost. They might mix camping with a couple of nights in a refugio dorm bed to get a proper rest. They’ll cook most meals but may purchase a celebratory dinner or two at the refugios. They might rent some bulkier gear to avoid traveling with it.
- Estimated Daily Cost on Trail: $150 – $220 USD per person.
The All-Inclusive Tour
For those who prefer convenience and expert guidance, a fully guided tour is the way to go. This price typically includes a professional guide, all accommodation (usually in refugios), all meals, park entrance fees, and all local transportation, including the catamaran. You simply show up with your personal gear.
- Estimated Total Cost for 5-Day Tour: $1,800 – $3,000+ USD per person.
How to Save Money on the W Trek
While Torres del Paine is not a cheap destination, there are several effective strategies to reduce your overall costs without compromising the experience.
- Travel during the shoulder season: Hiking in October, November, March, or April often means lower prices for accommodation and fewer crowds. You’ll also be rewarded with beautiful spring flowers or vibrant autumn colors.
- Book independently and far in advance: Using a third-party booking agency is convenient but adds a service fee. By navigating the Vertice and Las Torres websites yourself and booking 6-9 months ahead, you can secure the most affordable options (campsites) before they sell out.
- Cook your own meals: This is arguably the single biggest money-saver. The cost of buying pasta, oats, and energy bars in Puerto Natales is a fraction of the price of full board at the refugios. It requires more effort but significantly cuts down daily expenses.
- Stay in Puerto Natales hostels: Before and after your trek, opt for hostels in Puerto Natales. They offer affordable lodging, often have communal kitchens where you can prepare food, and provide a great place to meet other travelers and get last-minute tips. Many also offer secure luggage storage while you are on the trail.
Final Tips for a Successful Trek
You’ve booked your flights, reserved your refugios, and packed your bags. The final step is preparing your mind and body for the adventure ahead. A little forethought can make the difference between a challenging ordeal and an unforgettable journey. Here are our essential tips for a smooth and successful W Trek.
Physical Preparation
While you don’t need to be a professional athlete, arriving with a good level of fitness will dramatically increase your enjoyment of the W Trek. The long days, variable terrain, and weight of your pack can be demanding. We recommend starting a training regimen at least two to three months before your trip.
- Cardiovascular Training: Incorporate activities like running, cycling, or swimming into your routine 3-4 times a week. This builds the endurance needed for long hiking days.
- Strength Training: Focus on building strength in your legs, core, and back. Exercises like squats, lunges, and planks will help you tackle steep ascents and carry your pack more comfortably.
- Practice Hikes: The best way to train for hiking is to hike. Find local trails and complete several hikes that are 4-6 hours long. Crucially, do these hikes wearing the same boots and a weighted backpack that you plan to use in Patagonia. This breaks in your footwear and gets your body accustomed to the load.
Navigating the Trail
The W Trek is a well-trodden path, and for the most part, the trail is clearly marked and easy to follow. However, fog, snow, or a moment of distraction can lead you astray, so it’s wise to be prepared.
- Trail Markings: The main trails are marked with orange-painted stakes, rock cairns, and signs at major junctions. Keep an eye out for these, especially when crossing open, rocky areas.
- Offline Maps: Do not rely on a cell signal for navigation. Before you leave, download the Torres del Paine trail map onto a GPS app on your phone, such as AllTrails, Gaia GPS, or Maps.me. A fully charged phone and a power bank will ensure you have a reliable backup.
Dealing with Patagonian Weather
The weather in Patagonia is notoriously unpredictable and is perhaps the trek’s greatest challenge. It’s common to hear that you can experience “four seasons in one day,” and this is no exaggeration. You can start a morning in brilliant sunshine, face a blizzard at a high pass, and be battered by gale-force winds on the descent.
The Patagonian wind, in particular, is legendary. It can be strong enough to knock you off balance. To manage it, lean into the wind, use trekking poles for extra stability, and ensure everything on the outside of your pack is securely fastened. Mentally preparing for rapid weather changes and having the right waterproof and windproof gear is essential for both safety and comfort.
Leave No Trace Principles
Torres del Paine is a pristine, protected wilderness. As visitors, we have a collective responsibility to preserve its beauty for future generations. Adhering to the Leave No Trace principles is not just a suggestion; it’s a requirement.
- Pack It In, Pack It Out: There are no trash cans on the trail. You must carry out everything you bring in, including food wrappers, fruit peels, and all other waste. Bring a dedicated bag for your rubbish.
- Respect Wildlife: Observe animals from a distance. Never feed wildlife, as it harms their health, alters natural behaviors, and can make them aggressive.
- Stay on the Designated Trails: Venturing off-trail causes soil erosion and damages fragile Patagonian flora that can take decades to recover. Stick to the marked path at all times.
Connectivity and Staying in Touch
Consider the W Trek a digital detox. While some of the main refugios offer paid Wi-Fi, it is generally slow, expensive, and unreliable. Cell service is non-existent for almost the entire duration of the trek. For more on staying connected in the region, check out our guide to Internet, Sim Card and Phone in Patagonia and Tierras del Fuego. You can also find information on Chile-wide connectivity.
- Set Expectations: Embrace the opportunity to disconnect from the outside world and connect with the nature around you. Don’t count on being able to upload photos or check emails.
- Inform Someone of Your Itinerary: Before you begin your trek, give a copy of your detailed itinerary—including your daily routes, accommodation bookings, and expected return date—to a friend or family member back home. This is a simple but critical safety precaution.
Takeaways
