Face Shadow Play Guide
Master the art of face shadow play with our expert tips and tricks.
Ever wondered how a subtle shift in light can completely transform a face, adding drama, depth, or a touch of mystery? This guide is your key to mastering the art of facial shadows, unlocking a powerful tool for photographers, artists, and anyone looking to enhance portraiture. We'll delve into how shadows sculpt features and evoke specific moods, turning simple lighting into a captivating storytelling element.
Prepare to understand the core principles of light and shadow, discover your essential shadow-crafting toolkit, and learn practical techniques to create striking and evocative portraits. Get ready to elevate your understanding of how light and shadow work together to reveal the true character of a face.
Essentials
The Art and Mood of Facial Shadows
What is Shadow Play?
When we first learn about photography or lighting, the focus is often on achieving “correct” exposure—making sure the subject is perfectly lit, with no harsh shadows or lost details. Shadow play invites us to flip that script. It’s the intentional and artistic use of shadows to sculpt, define, and add mood to a portrait. Instead of fighting shadows, we embrace them as a primary tool. This is the shift from technically correct lighting to truly creative lighting, where the darkness is just as important as the light. Understanding how to work with light is key to mastering this, and understanding natural light is a great place to start.
Why Shadows are a Powerful Tool
Shadows are more than just the absence of light; they are a fundamental element of visual storytelling. By learning to control them, you unlock a new layer of expression in your portraits. Here’s why they are so effective:
- Creating drama and mystery: What is left unseen can be more powerful than what is shown. Shadows conceal parts of the face, leaving the viewer to fill in the blanks and creating a sense of intrigue and suspense.
- Accentuating or altering facial features: Shadows act like a sculptor’s chisel. A well-placed shadow can carve out cheekbones, strengthen a jawline, or add a look of intensity to the eyes, fundamentally changing how we perceive the subject’s face. This is a core concept in portrait photography.
- Conveying emotion and telling a story: The quality and placement of shadows can instantly set a mood. Deep, hard shadows might suggest conflict or melancholy, while soft, gentle shadows can feel romantic or serene. They help translate an internal feeling into a visual cue, which is vital for capturing the essence of destinations.
- Adding depth and dimension: Photography is a two-dimensional medium, but shadows create the illusion of three-dimensional form. They give a face shape, volume, and a sense of presence, preventing the portrait from looking flat and lifeless. Learning about beginner photo lighting will help you understand how to manipulate light and shadows effectively.
Core Principles of Light and Shadow
Hard Light vs. Soft Light
Before you can paint with shadows, you must understand your brush: the light itself. All light is not created equal. The most fundamental distinction in lighting is between hard and soft light, a concept determined by the size of the light source relative to your subject. Understanding this difference is the first step toward intentional, creative control. This forms a core part of Beginner’s Photo Lighting.
Hard Light is the source of drama. It creates shadows with sharp, clearly defined edges and high contrast between the brightest highlights and the darkest shadows. Think of the crisp shadow you cast on a sunny, cloudless day. This effect is produced by a small, direct light source.
- Source: A bare lightbulb, direct midday sun, a focused flashlight, or a studio light without any modifier.
- Effect: Hard light is unapologetic. It emphasizes texture, revealing every pore and wrinkle, which can be used to create a gritty, intense, or dramatic mood.
Soft Light is the source of subtlety and flattery. It wraps gently around your subject, creating smooth, gradual transitions from light to shadow. The shadow edges are feathered and indistinct. Picture the gentle light coming through a large window on an overcast day. This is an example of Understanding Natural Light.
- Source: Any large, diffused light source will create soft light. This includes a professional softbox, a lamp shining through a white sheet, or the sky on a cloudy day.
- Effect: Soft light is forgiving and often seen as more traditionally beautiful. It minimizes skin texture and creates a gentle, serene, or romantic atmosphere.
The Critical Role of Light Position
Once you’ve chosen your light’s quality (hard or soft), its position becomes the single most important factor in shaping the face. Simply moving your light source a few inches up, down, or to the side can completely transform the mood and story of your image. Where you place the light dictates where the shadows will fall. This is a key element in Manipulating Light and Shadows.
- Side Lighting: Placing your light directly to the side of your subject (at a 90-degree angle) is a classic way to create drama. It illuminates one half of the face while plunging the other into deep shadow, carving out features and adding a profound sense of dimension and mystery.
- Top Lighting: When the light source is positioned directly above the subject, it casts shadows downward. This can create prominent shadows under the cheekbones and nose, and often results in deep, hollowed-out eye sockets. While it can be unflattering if not controlled, it’s also used to create a moody, high-fashion, or pensive look.
- Under-lighting (Ghoul Lighting): This is achieved by placing the light source below the subject’s face. It inverts our natural expectation of how light works (since our primary light, the sun, is always above us). This casts shadows upwards, creating an eerie, unsettling, or sinister mood perfect for horror or avant-garde concepts.
- Backlighting: Placing the main light source behind your subject, facing the camera, conceals the front of the face in shadow. This technique is used for two primary effects: creating a complete silhouette where only the outline is visible, or, with careful exposure, creating a beautiful rim light—a bright halo of light that separates the subject from the background.
Your Shadow-Crafting Toolkit
You don’t need a professional studio to start experimenting with shadow play. The most powerful tools are often the simplest ones, combined with a bit of ingenuity. This section will guide you through the gear you might need, from items you already have at home to more specialized equipment.
Essential Light Sources for Every Budget
The quality of your shadows is determined by the quality and control of your light, not the price tag of your equipment. Here’s how to get started, no matter your budget.
- No-Cost: Your best friend is a window. Window light on a clear day acts as a large, soft light source, while direct sun provides a hard, crisp light. To control it, simply use a piece of black cardboard or thick paper to block off parts of the window, effectively “shaping” the light that falls on your subject.
- Budget-Friendly: Everyday items can be transformed into powerful lighting tools. A simple desk lamp with a movable head, a bright flashlight, or even your smartphone’s torch can produce stunningly dramatic, hard-edged shadows. Their small size makes them perfect for creating precise, controlled beams of light.
- Intermediate/Pro: As you advance, you might consider investing in more versatile gear. LED panels offer adjustable brightness and color temperature, while speedlights (external flashes) and studio strobes provide powerful bursts of light that can be shaped with a wide array of professional modifiers.
Remember, the most crucial element is your vision, not your gear. Some of the most compelling and creative shadow portraits have been crafted with nothing more than a single flashlight in a dark room. Master the fundamentals with simple tools, and you’ll be able to create incredible images with any light source.
Shaping Light and Casting Shadows
Once you have a light source, the next step is to control and shape its output. This is where you move from simply lighting a subject to actively sculpting with shadows.
Light Modifiers
These tools attach to or are placed in front of your light to narrow, focus, or cut the beam.
- Grids and Snoots: These accessories are used to create a tight, focused, circular beam of light. A snoot is a tube that funnels the light, while a grid is a honeycomb-like mesh. Both are excellent for isolating a specific facial feature, like the eyes, in a pool of light.
- Barn Doors: These are sets of four adjustable flaps that attach to the front of a light. By opening or closing them, you can “cut” the light spill and create sharp, linear shadows, perfect for casting precise stripes or blocks of light and shadow.
Light Blockers (Negative Fill)
Sometimes, creating deep, rich shadows isn’t about adding more light but about taking it away. Negative fill refers to using any dark object to block or absorb ambient light, preventing it from filling in the shadows you want to preserve. A simple piece of black foam core, a dark piece of fabric, or even a person wearing a black shirt can be positioned on the shadow side of the face to absorb stray light and make the shadows dramatically darker and more defined.
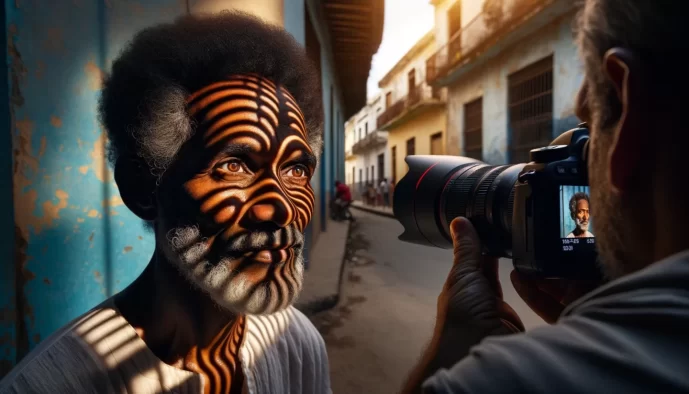
Everyday Objects as Pattern Generators (Gobos)
A “gobo” (a term for a “go-between object”) is anything you place between your light source and your subject to cast a patterned shadow. Your home is full of potential gobos that can add texture, depth, and narrative to your images. Get creative and look for interesting shapes and patterns all around you.
- Window blinds or shutters for the classic film noir effect.
- A piece of lace or patterned fabric for delicate, intricate shadows.
- The leaves of a houseplant to create a natural, dappled light effect.
- Kitchen utensils like a colander, cheese grater, or slotted spoon for unique geometric or abstract patterns.
- A simple piece of cardboard with shapes (lines, circles, abstract designs) cut out of it for a completely custom look.
Classic Shadow Play Techniques to Practice
Once you understand the principles of light and shadow, you can start practicing with established lighting patterns. These techniques are classic for a reason—they are effective, evocative, and provide a fantastic foundation for developing your own style. Think of them as the fundamental scales you learn before composing your own music.
Split Lighting
As the name suggests, split lighting divides the face perfectly into two halves: one in light, the other in shadow. It’s a powerful and dramatic look, often used to create a sense of conflict, mystery, or duality in a character. To achieve this effect, position your single light source at a perfect 90-degree angle to your subject, directly to their side. You may need to ask them to turn their head slightly toward or away from the light to get the dividing line exactly down the center of their face.
Rembrandt Lighting
Named after the Dutch painter who famously used it in his portraits, Rembrandt lighting is less severe than split lighting but equally dramatic. Its defining characteristic is a small, inverted triangle of light on the cheek of the shadow-dominant side of the face. This pattern adds depth and a somber, moody quality. To create it, place your light source roughly 45 degrees to the side of your subject and position it slightly above their eye level, angled down. Watch closely as the shadow from the nose connects with the shadow on the cheek, leaving only that signature triangle of light.
Loop and Butterfly Lighting
These two techniques are often considered more conventional or flattering, making them popular in classic portraiture and Hollywood glamour shots.
- Loop Lighting: This is a simple and widely used pattern. It’s created by placing the light slightly higher than the subject’s eye level and about 30-45 degrees from the camera. The key is to create a small “loop” of shadow from the nose that points down towards the corner of the mouth, without connecting to the shadow on the cheek.
- Butterfly Lighting: Also known as “Paramount” lighting due to its frequent use by Paramount Studios in the golden age of Hollywood, this technique is created by placing the light source directly in front of and high above the subject. This casts a small, symmetrical shadow directly under the nose that often resembles a butterfly. It’s known for accentuating cheekbones and is very flattering for subjects with strong facial structures.
Projecting Patterns onto the Face
This is where shadow play becomes truly expressive and artistic. By placing an object between your light source and your subject, you can cast specific and meaningful patterns onto their face. This object is often called a “gobo,” which stands for “go-between object.” The possibilities are limited only by your imagination.
Some classic ideas to get you started include:
- The Film Noir Effect: Shine your light through a set of window blinds or even a piece of cardboard with clean, straight lines cut into it to cast linear shadows across the face.
- Dappled Light: For a more organic and natural feel, shine a light source through the leaves of a houseplant or a bunch of branches to create a soft, dappled pattern.
- Textured Shadows: Use everyday objects like lace fabric, a colander, or a mesh screen to project intricate and interesting textures onto your subject.
Advanced and Creative Explorations
Once you’ve mastered the fundamentals of placing and shaping light, you can begin to push the creative boundaries. These advanced techniques introduce color, deepen contrast, and blend the art of lighting with other disciplines to elevate your shadow play from a technical exercise to a true form of expression.
Introducing Color with Gels
Shadows don’t have to be black, and highlights don’t have to be white. By introducing colored gels, you can infuse your portraits with mood, emotion, and a cinematic quality. A gel is simply a transparent colored sheet that you place over your light source.
The process is straightforward: simply affix the gel to your light, ensuring it doesn’t directly touch a hot bulb. You can use tape, clips, or a dedicated gel holder. The effect is immediate, tinting the light that falls on your subject. But the real artistry lies in how you use it:
- Tinting Highlights: Placing a gel over your main light source (the key light) will color the illuminated parts of the face, leaving the shadows relatively neutral.
- Coloring Shadows: A more subtle technique involves using a second, weaker light with a gel on it. Position this light to gently fill the shadow areas with color, creating a rich, dual-toned look.
- Using Complementary Colors: For a powerful, high-impact effect, try using colors from opposite sides of the color wheel. Imagine a warm, orange light illuminating one side of the face, while a cool, blue-gelled light fills the shadows on the other. This creates a dynamic visual tension that is immediately captivating.
The Power of Negative Fill
We often think of lighting as an additive process—adding light to a scene to create highlights and shadows. However, sometimes the most impactful change comes from taking light away. This is the principle of negative fill. In most rooms, ambient light bounces off walls and ceilings, subtly filling in the shadows you’ve worked so hard to create, making them appear gray and less defined.
Negative fill is the act of using a black, non-reflective surface to absorb that stray light and prevent it from contaminating your shadows. This makes your darks deeper, richer, and more dramatic. You don’t need fancy equipment for this:
- A piece of black foam core or cardboard is the perfect tool.
- A large piece of black fabric can also be draped or hung.
To use it, simply place the black surface on the shadow side of your subject, just out of the camera’s frame. Position it to block any ambient light from reflecting back onto the face. The closer you bring it to the subject, the more light it will absorb and the deeper the corresponding shadow will become. It’s the secret to achieving that deep, high-contrast look without adding more lights.
Combining Shadow Play with Makeup
Light and makeup are natural partners in shaping the face. By consciously combining them, you can create looks that are graphic, bold, and seamlessly integrated. This is where the face truly becomes a canvas, with makeup creating shapes and textures for the light to interact with.
Consider these approaches:
- Amplify with Contouring: Before you even turn on a light, you can use contouring makeup to enhance the natural shadows under the cheekbones, along the jawline, and at the temples. When you apply your lighting, these pre-darkened areas will appear even deeper and more sculpted, amplifying the effect dramatically.
- Create Graphic Shapes: Use makeup as a tool for creating your own shadows. A bold, sharp line of black eyeliner, a dramatic dark eyeshadow, or even abstract shapes painted on the face can become focal points. When you light the face from the side, the light will catch the edge of the makeup, creating a fascinating interplay between the real shadow cast by the light and the “shadow” created with cosmetics.
Troubleshooting Common Shadow Issues
Even the most seasoned photographers and artists run into challenges. When your shadows aren’t behaving the way you envisioned, a little troubleshooting is all you need. Here are solutions to the most common shadow play problems.
My Shadows are Muddy or Not Dark Enough
The Problem: You’ve set up your key light to cast a beautiful, dramatic shadow, but instead of being deep and rich, the shadow area looks grey, washed out, and lacks impact. This almost always happens because there is too much ambient or “fill” light in your environment bouncing around and contaminating your shadows.
The Solution: The goal is to create a high-contrast scene, which means you need to control all the light, not just the light you’re adding. Start by darkening the room as much as possible—turn off all overhead lights, lamps, and close the blinds to block sunlight. If shadows still aren’t deep enough, introduce negative fill. Use a piece of black foam core, cardboard, or fabric and hold it on the shadow side of the face. This black surface will absorb stray light instead of reflecting it, instantly creating deeper, more dramatic shadows.
The Shadow Edges Aren’t Sharp Enough
The Problem: You’re aiming for that crisp, graphic, film-noir look, but your shadow edges are soft and fuzzy with a gradual transition from light to dark. This is a direct result of the size and quality of your light source.
The Solution: To get a hard, well-defined shadow edge, you need a small, direct light source. If you’re using a softbox or have a lampshade on your light, remove the diffusion material. The bare bulb itself will produce a much harder light. Another effective technique is to simply move your light source further away from your subject. While it seems counterintuitive, a light source that is farther away becomes “smaller” relative to the subject, which in turn creates sharper, crisper shadow lines. A flashlight or a smartphone torch are excellent tools for creating these defined edges.
I’m Getting Unflattering Shadows
The Problem: The shadows are falling in awkward places, perhaps creating deep, dark circles under the eyes (often from top lighting), accentuating wrinkles you’d rather soften, or casting a strange shape from the nose. The light is creating drama, but not the kind you want.
The Solution: This issue is all about the position and angle of your light. There is no single “correct” position; it depends entirely on your subject’s unique facial structure. The key is to experiment and observe closely. Move your light source slowly—just an inch up, down, left, or right—and watch how the shadows shift and reshape on the face. Have your subject turn their head slightly as you adjust the light. Often, a tiny adjustment in height or angle is all it takes to transform an unflattering shadow into a beautifully sculpted one that enhances the cheekbones or jawline perfectly.
