How to get the BEST landscape photos from bad weather : mastering moody landscapes
Rain pouring down? Skies a dull, uniform grey? Most photographers pack up their gear and head indoors. But what if those less-than-ideal conditions are actually the key to unlocking truly breathtaking landscape images? This article reveals how to get the BEST landscape photos from bad weather, transforming gloomy days into opportunities for dramatic, moody masterpieces.
We’ll dive into the unexpected beauty that foul weather brings to the scene, ensuring you’re prepared with essential safety precautions for challenging shoots. Plus, we’ll guide you through the right gear to protect both yourself and your valuable equipment, so you can confidently capture stunning moody landscapes no matter the forecast.
Essentials
Landscape Photography Guide
Welcome to our comprehensive guide to landscape photography. This guide will cover everything you need to know to capture stunning natural scenes, from understanding composition to mastering light and shadow. Whether you’re a beginner or looking to refine your skills, we’ve got you covered.
One of the most crucial aspects of compelling landscape photography is composition. Learning how to arrange elements within your frame can make the difference between a snapshot and a masterpiece. We’ll explore techniques like the rule of thirds and leading lines, and delve into how to effectively add depth to your landscape photos. Understanding balance and visual weight is also key to creating harmonious images. Furthermore, mastering depth and layering will elevate your shots by giving them a sense of scale and dimension.
Light is perhaps the most important element in photography. We’ll discuss how to best utilize natural light, including the golden hours for that perfect glow. Understanding how to work with light and shadows can dramatically enhance your images. For those who love dramatic skies, our sunset photo guide offers specific tips.
When it comes to capturing the grandeur of mountains, specific techniques can make your photos stand out. Check out our tips for better mountain photography. If you’re venturing into colder climates, you might be interested in learning how to photograph the Aurora Borealis.
Even with just your smartphone, you can capture incredible landscapes. Our tips for capturing landscapes with a smartphone will help you make the most of the device you have.
Don’t let your landscape photos become boring! We discuss 10 reasons why your landscape photos might be boring and how to overcome them. Mastering editing is also crucial. We cover RAW processing and discuss whether image edits are truth or art. Developing a consistent editing style will give your portfolio a professional look. Specific techniques like making a High Pass Filter in Photoshop can refine your images, as can proper color correction and enhancement.
Choosing the right gear is also important. We compare expensive pro high-end cameras versus compact cameras for landscape photography. While this guide focuses on landscapes, understanding how to capture motion can add dynamism to your broader photography practice. For those interested in travel and portraits within these landscapes, learn how to use an 85mm lens for stunning travel portraits.
Don’t forget to consult our location chart for inspiration on where to take your next landscape photo adventure.
The Unexpected Beauty: Why Bad Weather Elevates Landscape Photography
Many perceive grey skies and gathering storms as a signal to retreat indoors. For the landscape photographer, however, these are precisely the moments when the natural world unveils some of its most compelling and evocative scenes. Far from being a hindrance, what is often termed “bad” weather can be the very ingredient that transforms a good photograph into an unforgettable one, imbued with atmosphere and a distinct character.
Redefining “Bad” Weather for Photographers
For the landscape photographer, the lexicon of weather undergoes a subtle but significant reinterpretation. “Bad” weather ceases to be a mere inconvenience; instead, it becomes a wellspring of creative opportunity. Driving rain, swirling mist, dramatic cloud formations, or the silent fall of snow are not obstacles but rather powerful visual elements. This shift in perspective is crucial. It is about recognising that the conditions which might deter the casual observer are often the very same conditions that sculpt light, create texture, and evoke profound moods, offering a richer, more nuanced palette than a simple, sunlit day. Learning how to add depth to your landscape photos can be particularly effective in these conditions.
The Allure of Moody Atmospheres
There is an undeniable magnetism to landscapes shrouded in a moody atmosphere. Fog drifting through ancient woodlands, the soft diffusion of light on an overcast day, or the dramatic interplay of shadow and light before a storm can evoke a powerful emotional response. These scenes often possess a quiet introspection, a sense of mystery, or a touch of melancholy that speaks to a deeper appreciation of the natural world. Unlike the bright, sometimes harsh, clarity of a perfect sunny day, moody conditions invite contemplation, drawing the viewer into a world that feels both intimate and immense. The atmosphere itself becomes a subject, lending a narrative quality to the image that can be profoundly affecting. Understanding Manipulating Light and Shadows is key to capturing these moods.
Unique Light, Textures, and Drama
Inclement weather is a master of transformation, altering the familiar into something altogether new and striking. Consider the quality of light: overcast skies act as a vast, natural softbox, bathing the landscape in an even, diffused light that enriches colours and reveals subtle details. Mist and fog scatter light in ethereal ways, creating layers and separation that lend a three-dimensional quality to a scene. Raindrops can add a glistening texture to foliage and stone, while wind can animate grasses and water, imbuing the static landscape with a sense of dynamism. Then there is the inherent drama of storm clouds, the stark beauty of a snow-covered vista, or the fleeting magic of light breaking through after a downpour. These elements provide a visual richness often absent in more placid conditions. You can learn more about this in our comprehensive Landscape Photography guide.
Standing Out from the Sunny Day Crowd
In a visual landscape often dominated by images of clear blue skies and sun-drenched scenery, photographs captured in less conventional weather naturally distinguish themselves. These images often tell a different story, one of resilience, ephemeral beauty, or the raw power of nature. By embracing the challenge and opportunity presented by moody weather, photographers can create work that is not only visually striking but also less commonly seen. It allows for a more personal interpretation of a location, revealing aspects of its character that might remain hidden under a blanket of uninterrupted sunshine. This pursuit of the unique atmosphere found in “bad” weather can lead to a more distinctive and compelling portfolio. Perhaps you’ll find inspiration for your next adventure in our Location Chart.
Safety First: Essential Precautions for Foul Weather Shoots
The allure of a dramatic sky or a landscape veiled in mist is undeniably potent, often yielding the most compelling photographic narratives. However, these atmospheric conditions inherently carry greater risks than a placid, sunny day. To venture into what many might term “foul weather” is not an act of bravado, but rather an exercise in meticulous preparation and a profound respect for the forces of nature. Your safety, and that of anyone accompanying you, must always be the foremost consideration, far outweighing the pursuit of any single image. Prudence and preparedness are the true companions of the adventurous photographer.
Thorough Weather Research and Forecasting
Before even considering packing your camera bag, a deep dive into weather conditions is imperative. This extends beyond a cursory glance at a smartphone app. Consult multiple reputable sources: national meteorological services, detailed local forecasts, and specialized weather platforms that offer insights into atmospheric pressure, wind patterns, precipitation intensity, and lightning risk. Pay particular attention to how conditions might evolve over several hours, especially in mountainous or coastal regions where weather can shift with astonishing rapidity.
Understanding the nuances of the forecast is key. “Cloudy” can mean a soft, diffused light perfect for subtle moods, or it could signify an approaching storm front. “Windy” might animate the landscape beautifully, or it could present a genuine hazard. Learn to interpret weather maps, satellite imagery, and radar if possible. This knowledge allows you to anticipate changes, choose appropriate locations, and, most importantly, decide if the conditions are within safe operational limits.
Essential Safety Gear Checklist
While your photographic equipment is important, your personal safety gear is paramount when conditions are challenging. This checklist focuses on items that can prove critical in an emergency or simply make a difficult situation more manageable:
- First-Aid Kit: A compact kit tailored for outdoor use, including blister treatment, antiseptic wipes, pain relievers, and any personal medications.
- Navigation Tools: A physical map and compass are indispensable, even if you primarily use GPS. Batteries can fail, and signals can be lost. Know how to use them.
- Headlamp or Flashlight: Essential, even if you plan to be back before dark. Bad weather often brings premature twilight. Always carry spare batteries.
- Whistle: An internationally recognized distress signal, far more effective than shouting.
- Emergency Shelter: A lightweight bivy sack or emergency blanket can offer crucial protection against hypothermia if you are unexpectedly delayed or immobilized.
- High-Energy Food and Water: More than you anticipate needing. Cold and exertion deplete energy reserves quickly.
- Multi-Tool or Knife: Universally useful for minor repairs or unexpected situations.
- Portable Power Bank: To keep your mobile phone charged, which can be a lifeline for communication or navigation assistance.
Communication: Letting Others Know Your Plans
This is a non-negotiable aspect of responsible outdoor photography, particularly if you are venturing out alone or into remote areas. Inform a reliable person – a friend, family member, or even local authorities like park rangers if appropriate – of your detailed plans. This information should include:
- Your precise intended location(s) and planned route.
- Your estimated time of departure and, crucially, your expected time of return.
- A “panic time” – a point at which, if you have not made contact or returned, they should initiate contact or raise an alarm.
- Details of your vehicle (make, model, colour, license plate) and where it will be parked.
In areas with unreliable mobile phone coverage, consider carrying a personal locator beacon (PLB) or a satellite messenger. These devices can transmit your location and a distress signal in an emergency, independent of cellular networks.
Recognizing Your Limits: When to Turn Back
There is profound wisdom, not failure, in deciding to curtail an outing or abandon a photographic objective when conditions deteriorate beyond your level of preparedness or comfort. The landscape will endure; your well-being is paramount. Cultivate an honest self-awareness of your physical capabilities, your experience in challenging weather, and the limitations of your gear.
Heed the warning signs: weather worsening beyond the forecast, unexpected drops in temperature, rising wind speeds that make movement difficult, signs of hypothermia or excessive fatigue, or simply a persistent intuitive feeling that something is amiss. The perfect shot is never worth risking serious injury or worse. Learning to respect nature’s power and your own boundaries is a mark of a seasoned and sensible photographer. Another day, with better preparation or more favourable conditions, will always present new opportunities.
Gearing Up: Protecting Yourself and Your Equipment
Venturing into the tempestuous embrace of bad weather to capture moody landscapes is an endeavour that demands respect for the elements. Proper preparation is not merely a suggestion but a prerequisite, ensuring not only the safety of your valuable equipment but also your own comfort and security. With these concerns addressed, your mind is free to focus on the artistic pursuit of capturing the dramatic beauty before you.
Protecting Your Camera and Lenses
Your camera and lenses are the conduits of your vision, and in inclement weather, they are particularly vulnerable. Shielding them from moisture, wind, and cold is paramount to their longevity and your ability to continue shooting effectively.
Weather-Sealed vs. Non-Weather-Sealed Gear
Many contemporary cameras and lenses boast “weather-sealing,” a design feature incorporating rubber gaskets and tight tolerances to resist the ingress of dust and moisture. This provides a commendable level of protection against light rain or mist. However, it is crucial to understand that weather-sealing does not equate to waterproofing; these devices are not intended for submersion or prolonged exposure to heavy downpours. Always consult your equipment’s manual for specific limitations.
If your gear is not weather-sealed, do not despair. With diligent use of external protection, you can still achieve remarkable results. The key is heightened vigilance and a proactive approach to shielding your equipment.
Rain Covers and Sleeves
A dedicated rain cover or sleeve is an indispensable ally in wet conditions. These range from simple, transparent plastic bags tailored for camera bodies to more sophisticated, purpose-built covers crafted from waterproof fabrics, often featuring clear panels for viewing controls and sleeves for hand access. Their primary function is to create an impermeable barrier against rain, snow, and even corrosive sea spray, allowing you to operate your camera with greater peace of mind.
Lens Hoods: More Than Just Sun Protection
While commonly associated with mitigating lens flare on sunny days, the lens hood assumes an equally critical role in adverse weather. It acts as a protective awning for your front lens element, significantly reducing the likelihood of raindrops or snowflakes marring your image or necessitating constant wiping. Furthermore, it offers a degree of physical protection against accidental bumps – a not insignificant benefit when navigating challenging environments.
Keeping Lenses Clear: Cloths and Blowers
Despite your best efforts, moisture and debris may still find their way onto your lens. A generous supply of clean, high-quality microfiber cloths is essential. Store them in a dry, accessible place. Before wiping any lens surface, especially if it might have gritty particles like sand or dried salt spray, use a photographic bellows blower (often called a rocket blower) to dislodge any loose contaminants. This simple step can prevent microscopic scratches that accumulate over time and degrade image quality. Wiping a wet, dirty lens directly is a recipe for gradual damage.
Essential Accessories for Moody Conditions
Beyond the immediate protection of your camera body and lens, certain accessories transition from useful to essential when confronting the demands of moody landscape photography. These tools enhance your creative capabilities and ensure consistent results in challenging light and weather.
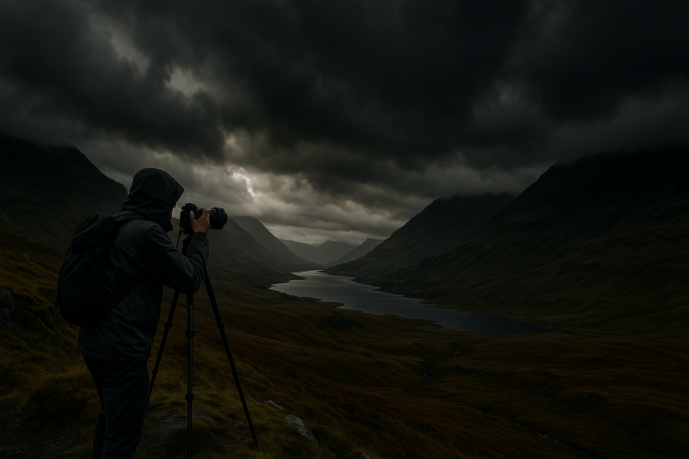
The Indispensable Sturdy Tripod
Low light levels are a hallmark of moody scenes, often necessitating longer shutter speeds than can be managed handheld. A robust, stable tripod is therefore non-negotiable. It ensures sharpness in your images and allows for creative techniques like capturing the motion of clouds or water. In windy conditions, a flimsy tripod will yield blurred images; look for one with solid leg locks, a stable base, and perhaps a hook on the center column to hang a weighted bag for added stability. Even with a tripod, strong gusts can introduce vibrations, so a heavier, well-constructed model is a wise investment.
Filters for Bad Weather (CPL, ND, GND)
Photographic filters offer nuanced control over light and reflections, which can be particularly beneficial in the complex lighting of bad weather.
- A Circular Polarising Filter (CPL) is invaluable for reducing glare from wet surfaces like foliage, rocks, or water, thereby enriching colours and saturation. It can also enhance the drama in stormy skies by increasing contrast between clouds and sky.
- Neutral Density (ND) filters reduce the amount of light entering the lens, permitting the use of very long shutter speeds even during daylight hours. This is key for achieving silky smooth water, streaking clouds, or conveying a sense of ethereal movement in wind-swept landscapes.
- Graduated Neutral Density (GND) filters help balance scenes with a wide dynamic range, such as a dark, brooding foreground against a much brighter, stormy sky. One part of the filter is dark, transitioning to clear, allowing you to selectively darken the brighter portion of your composition.
Remember to protect your filters from the elements just as you would your lens, as raindrops or smudges on them will affect your final image.
Ample Batteries and Memory Cards
Cold temperatures, characteristic of many moody weather scenarios, significantly accelerate battery drain. Always carry at least one fully charged spare battery, preferably two, and keep them warm in an internal pocket close to your body until needed. Similarly, challenging conditions might lead you to shoot more frames – perhaps bracketing exposures or capturing a sequence as the light changes rapidly. Ensure you have memory cards with ample capacity, and consider starting your outing with freshly formatted cards to avoid unwelcome interruptions.
Personal Gear for Comfort and Endurance
The photographer’s well-being is intrinsically linked to the quality of their work. Discomfort from cold, wet, or wind is not only unpleasant but also a significant distraction that can impair creative decision-making and, in extreme cases, pose a safety risk. Prioritising personal comfort is an investment in your photographic practice.
Layered Waterproof Clothing
The principle of layering is fundamental to staying comfortable in variable and inclement weather. A three-layer system is generally most effective:
- Base Layer: Worn next to the skin, this layer should wick moisture (perspiration) away from your body to keep you dry. Merino wool or synthetic fabrics are excellent choices.
- Mid Layer: This is your insulating layer, designed to trap body heat. Fleece jackets, down vests, or synthetic insulated jackets work well. The thickness can be adjusted based on the temperature.
- Outer Layer: This is your primary shield against wind and precipitation. A high-quality waterproof and windproof jacket and trousers are essential. Look for materials that are also breathable, allowing perspiration vapour to escape, thus preventing moisture build-up from within.
Appropriate Footwear for Treacherous Terrain
Navigating landscapes slick with rain, mud, or snow demands reliable footwear. Sturdy, waterproof hiking boots with excellent ankle support and deep, aggressive treads for superior grip are indispensable. Consider the specific terrain you are likely to encounter. Paired with warm, moisture-wicking socks (wool or specialized synthetic hiking socks are ideal), appropriate footwear will keep your feet dry, warm, and secure, allowing you to traverse challenging ground with greater confidence.
Warm Accessories: Hats, Gloves, Thermals
A significant amount of body heat is lost through the head, so a warm, preferably waterproof or water-resistant, hat is crucial. For your hands, operating a camera in cold weather can be challenging. Consider thin liner gloves for dexterity, paired with warmer, waterproof outer mittens or gloves that can be easily removed. Some photographers prefer specialized gloves with retractable fingertips. Thermal base layers (long underwear) made from merino wool or synthetics provide an additional layer of warmth beneath your regular clothing without adding excessive bulk, significantly enhancing comfort in colder climes.
Compositional Techniques for Evocative Moody Landscapes
When the weather turns, the landscape transforms, offering a canvas ripe with emotional depth and visual intrigue. Far from being a hindrance, “bad” weather provides unique compositional opportunities. The art lies in understanding how to harness these transient elements – the mist, the driving rain, the turbulent skies – to craft images that resonate with atmosphere and feeling. It is not merely about documenting a scene, but about interpreting its soul through deliberate composition. This is a core aspect of successful landscape photography.
Leading the Eye Through Mist and Fog
Mist and fog possess a remarkable ability to simplify a scene, veiling distractions and inviting a more contemplative gaze. Compositionally, they act as a natural diffuser, softening details and creating a sense of mystery. To guide the viewer’s eye through such ethereal conditions, seek out natural leading lines. A winding path disappearing into the haze, the gentle curve of a riverbank, or a row of trees diminishing into the white unknown can create a compelling journey for the eye. These elements, partially obscured, pique curiosity and draw the observer deeper into the frame, transforming the indistinct into the intriguing. Learning how to add depth to your landscape photos is key here.
Isolating Subjects for Impact
The obscuring nature of challenging weather can be a powerful tool for isolating subjects. A lone tree standing defiant against a curtain of fog, a solitary structure braving a downpour, or a distant peak emerging momentarily from cloud cover – these become potent focal points. By muting the complexities of the background, the weather allows the chosen subject to command attention with heightened presence. This technique fosters a sense of intimacy or, conversely, a profound solitude, lending a narrative weight to the isolated element. The key is to identify subjects that possess strong character or form, allowing them to stand out even amidst the atmospheric drama. Sometimes, even a great subject can be ruined by poor composition, a common issue addressed in our guide on 10 reasons why your landscape photos are boring.
Harnessing the Power of Negative Space
Moody weather often gifts the photographer with expansive areas of negative space – the unbroken expanse of a stormy sky, a landscape enveloped in dense fog, or a wide, rain-swept foreground. Rather than viewing these as empty, consider them active compositional elements. Negative space can amplify the impact of your subject by providing visual breathing room, allowing it to stand out with greater clarity. It can also contribute significantly to the overall mood, evoking feelings of vastness, serenity, or even desolation. The artful balance between subject and its surrounding emptiness is crucial for creating a harmonious and emotionally resonant image. Understanding using balance & visual weight in your compositions is essential for mastering this.
Capturing Movement: Wind, Water, and Clouds
Inclement weather is inherently dynamic. The challenge and reward lie in conveying this sense of movement within a still photograph. Wind-whipped trees, lashing rain, surging waves, or scudding clouds all offer opportunities to animate your landscapes. Experiment with shutter speeds: a longer exposure can transform driving rain into delicate streaks, smooth restless water into a silken surface, or paint the sky with the ethereal trails of moving clouds. Conversely, a faster shutter speed can freeze a dramatic splash or the contorted branches of a tree battling the wind. By thoughtfully capturing these kinetic elements, you imbue your images with the very energy of the storm. Our guide on capture motion: a photo guide will help you master this.
Creating Depth with Atmospheric Layering
Fog, mist, and even falling rain or snow naturally create layers within a landscape, enhancing the perception of depth. As elements recede into the distance, they become progressively fainter and less saturated, an effect known as atmospheric perspective. Seek out compositions where hills, trees, or other features are arranged at varying distances, allowing these atmospheric veils to separate them distinctly. This layering adds a painterly quality to the image, drawing the viewer’s eye from one plane to the next, and lending a profound sense of scale and dimensionality to even familiar scenes. This is closely related to using depth & layering in your compositions.
Finding Strong Foreground Interest
Even when the distant scene is shrouded in atmosphere, a compelling foreground element is vital to anchor the composition and provide a point of entry for the viewer. In moody conditions, look for textures and details that are enhanced by the weather: glistening wet rocks, intricate patterns in damp sand, puddles reflecting the dramatic sky, or the stark silhouette of wind-swept grasses. A well-chosen foreground not only adds visual interest but also connects the viewer to the scene, guiding their gaze towards the atmospheric mid-ground and distant elements, thus creating a more immersive experience.
Working with Silhouettes and Contrasts
The diffused light of an overcast day, or the dramatic backlighting that can occur as a storm breaks or fog thins, provides excellent opportunities for creating striking silhouettes. By exposing for the brighter sky or background, foreground elements are rendered as dark, defined shapes. This technique emphasizes form and outline, stripping away detail to reveal the essential character of a subject. The contrast between these dark silhouettes and the luminous, often soft, backdrop can produce images of immense graphic power and emotional intensity. Look for subjects with recognizable and interesting shapes – lone trees, rugged coastlines, or architectural elements – to make the most of this approach. Understanding manipulating light and shadows is crucial for this technique.
Mastering Camera Settings in Challenging Conditions
The very elements that make bad weather so visually compelling—dramatic light, shifting mists, and dynamic skies—also present unique challenges for your camera. Automatic settings, often adequate for brighter days, may falter in these complex scenarios. To truly capture the essence of a moody landscape, a more deliberate approach to your camera’s settings is essential. This control allows you to translate the scene’s atmosphere into a powerful image, rather than merely documenting the conditions.
Nailing Exposure in Tricky Light
Moody weather often means dealing with a wide dynamic range—the difference between the brightest highlights and the darkest shadows. Storm clouds can be intensely bright while the landscape below remains dim, or fog can diffuse light in ways that confuse camera meters. Achieving a balanced exposure that retains detail in both extremes is paramount.
Understanding Your Histogram
Your camera’s LCD screen can be deceptive, especially in dim or wet conditions. The histogram, however, offers an objective representation of the tonal values in your image. It graphs the pixels from pure black on the left to pure white on the right. For moody scenes, you’ll often want to avoid “clipping”—where the graph bunches up hard against either edge, indicating lost detail in shadows or highlights. A well-exposed moody image might show a concentration of tones towards the mid-tones or shadows, but ideally without significant spikes at the absolute extremes, unless that is a specific creative choice (like a silhouette).
Exposure Bracketing (AEB) for HDR
When faced with extreme contrast that your camera sensor cannot capture in a single frame, Exposure Bracketing (AEB) becomes an invaluable tool. This function instructs your camera to take a series of shots—typically three or five—at different exposure values: one at the metered exposure, one or more underexposed, and one or more overexposed. Later, these images can be merged into a High Dynamic Range (HDR) photograph, preserving details that would otherwise be lost. This is particularly useful for scenes with dramatic skies and shadowy foregrounds, common in stormy weather.
Exposing to the Right (ETTR) in Low Light
In low-light situations, such as dense fog or twilight after a storm, the technique of “Exposing to the Right” (ETTR) can be beneficial. This involves intentionally overexposing the image slightly, pushing the histogram data as far to the right as possible without clipping important highlights. The rationale is that it’s generally easier to recover detail and reduce noise by darkening an image in post-processing than it is to brighten an underexposed image, which can amplify noise. Exercise caution, however, as irretrievably blown highlights in key areas can ruin an otherwise compelling moody shot.
Aperture Choices for Moody Scenes
Your choice of aperture (f-stop) directly influences both the depth of field—how much of your scene is in sharp focus—and the amount of light reaching your sensor. For moody landscapes, there isn’t a single “correct” aperture; the decision depends on your artistic intent.
- Wider apertures (e.g., f/2.8 – f/5.6): These settings create a shallower depth of field, which can be effective for isolating a subject against a misty or rain-swept background. They also allow more light, useful in dim conditions or when you need a faster shutter speed.
- Mid-range apertures (e.g., f/8 – f/11): Often considered the “sweet spot” for landscape photography, these apertures typically offer excellent sharpness across the frame and a generous depth of field, ensuring both foreground and background elements are in focus. This can be ideal for capturing the layered complexity of a stormy sky over a detailed landscape.
- Narrower apertures (e.g., f/16 and beyond): While providing maximum depth of field, very small apertures can introduce softness due to diffraction. They also necessitate longer shutter speeds or higher ISOs, which may not always be desirable. However, they can be used creatively, for instance, to create starburst effects from distant light sources in a gloomy scene.
Consider the narrative you wish to convey. A soft, ethereal feel might call for a wider aperture, while a scene demanding sharp detail throughout might benefit from a mid-range setting.
Shutter Speed: Freezing vs. Blurring Elements
Shutter speed determines how long your camera’s sensor is exposed to light, and it plays a critical role in how motion is rendered in your moody photographs. Bad weather is inherently dynamic, and your shutter speed choice dictates whether you freeze that motion or allow it to blur, creating a sense of passage or energy.
Capturing Streaks of Rain or Snow
To make falling rain or snow visible as streaks rather than frozen pinpricks or an invisible haze, a moderately slow shutter speed is required. There’s no exact formula, as it depends on the intensity of the precipitation and the speed of the wind. Generally, speeds between 1/30th and 1/125th of a second can work well. Experimentation is key; too fast, and the precipitation may vanish, too slow, and it might blur into an indistinct wash. Consider the background as well—streaks are more visible against a darker, less cluttered backdrop.
Smoothing Water and Moving Clouds
Long exposures, often lasting several seconds or even minutes, can transform turbulent water into a silky, ethereal surface and stretch fast-moving storm clouds into dramatic streaks across the sky. This technique imparts a sense of calm or immense power to the scene. Achieving such slow shutter speeds, especially during daylight hours (even overcast ones), usually requires Neutral Density (ND) filters to reduce the amount of light entering the lens. A sturdy tripod is absolutely essential for these long exposures to prevent any camera shake.
ISO Management in Dim and Stormy Light
ISO controls your camera sensor’s sensitivity to light. While a higher ISO allows for shooting in darker conditions or using faster shutter speeds/narrower apertures, it comes at the cost of increased digital noise, which can detract from the image quality. For moody landscapes, the aim is generally to keep the ISO as low as possible—ideally at your camera’s base ISO (often ISO 100 or 200)—to maximize image quality and dynamic range.
However, there are situations where increasing the ISO is a necessary compromise. If you need a specific shutter speed to freeze motion (like wind-whipped trees) or to handhold your camera in failing light, and your aperture is already as wide as you’re comfortable with, then raising the ISO is the logical next step. Modern cameras offer impressive high-ISO performance, but it’s wise to understand your own camera’s limits and at what point noise becomes unacceptable for your standards.
White Balance for Mood and Atmosphere
White Balance (WB) determines how your camera interprets colors under different lighting conditions, ensuring that white objects appear white. In the often monochromatic or uniquely lit environments of bad weather, white balance becomes a powerful tool for enhancing mood.
While Auto White Balance (AWB) can perform adequately, it may sometimes neutralize the very color casts that contribute to the scene’s atmosphere. Consider using presets:
- Cloudy or Shade: These settings often introduce a subtle warmth, which can be pleasing in damp, cool conditions or can bring out the subtle hues in fog.
- Daylight/Sunny: Using this in overcast conditions might render a cooler, bluer tone, which can enhance the feeling of cold or desolation.
- Custom Kelvin: For the most precise control, setting a custom Kelvin temperature allows you to fine-tune the color balance to your exact vision. Lower Kelvin values produce cooler (bluer) images, while higher values create warmer (yellower/oranger) tones.
Shooting in RAW format is highly recommended, as it gives you complete flexibility to adjust white balance non-destructively in post-processing. This allows you to experiment and decide later which color interpretation best conveys the emotion of the moody landscape you’ve captured. A cooler palette might emphasize the raw, untamed nature of a storm, while a slightly warmer, more desaturated look can evoke a sense of quiet melancholy in mist.
Photographing Specific Bad Weather Phenomena
Each type of “bad” weather unfurls a distinct canvas for the landscape photographer. Understanding the nuances of fog, rain, snow, and storms allows one to not merely endure these conditions, but to harness their unique visual language. Let us explore how to approach these phenomena, transforming challenging elements into compelling photographic narratives.
The Ethereal Charm of Fog and Mist
Fog and mist possess a transformative quality, simplifying complex scenes and imbuing them with an atmosphere of mystery and serenity. They soften harsh lines, mute colours, and create a sense of depth that can be profoundly evocative. The world enveloped in fog is a world of suggestion, inviting the viewer to look closer and imagine what lies beyond the veil.
Finding Fog: Valleys, Water Bodies, and Mornings
Fog often graces us with its presence under specific meteorological conditions. Valleys are prime locations, as cooler, denser air tends to settle in these low-lying areas, particularly after a clear, calm night. This phenomenon, known as radiation fog, occurs when the ground cools rapidly, in turn cooling the air above it to its dew point.
Water bodies, such as lakes, rivers, and coastal areas, are also generous sources of fog. Evaporation from the water surface adds moisture to the air. When this moist air encounters cooler temperatures, especially during early mornings or as seasons change, advection fog or steam fog can form. Early mornings are generally the most opportune time, as the night’s cooling allows moisture to condense before the sun’s warmth begins to dissipate it.
Composition Tips for Foggy Scenes
Composing in fog is an exercise in subtlety and suggestion. The reduced visibility naturally simplifies the scene, allowing prominent subjects to stand out. Seek out strong silhouettes – a lone tree, a distant mountain peak, or a rustic structure – that can serve as focal points, their forms accentuated by the surrounding softness.
Layering is another powerful technique. As fog varies in density, different elements in your scene will be obscured to varying degrees, creating a beautiful recession of planes and enhancing the sense of depth. Leading lines, such as paths, fences, or rivers, become particularly compelling as they snake into the mist, drawing the viewer’s eye into the unknown. Do not shy away from negative space; the fog itself can become an active element in your composition, adding to the ethereal mood.
Capturing the Drama of Rain
Rain is often perceived as an impediment, yet for the photographer, it can introduce a dynamic and reflective quality to the landscape. Far from being a mere nuisance, rain can animate a scene, imbuing it with textures, moods, and a sense of immediacy that fair weather often lacks.
Protecting Gear While Shooting in Rain
While the artistic possibilities of rain are enticing, protecting your equipment is paramount. If your camera and lenses are not inherently weather-sealed, a dedicated rain cover or even a simple, well-secured plastic bag can provide essential protection. Lens hoods are invaluable, not only for shielding the front element from stray light but also for deflecting raindrops. Keep several microfibre cloths readily accessible – one for drying your gear and another, clean one, for carefully wiping the lens if needed. Patience and a gentle touch are key when dealing with wet equipment.
Finding Reflections and Textures
Rain transforms ordinary surfaces into mirrors. Puddles, wet streets, and even glistening leaves can offer stunning reflections, adding depth and a painterly quality to your images. Look for how rain interacts with different materials; it can accentuate the texture of ancient stone, create intricate patterns on foliage, or lend a sheen to wooden structures. Consider shooting through a rain-streaked window for an impressionistic effect, or use a fast shutter speed to freeze individual raindrops, revealing their delicate forms against a darker background.
Winter Wonderland: Snow and Ice Photography
The arrival of snow and ice dramatically reshapes the landscape, offering a world of pristine beauty, intricate details, and unique lighting challenges. It’s a season that demands a careful approach but rewards the persistent photographer with images of stark elegance and ephemeral artistry.
Exposure Compensation for Snow
Photographing snowy scenes often requires a conscious adjustment to your camera’s exposure settings. Camera light meters are calibrated to an average middle grey (18% grey). A vast expanse of bright snow can fool the meter into underexposing the scene, resulting in snow that appears dull and grey rather than brilliant white. To counteract this, you will typically need to apply positive exposure compensation, often in the range of +0.7 to +2 stops. Always consult your histogram to ensure that the whites are bright but not clipped (overexposed), preserving crucial detail in the highlights.
Highlighting Ice Formations and Frost
Ice and frost present a delightful array of textures and patterns. To truly capture their delicate beauty, pay close attention to the quality and direction of light. Backlighting or side-lighting can accentuate the translucency of ice, revealing its internal structures and creating a luminous glow. Macro lenses are particularly effective for capturing the intricate crystalline patterns of frost on leaves or windowpanes. Look for compositions that emphasize the sculptural forms of icicles or the abstract patterns created by freezing water along riverbanks or lakeshores.
Stormy Skies and Dramatic Clouds
There is a primal power in a stormy sky, a spectacle of nature that can transform a familiar landscape into something altogether more formidable and awe-inspiring. The roiling clouds, shafts of light, and intense colours offer a rich palette for the landscape photographer willing to embrace the drama.
Anticipating and Chasing Storms (Safely)
Photographing storms requires careful planning and an unwavering commitment to safety. Modern weather radar apps and websites are invaluable tools for tracking the movement and intensity of storm systems. Identify potential vantage points in advance – locations that offer an expansive view of the sky while also providing a safe retreat should conditions worsen rapidly. Your safety is always the priority; never position yourself in exposed areas during a thunderstorm, avoid lone trees, and be aware of the risk of flash floods in certain terrains. The goal is to witness the storm’s majesty, not to become its victim.
Using Wide-Angle Lenses for Expansive Skies
Wide-angle lenses are often the preferred choice for capturing the grandeur of stormy skies. They allow you to encompass the vastness of the cloud formations and the dramatic interplay of light and shadow across the landscape. When composing, strive to include a strong foreground element – perhaps a distinctive tree, a rugged coastline, or a winding road – to provide a sense of scale and anchor the image. This juxtaposition of the terrestrial with the celestial can create a powerful and immersive photograph.
The Golden Hours of Bad Weather: Before and After Storms
The periods immediately preceding and following a storm often yield the most extraordinary light. These transitional moments, when the atmosphere is charged with energy and moisture, can produce fleeting displays of colour and drama that are a true gift to the photographer.
Anticipating Clearing Storms
As a storm begins to break, keep a keen eye on the horizon. The moments when sunlight first pierces through the retreating clouds can be magical. Dark, brooding clouds might still dominate one part of the sky, while another is illuminated by brilliant, warm light, creating a stunning contrast. This dynamic interplay of light and shadow can sculpt the landscape in new and exciting ways. Patience is key, as these conditions can evolve rapidly.
Capturing Rainbows and Sunbeams
The aftermath of a rain shower, when the sun reappears, is the prime time for rainbows. For a rainbow to form, the sun must be behind you and there must be rain or moisture in the air in front of you. Compose your shot to include a compelling foreground or mid-ground element that complements the arc of the rainbow. Sunbeams, or crepuscular rays, are another beautiful phenomenon often seen as storms clear. These occur when sunlight streams through gaps in the clouds, illuminated by lingering moisture or dust particles in the air. They can add a divine, ethereal quality to your images, drawing the eye and highlighting specific areas of the landscape.
Post-Processing: Enhancing the Mood and Drama
The art of landscape photography extends beyond the moment of capture, particularly when embracing the evocative atmospheres of inclement weather. Post-processing is not about fabricating a scene that did not exist, but rather about thoughtfully refining the image to fully express the mood and drama experienced in the field. It is a subtle dance of adjustments, aimed at enhancing the inherent qualities of your photograph.
The Importance of Shooting in RAW
To unlock the full potential of your moody landscape images during post-processing, capturing them in RAW format is paramount. Unlike JPEGs, which are processed and compressed in-camera, RAW files retain all the image data recorded by the sensor. This unprocessed information provides significantly greater flexibility when making adjustments. You gain more latitude for correcting exposure, refining white balance to perfectly match the atmospheric conditions, and recovering details from highlights and shadows that might otherwise be lost. This extended dynamic range is invaluable when dealing with the challenging light often present in bad weather, allowing for a more nuanced and faithful interpretation of the scene.
Basic Adjustments: Exposure, Contrast, Highlights, Shadows
The foundational stage of post-processing involves carefully manipulating the core tonal values of your image. These basic adjustments are instrumental in shaping the overall mood:
- Exposure: Fine-tuning the overall brightness is key. A slightly underexposed image can intensify a brooding, stormy atmosphere, while a gentle lift in exposure might accentuate the ethereal quality of mist or fog. The goal is to align the image’s luminosity with the emotional tenor you wish to convey.
- Contrast: This tool powerfully influences the visual impact. Reducing contrast can soften a scene, ideal for conveying the gentle gradations of a foggy morning. Conversely, increasing contrast can add punch and drama to stormy skies or define textures more sharply. The application depends entirely on the specific mood you are cultivating.
- Highlights and Shadows: Skillful management of highlights and shadows allows you to reclaim detail and guide the viewer’s eye. Recovering subtle information in bright skies or deep shadows can add depth and realism. You might choose to deepen shadows to enhance mystery or carefully lift them to reveal hidden textures, all while ensuring that clipping (loss of detail in the brightest or darkest areas) is avoided.
Color Grading for Atmosphere
Color plays a profound role in establishing the emotional tone of an image. Thoughtful color grading can transform a photograph, subtly guiding the viewer’s perception of the scene’s atmosphere. It’s less about dramatic alteration and more about nuanced enhancement.
Desaturation and Muted Palettes
Sometimes, reducing the intensity of colors can significantly amplify the mood. A desaturated or muted color palette can evoke a sense of melancholy, timelessness, or stark beauty. This approach is particularly effective for scenes shrouded in fog, overcast winter landscapes, or when aiming for a more minimalist, contemplative feel. By softening the colors, you draw more attention to form, texture, and the interplay of light and shadow.
Split Toning for Emotional Impact
Split toning involves introducing different color tints to the highlights and shadows of an image. When applied with a delicate touch, it can subtly infuse a photograph with a specific emotional quality. For instance, adding cool blues or cyans to the shadows and a hint of warm yellow or orange to the highlights can create a pleasing visual harmony or suggest the lingering warmth of light amidst a cool, damp atmosphere. The key is subtlety; overpowering split toning can appear artificial, but a gentle application can beautifully enhance the existing mood.
Enhancing Specific Hues (e.g., blues, grays)
Bad weather often presents a palette dominated by particular colors – the deep blues of a stormy sky, the myriad grays of mist and rain, or the earthy tones of wet landscapes. Selectively enhancing these dominant hues can strengthen the atmospheric narrative. This might involve carefully increasing the saturation or luminance of blues to make a storm feel more imposing, or refining the transitions between different shades of gray to add depth to a foggy scene. The objective is to amplify the natural colors that contribute to the mood, rather than introducing artificial vibrancy.
Adding Local Adjustments
While global adjustments affect the entire image, local adjustments allow for targeted refinements, offering a more sophisticated level of control in guiding the viewer’s experience and emphasizing key elements within the moody landscape.
Dodging and Burning to Guide the Eye
An age-old darkroom technique adapted for the digital realm, dodging (lightening) and burning (darkening) are invaluable for directing attention within the frame. By selectively lightening certain areas, you can draw the viewer’s eye towards points of interest, such as a solitary tree in mist or a dramatic cloud formation. Conversely, darkening less important areas can help them recede, adding a sense of depth and preventing distractions. This careful interplay of light and shadow enhances the three-dimensional quality of the image and reinforces the compositional intent.
Enhancing Textures and Details Selectively
Inclement weather often accentuates textures: the roughness of wet rocks, the delicate patterns of frost, the swirling movement of clouds, or the sheen on damp foliage. Local adjustments, using tools like clarity, texture sliders, or targeted sharpening, can bring these tactile qualities to life. The aim is to enhance these details in specific areas where they contribute most to the story of the image, without over-processing the entire scene, which can lead to an unnatural appearance.
Noise Reduction and Sharpening
Shooting in bad weather frequently means contending with low light levels, which can necessitate higher ISO settings, potentially leading to digital noise. Effective noise reduction is therefore an important step. Modern software offers sophisticated algorithms that can reduce noise while preserving essential image detail. It’s a balancing act; overly aggressive noise reduction can result in a soft, plastic-like appearance. Following noise reduction, judicious sharpening is often applied. This helps to restore or enhance the crispness of details, particularly important after the slight softening that can occur during noise removal. Using sharpening masks to apply the effect selectively to edges and textured areas, while protecting smooth regions like skies or water, yields the most natural results.
Removing Distractions (Raindrops on Lens, etc.)
Despite best efforts to protect equipment, bad weather photography can sometimes result in minor imperfections, such as raindrops or dust spots on the lens, or perhaps an errant sensor dust mark. These small distractions, while seemingly minor, can detract from the overall impact of an otherwise compelling moody landscape. Tools like the clone stamp, healing brush, or content-aware fill in most editing software allow for the meticulous removal of such blemishes. Taking the time to clean up these elements ensures a polished final image where the viewer’s attention remains focused on the intended atmosphere and subject matter. While preventative measures in the field are always preferred, the ability to correct these minor issues in post-production is a valuable asset.
Finding Inspiration and Locations for Moody Shots
The quest for compelling moody landscapes is as much about discovering the right state of mind as it is about finding the perfect vista. It involves a blend of diligent preparation and a willingness to embrace the unforeseen. When the skies turn dramatic, opportunities abound for those who know where, and how, to look.
Scouting Locations in All Conditions
Familiarity with a location is a significant asset, particularly when conditions are challenging. Scouting is not merely about finding a picturesque spot; it’s about understanding its character in diverse circumstances. Visiting a potential location during fair weather allows you to assess its compositional possibilities without the added pressure of inclement conditions. Note how the light interacts with the landscape at different times of day, identify strong leading lines, potential foreground elements, and how textures might be accentuated by mist or rain.
Observe how elements transform: a gentle stream might swell into a dynamic torrent after heavy rain, or a sparse, skeletal tree can gain immense character when silhouetted against an ominous sky. By scouting in various conditions, you begin to build a mental catalogue of how a place responds to atmospheric shifts, enabling you to anticipate its potential when the weather turns.
Revisiting Familiar Places in Bad Weather
There is a unique pleasure in witnessing a well-known landscape transformed by adverse weather. A place you thought you knew intimately can reveal entirely new facets when cloaked in fog, lashed by rain, or dusted with snow. This approach offers a distinct advantage: you are already acquainted with the terrain, access points, and general layout, allowing you to concentrate more on the creative aspects of capturing the mood rather than navigating an unfamiliar environment in difficult conditions.
The favourite local woodland, the coastal path walked countless times, or the nearby hills can all offer fresh inspiration. The interplay of familiar forms with dramatic, transient atmospheres often yields images that are both personal and powerfully evocative. This practice cultivates a deeper appreciation for the subtle nuances of your surroundings.
Using Weather Apps and Maps for Planning
While spontaneity has its place, thoughtful planning significantly increases your chances of encountering the desired moody conditions. Modern meteorological tools are invaluable for this purpose. Utilise a combination of applications:
- General Weather Forecasts: These provide an overview of temperature, precipitation, and wind, helping you anticipate broader weather patterns.
- Radar Apps: Essential for tracking rain, snow, and storm cells in real-time. They allow you to predict the arrival, intensity, and movement of precipitation.
- Specialised Fog/Mist Prediction Tools: Some services offer forecasts for fog formation, often based on humidity, temperature inversions, and topography.
- Wind Forecasts: Understanding wind speed and direction is crucial, especially for coastal shots or when working with long exposures to capture cloud movement.
Topographic maps, when cross-referenced with weather forecasts, can help identify locations prone to mist and fog, such as valleys, areas near bodies of water, or specific elevations where cloud bases are predicted to sit. This strategic use of information allows you to be in the right place when the atmosphere is at its most expressive, turning forecasting into a creative tool.
Embracing the Serendipity of Changing Weather
For all the meticulous planning, the true magic of moody landscape photography often lies in the unpredictable. Weather is a fluid, dynamic force, and its most captivating moments can be fleeting and entirely unexpected. A sudden shaft of light piercing through storm clouds, the ethereal dance of mist as it drifts through a valley, or the brief appearance of a rainbow after a downpour – these are gifts of serendipity.
Cultivate an attitude of flexibility and responsiveness. Be prepared to deviate from your original plan if the conditions present a more compelling, unforeseen opportunity. Sometimes, the most memorable images are born from these spontaneous encounters with nature’s artistry. This openness to the moment is what distinguishes a good photograph from a truly exceptional one.
Learning from Other Moody Landscape Photographers
Inspiration can be found in the work of those who have mastered the art of capturing moody landscapes. Study the portfolios of photographers whose work resonates with you, not with the aim to replicate, but to understand their vision and technique. Observe how they utilise light, compose their scenes, and convey emotion through their choice of subject and post-processing style.
Explore photography books, online galleries, and exhibitions. Pay attention to how different artists interpret similar conditions or locations. Consider the narrative they weave, the atmosphere they evoke, and the technical choices that support their artistic intent. This process of informed observation can broaden your own creative horizons and help you refine your unique photographic voice. The goal is to absorb principles and ideas that you can then adapt and integrate into your personal approach to capturing the dramatic beauty of challenging weather.
