Mastering Exposure Triangle
Unlock the secret to perfect photos by mastering the exposure triangle. Learn how ISO, aperture, and shutter speed interplay!
Ever looked at a stunning photograph and wondered how the photographer achieved that perfect balance of light and shadow? The secret often lies in understanding and mastering the Exposure Triangle. If you’re looking to elevate your photography beyond automatic settings and take control of your images, this guide is for you.
This article will demystify the core concept of exposure in photography. We’ll break down the three essential pillars – Aperture, Shutter Speed, and ISO – explaining what each one does and how they work together to create the final image. Get ready to unlock your creative potential and capture the world exactly as you see it.
Essentials
What is Exposure in Photography?
At its heart, photography is the art of capturing light. Exposure is simply the amount of light that reaches your camera’s sensor, which ultimately determines how bright or dark your final photograph appears. Getting this right is the foundational skill for moving beyond automatic settings and taking creative control of your images. For a deeper dive, check out our guide on achieving proper exposure.
Defining a “Correct” Exposure
While art is subjective, a technically “correct” exposure is one that captures a full range of tones, from deep shadows to bright highlights, without losing significant detail at either extreme. Let’s look at the common results:
- Underexposed: The image is too dark. Details in the shadows are lost to pure black, and the overall scene looks dim and murky.
- Overexposed: The image is too bright. Details in the highlights are “blown out” to pure white, losing all texture and information in the brightest parts of the scene. This is a common issue when dealing with the exposure range.
- Balanced: The image has a good balance of light and shadow, with details visible across the entire tonal range. The photo looks natural and properly lit.
While your camera’s LCD screen gives you a quick preview, it can be misleading depending on the ambient light. Your two most reliable guides are your camera’s light meter and the histogram.
Your Tools for Judging Exposure
The Light Meter: Look through your viewfinder or on your screen, and you’ll see a small scale with a zero in the middle, typically ranging from -2 to +2. This is your light meter. When the indicator is at 0, your camera believes the scene is perfectly exposed based on its calculations. If the indicator is on the minus side, the camera predicts an underexposed image; on the plus side, it predicts an overexposed one. It’s an excellent starting point, but it’s not foolproof.
The Histogram: The histogram is your most accurate tool. It’s a graph that displays the distribution of tones in your image. The horizontal axis represents brightness, from pure black on the far left to pure white on the far right, with all the mid-tones in between. The vertical axis shows how many pixels exist at each level of brightness.
- A graph heavily skewed to the left indicates an underexposed image with a lot of dark pixels.
- A graph heavily skewed to the right indicates an overexposed image. If the graph is “climbing” the right wall, it means you have “clipped” highlights—areas of pure white with zero detail.
- A well-balanced exposure typically shows a mountain-like shape across the middle of the graph, without significant clipping on either end.
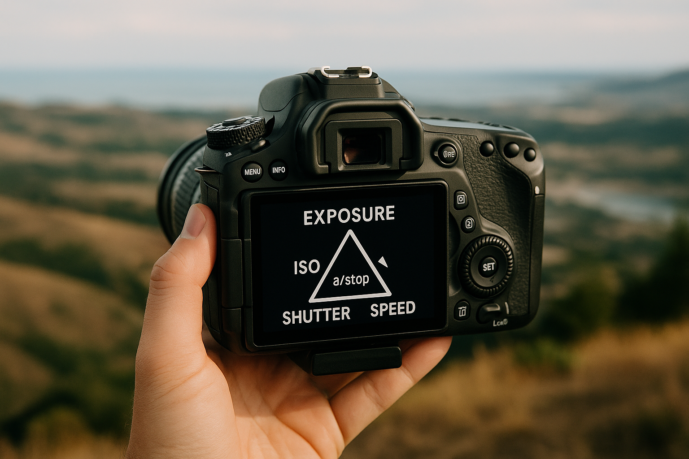
Introducing the Exposure Triangle
Exposure isn’t controlled by a single button; it’s a constant balancing act between three core settings: Aperture, Shutter Speed, and ISO. These three elements form what is known as the Exposure Triangle. Change one, and you must adjust at least one of the others to maintain the same level of brightness in your photo. Mastering this relationship is the key to unlocking full creative control and is a core concept in camera settings mastery.
A simple way to understand this is the “filling a bucket with water” analogy. Imagine your goal is to fill a bucket to a specific level (this is your “correct” exposure). You have three controls:
- Aperture is the width of the hose. A wider hose (large aperture) lets in more water at once. Learn more about aperture in this photo guide.
- Shutter Speed is the amount of time you leave the tap on. A longer time lets more water flow. Explore our shutter speed guide.
- ISO is the pressure of the water. Higher pressure (high ISO) fills the bucket faster but can be more turbulent and messy (creating “noise”). Understanding ISO in photos is crucial.
You can achieve your goal—a full bucket—with many different combinations. A very wide hose for a very short time gives the same result as a narrow hose for a long time. This is the essence of the exposure triangle.

Pillar 1: Aperture
What is Aperture?
Think of aperture as the pupil of your camera’s eye. It’s a physical, adjustable opening inside your lens that can get wider or narrower to control the volume of light reaching the camera’s sensor. The wider the opening, the more light gets in; the narrower the opening, the less light gets in. It’s the first fundamental control you have over exposure. You can learn more about understanding exposure and how aperture fits into the bigger picture.
Aperture is measured in units called f-stops, which you’ll see written as f/1.8, f/4, f/8, f/16, and so on. Here’s the one tricky part you need to remember: the relationship is inverse. A small f-number (like f/1.8) corresponds to a large aperture opening, letting in a lot of light. Conversely, a large f-number (like f/16) means a small aperture opening, letting in very little light. This concept is further explored in our guide on Aperture: A Photo Guide.
The Creative Effect: Depth of Field
While aperture plays a crucial role in brightness, its most significant creative impact is on Depth of Field (DoF). DoF refers to the zone of your photograph, from near to far, that appears acceptably sharp. By changing your aperture, you gain precise artistic control over what is in focus and what is not. This is a key aspect of camera settings mastery.
- A large aperture (a small f-number like f/1.8 or f/2.8) creates a very shallow Depth of Field. This means only a thin slice of your scene will be sharp, causing the foreground and background to fall away into a beautiful, soft blur. This effect, known as bokeh, is perfect for portraits, as it isolates your subject from a distracting background. You can explore this further when considering different photography genres.
- A small aperture (a large f-number like f/11 or f/16) creates a deep Depth of Field. This keeps a much larger area of the scene in focus, from the rocks at your feet to the mountains in the distance. This is the go-to technique for landscape photography, where the goal is to render the entire vista with crisp detail.

Notice how only the flower is sharp, beautifully isolating it from the soft, blurred background.

Here, both the flower and the background foliage are in sharp focus, creating a completely different feel.
Pillar 2: Shutter Speed
If aperture controls the volume of light entering your lens, shutter speed controls the duration. It’s the second pillar of the exposure triangle and your primary tool for controlling anything that moves within your frame. Mastering shutter speed is the key to unlocking a world of creative possibilities, from freezing a moment in perfect clarity to painting with motion and time.
What is Shutter Speed?
In the simplest terms, shutter speed is the length of time your camera’s sensor is exposed to light. Inside your camera, a tiny curtain (the shutter) sits in front of the sensor. When you press the shutter button, this curtain opens, exposes the sensor to light coming through the lens, and then closes again. The duration it stays open is the shutter speed.
This duration is measured in seconds or, more commonly, fractions of a second. On your camera’s display, you’ll see values like:
- 1/2000s (a very fast shutter speed, open for one two-thousandth of a second)
- 1/60s (a common handheld speed)
- 2″ (a slow shutter speed, open for a full two seconds)
The Creative Effect: Capturing Motion
Beyond its role in exposure, shutter speed is the artist’s dial for controlling motion. How you set it determines whether you freeze a fleeting moment with crisp precision or transform movement into a beautiful, artistic blur.
- Fast shutter speed (e.g., 1/1000s, 1/2000s, or faster) is essential for freezing action. It opens and closes the shutter so quickly that moving subjects appear perfectly sharp and suspended in time. This is the go-to setting for sports photography, birds in flight, or capturing the splash of a wave.
- Slow shutter speed (e.g., 1/15s, 1s, or longer) does the opposite. By leaving the sensor exposed for a longer period, it captures the movement of a subject across the frame, creating intentional motion blur. This technique is used to create the silky, ethereal look of waterfalls, dramatic light trails from cars at night, or a sense of speed in panning shots.


Practical Considerations
Working with shutter speed introduces a critical physical challenge: camera shake. When you hold a camera, tiny, unavoidable movements from your hands can cause the entire image to become blurry, especially at slower shutter speeds. The longer the shutter is open, the more these small movements are recorded by the sensor.
A general rule of thumb is to use a shutter speed at least as fast as your lens’s focal length (e.g., for a 50mm lens, use at least 1/50s). However, to guarantee sharpness, especially in low light or when using very slow speeds for creative effect, you have two main tools:
- Use a Tripod: For any shutter speed below approximately 1/60s (and for all intentional long exposures), a sturdy tripod is non-negotiable. It holds the camera perfectly still, eliminating camera shake and ensuring your static elements are tack-sharp while motion is beautifully blurred.
- Use Image Stabilization: Many modern lenses and camera bodies have built-in Image Stabilization (IS) or Vibration Reduction (VR). This technology physically compensates for small movements, allowing you to shoot handheld at slightly slower shutter speeds than would otherwise be possible.
Pillar 3: ISO
What is ISO?
If aperture is the size of the opening and shutter speed is the duration, ISO is the third piece of our puzzle: the camera sensor’s sensitivity to light. Think of it as artificially boosting the signal of the light that has already been collected. Unlike aperture and shutter speed, which are mechanical adjustments, ISO is a digital amplification. Learn more about understanding exposure.
ISO is measured in a standard sequence of numbers: 100, 200, 400, 800, 1600, and so on. The base ISO, typically 100 or 200, represents the sensor’s native sensitivity and will produce the cleanest, highest-quality image. Each time you double the ISO number (e.g., from 200 to 400), you double the sensor’s sensitivity, effectively making your image twice as bright. Understanding this is crucial for achieving proper exposure.
In essence, ISO is your digital brightener. When you can’t open your aperture any wider or slow your shutter speed any further without introducing unwanted blur, increasing the ISO is your go-to solution for achieving a correct exposure in darker environments. This is a key component of camera settings mastery.
The Trade-Off: Image Noise
This digital brightening comes at a cost: image noise. As you increase the ISO, you’re also amplifying any imperfections in the digital signal. This appears in your photos as an unwanted grainy or speckled texture, often most visible in the shadow areas. This digital noise can reduce the overall sharpness, detail, and color accuracy of your photograph, impacting the exposure range.
The relationship is straightforward: a higher ISO setting results in a brighter image but also introduces more noise. A low ISO like 100 will yield a very clean, smooth image, while a high ISO like 6400 will be noticeably grainy. The goal is always to use the lowest ISO possible for your given lighting situation to maintain the best image quality. This is covered in our ISO in Photos guide.
So, when should you use a high ISO? It’s an essential tool for low-light photography when you’re shooting handheld. If you’re indoors, at a concert, or capturing city streets at dusk without a tripod, you’ll need a fast enough shutter speed to prevent camera shake. Increasing the ISO allows you to achieve that faster shutter speed, sacrificing some image cleanliness for a sharp, usable shot. Learn more about shutter speed.


The Balancing Act: How They Work Together
Understanding Aperture, Shutter Speed, and ISO individually is the first step. The real magic happens when you learn how they influence one another. Mastering photography means seeing these three pillars not as separate controls, but as an interconnected system for sculpting light and achieving your creative vision. For a deeper dive into the fundamentals, explore our Beginner’s Photography 101 guide.
Understanding Stops of Light
To understand the relationship between the three settings, you need to know about “stops.” A stop of light is a simple, universal measurement in photography. Changing your exposure by one full stop means you are either doubling or halving the amount of light reaching the sensor. This concept applies equally to all three elements of the triangle. This is a key concept for understanding exposure.
Making your image one stop brighter could mean doubling the ISO, doubling the shutter speed duration, or opening the aperture to let in twice as much light. Conversely, making it one stop darker involves halving one of these values. Here’s how it works in practice:
- Aperture: Moving from f/2.8 to f/4 is a one-stop decrease, halving the amount of light. The standard full-stop f-number scale is: f/1.4, f/2, f/2.8, f/4, f/5.6, f/8, f/11, f/16. Learning about aperture is crucial for controlling depth of field.
- Shutter Speed: Moving from 1/125s to 1/250s is a one-stop decrease, halving the time the sensor is exposed to light. A comprehensive shutter speed guide can help you master this.
- ISO: Moving from 200 to 400 is a one-stop increase in sensitivity, effectively doubling the brightness of the resulting image. Understanding ISO in photos is essential for managing light in different conditions.
If you increase one setting by one stop, you must decrease another by one stop to keep the overall exposure the same. This principle is fundamental to achieving proper exposure.
Achieving Equivalent Exposures
This brings us to the core concept of the balancing act: equivalent exposures. This is the principle that many different combinations of Aperture, Shutter Speed, and ISO can produce an image with the exact same level of brightness. While the brightness is identical, the creative result—the depth of field and motion capture—will be completely different. This concept is part of advanced exposure control.
This is where your artistic control comes in. You don’t just choose settings for a “correct” exposure; you choose the combination that best tells your story. Let’s look at an example. Imagine our camera meter tells us that a perfectly balanced exposure for a scene is f/4, 1/125s, and ISO 200. We can achieve that same brightness with other settings:
| Aperture | Shutter Speed | ISO | Exposure | Creative Effect |
|---|---|---|---|---|
| f/4 | 1/125s | 200 | Baseline | A balanced starting point with moderate depth of field and motion capture. |
| f/2.8 | 1/250s | 200 | Equivalent | Brighter aperture (+1 stop) is balanced by a faster shutter (-1 stop). This creates a shallower depth of field (blurrier background). This is a key aspect of focus modes and techniques. |
| f/5.6 | 1/60s | 200 | Equivalent | Darker aperture (-1 stop) is balanced by a slower shutter (+1 stop). This results in a deeper depth of field but introduces a risk of camera shake, which can be mitigated by using a tripod. |
| f/4 | 1/250s | 400 | Equivalent | Faster shutter (-1 stop) is balanced by a higher ISO (+1 stop). This freezes action better but introduces more digital noise. The increased sensitivity of dual native ISO can also play a role here. |
As you can see, the final brightness is the same in every case, but the artistic outcome is dramatically different. Your job as a photographer is to decide what is most important for your image—a blurry background, a sharp landscape, or frozen action—and then balance the triangle accordingly. This balancing act is crucial for understanding the exposure range, which defines the limits of what you can capture without burned highlights or clipped shadows.
Putting It All into Practice
Understanding the individual components of the exposure triangle is one thing; making them work for you in the real world is the key to unlocking your creative potential. The good news is that you don’t always have to juggle all three settings at once. Your camera has intelligent shooting modes designed to help you prioritize what matters most for your specific vision. For a deeper dive into the fundamentals, check out our Beginner’s Photography 101 guide.
Choosing Your Priority: Camera Shooting Modes
Think of these modes as a partnership between you and your camera. You tell it what creative element is most important—depth of field or motion—and the camera handles the rest to achieve a correct exposure. This is the fastest way to move beyond “Auto” and start making deliberate artistic choices. Mastering these modes is a key step in elevating your photography.
- Aperture Priority (A or Av)
In this mode, you choose the aperture (f-stop) and the ISO, and the camera automatically selects the correct shutter speed to get a balanced exposure. It’s the perfect mode when your primary concern is controlling the depth of field. It’s arguably the most popular mode for photographers of all levels. Learn more about aperture in our photo guide.Best for: Portraits, landscapes, street photography, and any scene where the zone of sharpness is your main creative decision.
- Shutter Priority (S or Tv)
Here, you set the shutter speed and ISO, and the camera chooses the appropriate aperture. This mode gives you direct control over how motion is captured in your image, whether you want to freeze it completely or turn it into an artistic blur. Explore our shutter speed guide for more details.Best for: Sports, wildlife, children playing, waterfalls, light trails, and any situation where controlling motion is the priority.
- Manual Mode (M)
In Manual mode, you are in complete control. You set the aperture, shutter speed, and ISO yourself. While it offers the ultimate creative freedom, it also has the steepest learning curve. It’s the best mode for situations where lighting is consistent (like a studio) or when you need to override the camera’s meter for a specific artistic effect. Dive deeper into camera settings mastery to get the most out of this mode.
Creative Scenarios and Starting Settings
Let’s walk through some common photographic situations to see how you can apply these concepts. These are starting points—don’t be afraid to adjust them based on the light and your creative goals. Understanding your camera anatomy & functions will help you make these adjustments with confidence.
Scenario 1: The Classic Portrait with a Blurry Background
Your goal is to make your subject pop by isolating them from a soft, out-of-focus background (bokeh). This requires a shallow depth of field.
- Your Priority: Aperture
- Goal: Shallow Depth of Field
- Starting Point: Set your camera to Aperture Priority (A/Av). Choose the lowest f-number your lens allows (e.g., f/1.4, f/1.8, f/2.8). Set your ISO to a low value like 100 or 200 for the cleanest image. The camera will then pick the right shutter speed for you.
Scenario 2: The Sweeping, Sharp Landscape
For a grand vista, you typically want everything from the foreground flowers to the distant mountains to be sharp and in focus. This calls for a deep depth of field.
- Your Priority: Aperture
- Goal: Deep Depth of Field
- Starting Point: Use Aperture Priority (A/Av) and select a mid-to-high f-stop, such as f/8, f/11, or f/16. Keep your ISO at its base level (100). Because a small aperture lets in less light, your shutter speed may become slow, so using a tripod is essential to prevent camera shake and ensure maximum sharpness. A tripod is a crucial tool for many photography trips.
Scenario 3: Freezing Fast Action
Whether it’s a bird in flight, a soccer game, or a speeding car, the key is to eliminate motion blur by using a very fast shutter speed.
- Your Priority: Shutter Speed
- Goal: No motion blur
- Starting Point: Switch to Shutter Priority (S/Tv). Set a fast shutter speed, like 1/1000s or higher. To give yourself flexibility as the light or action changes, you can set your ISO to Auto ISO. The camera will then adjust the aperture and ISO as needed to maintain a correct exposure at your chosen shutter speed. Understanding ISO in photos is vital for this.
Scenario 4: The Silky Smooth Waterfall
To create that beautiful, ethereal look where moving water looks like silk, you need to do the opposite of freezing action. You want to intentionally capture motion blur with a slow shutter speed.
- Your Priority: Shutter Speed
- Goal: Intentional, artistic motion blur
- Starting Point: A tripod is non-negotiable for this shot. Use Shutter Priority (S/Tv) or Manual (M). Set your ISO to 100 to reduce light sensitivity. Choose a slow shutter speed, such as 1/2s, 2s, or even longer. The camera (in S/Tv) will select a very small aperture to compensate. In bright daylight, you may need a special filter (called a Neutral Density or ND filter) to block light and achieve such a slow speed. For tips on controlling light, explore our guide on understanding natural light.
Common Challenges and Troubleshooting
Even with a solid understanding of the exposure triangle, things don’t always go to plan. Don’t worry—every photographer faces these issues. Here’s a quick guide to diagnose and fix the most common exposure and sharpness problems.
My Photos are Too Dark (Underexposed)
If your images look like they were taken at dusk when it was actually a bright, sunny day, they are underexposed. The fix is simple: you need to let more light reach the camera’s sensor. Think of it as opening the floodgates a little wider. Learn more about understanding exposure.
- Widen the aperture: Choose a smaller f-number (e.g., go from f/8 to f/4) to open up the lens and let in more light. This adjustment is crucial for proper exposure.
- Slow down the shutter speed: Extend the time the sensor is exposed to light (e.g., go from 1/250s to 1/125s). Be mindful of camera shake if you go too slow. For more on this, check out our shutter speed guide.
- Increase the ISO: Make the sensor more sensitive to the available light (e.g., go from ISO 100 to ISO 400). This is your best bet when you can’t adjust the other two settings. Understanding ISO in photos is key.
My Photos are Too Bright (Overexposed)
When your photo is so bright that you lose details in the highlights—like a white sky with no cloud definition—it’s overexposed. The solution is to reduce the amount of light hitting the sensor. You need to restrict the flow of light. Mastering this is part of achieving proper exposure.
- Narrow the aperture: Choose a larger f-number (e.g., go from f/4 to f/8) to shrink the lens opening.
- Speed up the shutter speed: Decrease the amount of time the sensor is exposed (e.g., go from 1/125s to 1/250s).
- Lower the ISO: Reduce the sensor’s sensitivity to light (e.g., go from ISO 400 to ISO 100). Always aim for the lowest possible ISO for the best image quality.
My Subject Isn’t Sharp
Blurriness is a frustrating problem, but it usually comes from one of three culprits. Learning to identify the type of blur is the key to fixing it. This is an important aspect of camera settings mastery.
- Is the whole image blurry? This is likely due to camera shake. It happens when you use a shutter speed that is too slow to handhold the camera steady. To fix this, increase your shutter speed to a faster setting (a good rule of thumb is to use a speed faster than your lens’s focal length, e.g., 1/250s for a 200mm lens). Alternatively, stabilize your camera on a tripod.
- Is the moving subject blurry but the background is sharp? This is motion blur. Your shutter speed was too slow to “freeze” the subject’s movement. The solution is to increase your shutter speed significantly. For fast-moving subjects like a running child or a bird, you might need 1/1000s or faster.
- Is the wrong part of the image sharp? If your subject’s nose is sharp but their eyes are blurry, the issue is likely with your focus or depth of field. You may have focused on the wrong spot. Recompose and ensure your focus point is precisely on your intended subject. If you’re using a very wide aperture (like f/1.8), your depth of field is razor-thin, making it easy to miss focus. Try narrowing your aperture (e.g., to f/2.8 or f/4) to create a larger zone of sharpness. This relates to exploring focus modes and techniques.
