Night Photography: Tips for shooting in low light
Master the art of capturing breathtaking night skies with our expert photography tips.
The world transforms after sunset, offering a canvas of shadows and subtle light perfect for stunning photography. But capturing those magical moments can be a challenge. If you've ever found yourself frustrated by grainy images or blurry subjects when shooting in the dark, you're not alone. This article is your guide to conquering low-light photography.
We'll equip you with the knowledge to succeed, diving into the essential gear that makes a difference, the crucial camera settings you need to master when visibility is low, and the secrets to achieving crystal-clear focus even when you can barely see your screen. Get ready to unlock the potential of your camera after the sun goes down.
Essentials
Essential Gear for Low-Light Success
While the photographer’s eye is always the most important tool, venturing out after dark requires a specific set of gear designed to overcome the challenges of low light. Having the right equipment doesn’t just make the process easier; it makes certain shots possible. Here’s a breakdown of the foundational gear that will set you up for success.
Your Camera: Manual Mode is a Must
The heart of your setup is a camera that gives you complete creative control. In the dark, automatic settings are unreliable and will almost certainly lead to blurry, poorly exposed images. This is where manual control becomes non-negotiable.
- DSLR vs. Mirrorless: Both camera types are highly capable for night photography. Mirrorless cameras have the advantage of an electronic viewfinder (EVF), which can brighten the scene and show you a live preview of your exposure before you take the shot. However, this can drain the battery faster. DSLRs often have better battery life and an optical viewfinder that, while dark, consumes no power. The choice often comes down to personal preference and your existing system.
- The Full-Frame Advantage: While cameras with smaller (APS-C or Micro Four Thirds) sensors can take beautiful night photos, full-frame sensors generally have a distinct advantage. Their larger physical size allows for larger individual pixels, which can gather more light. This results in cleaner images with less digital noise, especially when you need to increase the ISO.
- Full Manual Control: The most critical feature is the ability to independently set your aperture, shutter speed, and ISO. Your camera must have a Manual (M) mode to allow for the long exposures and specific settings that night photography demands.
Lenses: Go Wide and Fast
Your lens is your camera’s eye, and its ability to gather light is paramount. For night photography, you’ll want a lens that is both “fast” and, for many subjects, “wide.”
A “fast” lens is one with a very wide maximum aperture. The aperture is the opening in the lens that lets light through, and its size is measured in f-stops (e.g., f/1.8, f/2.8, f/4). A lower f-number means a wider opening, which allows more light to hit the camera sensor. For night shooting, a lens with a maximum aperture of f/2.8 or wider (like f/1.8 or f/1.4) is ideal, as it lets you use a faster shutter speed or a lower ISO to achieve a proper exposure.
A wide-angle lens (typically in the 14-35mm range on a full-frame camera) is invaluable for capturing expansive scenes like starry skies, the Milky Way, or broad cityscapes. It allows you to fit more of the scene into your frame, creating a sense of scale and grandeur.
The Tripod: Your Most Important Tool
If you invest in only one specialized piece of gear for night photography, make it a tripod. Because you’ll be using slow shutter speeds—often lasting several seconds or even minutes—it is physically impossible to hold the camera steady enough by hand. Any movement, no matter how slight, will result in a blurry, unusable photo.
When choosing a tripod, look for these key features:
- Stability: It must be sturdy and robust enough to hold your camera and lens combination perfectly still, even in a light breeze. Heavier tripods are generally more stable, but you must balance that with portability.
- Weight: A carbon fiber tripod is lighter than its aluminum counterpart, making it easier to carry on hikes, but it comes at a higher price. Aluminum is a great, budget-friendly option.
- A Solid Head: The tripod head is what connects your camera to the legs. A quality ball head is a popular choice, offering flexibility and the ability to lock your composition down securely.
Crucial Accessories for a Smooth Shoot
Beyond the big three, a few smaller accessories can make a significant difference in your workflow and the quality of your final images.
- Remote Shutter Release: Even on a sturdy tripod, the simple act of pressing the shutter button can introduce a tiny vibration that blurs your image. A remote shutter release (either a cabled remote or a wireless one) allows you to trigger the camera without touching it. Many also function as an intervalometer, which is essential for shooting time-lapses or exposures longer than 30 seconds.
- Extra Batteries: Long exposures and cold temperatures are a nightmare for battery life. A battery that lasts for hours during the day can be depleted in under an hour at night. Always carry at least one fully charged spare.
- Headlamp or Flashlight: You need to be able to see your camera settings and navigate your surroundings safely in the dark. A headlamp is particularly useful as it keeps your hands free. Look for one with a red light mode. Red light is much less harsh on your eyes and helps preserve your night vision, allowing you to see both your gear and the faint light of the stars more clearly.
Nailing Your Camera Settings in the Dark
Once your gear is set up, the real creative work begins. Night photography is a delicate dance between aperture, shutter speed, and ISO—the three pillars of the exposure triangle. Unlike daytime shooting, where the camera can often make smart automatic choices, at night, you are in complete control. Mastering these settings is the key to transforming a dark scene into a breathtaking image.
Aperture: Open Up to Let Light In
Your first step in the dark is to gather as much light as physically possible. This is the job of your lens’s aperture. For night photography, you’ll want to set your lens to its widest possible aperture, which is represented by the lowest f-number (e.g., f/1.8, f/2.8, or f/4). A “fast” lens with a wide aperture acts like a large bucket in the rain, collecting more light in a shorter amount of time.
By opening up your aperture, you allow your camera’s sensor to see more of the dimly lit scene. While a wide aperture creates a shallow depth of field (where only a small plane is in focus), this is often less of a concern for vast night landscapes or astrophotography where your subject is effectively at infinity. For scenes with distinct foreground and background elements, you may need to find a balance or use advanced techniques like focus stacking, but as a starting point, always go as wide as your lens allows.
Shutter Speed: The Art of the Long Exposure
Shutter speed determines how long your camera’s sensor is exposed to light. At night, this duration is dramatically longer than in the daytime, often lasting for many seconds or even minutes. This “long exposure” technique is what allows you to capture details the naked eye can’t see and create stunning motion effects.
- Control Motion: A relatively short exposure (e.g., 15-25 seconds) can freeze the stars in place for crisp astrophotography. A much longer exposure (several minutes to hours) will capture the Earth’s rotation, turning those same stars into beautiful, streaking trails across the sky. For guides on capturing motion, see our capture motion guide.
- Use “Bulb” Mode: Most cameras have a maximum shutter speed of 30 seconds. For anything longer, you’ll need to use Bulb (B) mode. In this mode, the shutter stays open for as long as you hold down the shutter button. This is where a locking remote shutter release becomes essential, allowing you to start and end the exposure without touching the camera. For more on controlling shutter speed, check out our shutter speed guide.
Your ideal shutter speed will vary wildly depending on your subject. Here are some general starting points:
- Cityscapes: 5 to 30 seconds. This is often enough to capture building lights and create light trails from traffic. For tips on shooting in urban environments after dark, consult our night city photo guide.
- Milky Way / Sharp Stars: 15 to 25 seconds. Any longer and you’ll start to see the stars blur due to the Earth’s rotation (see the “500 Rule” later on).
- Star Trails: 30 minutes or more. This is typically achieved by taking many shorter exposures and stacking them in post-processing or one single, very long exposure.
- Silky Water: 30 seconds to 2 minutes. This will smooth out waves and reflections for a glassy, ethereal look.
ISO: Balancing Sensitivity and Noise
ISO measures your camera sensor’s sensitivity to light. Increasing the ISO digitally brightens your image, making it an essential tool when you can’t make your aperture wider or your shutter speed longer. However, this brightness comes at a cost: digital noise, which appears as a grainy or speckled texture and can reduce image quality.
The goal is to find your camera’s “sweet spot”—the highest ISO you can use before the noise becomes unacceptable. For modern full-frame cameras, this might be ISO 3200 or 6400, while for older or crop-sensor models, you might want to stay at or below ISO 1600. Test your camera at different ISO settings to understand its limits.
The decision to raise ISO or lengthen shutter speed depends on your subject. If you are shooting starscapes and need to keep the stars sharp, you have a hard limit on your shutter speed. In this case, you must raise the ISO to get a proper exposure. If you are shooting a static cityscape, it’s better to keep the ISO low (e.g., 100-400) for maximum quality and use a much longer shutter speed to gather the light.
White Balance for Night Scenes
Leaving your white balance on “Auto” at night is a recipe for strange color casts. The mix of streetlights, moonlight, and ambient skyglow often confuses camera sensors, resulting in images that are excessively orange, yellow, or green. Taking control of your white balance is crucial for achieving natural and appealing colors.
Instead of Auto, try a specific preset. The “Tungsten” or “Incandescent” setting (often represented by a lightbulb icon) can work well to neutralize the warm, orange glow of older city streetlights. For more precise control, use the Kelvin (K) setting. A good starting point for many night cityscapes is between 3000K and 4000K. For astrophotography, a value around 3900K to 4800K can help create a natural-looking night sky. Experiment with different settings and remember that if you shoot in RAW, you can always fine-tune the white balance perfectly in post-processing.
Achieving Pin-Sharp Focus When You Can’t See
One of the first and most significant hurdles in night photography is achieving sharp focus. In the darkness, your camera’s sophisticated autofocus system, so reliable during the day, suddenly becomes nearly useless. Learning to take control and focus manually is not just a suggestion; it’s a fundamental skill for capturing crisp, professional-looking images after the sun goes down.
Why Autofocus Fails in Low Light
Modern cameras typically use phase-detect or contrast-detect autofocus systems. Both rely on having sufficient light and discernible contrast to analyze a scene and determine where to focus. When plunged into darkness, these systems are starved of the information they need to function correctly.
This leads to a frustrating phenomenon known as “focus hunting.” You’ll half-press the shutter, and the lens will rack back and forth, its motor whirring as it desperately searches for a point of contrast to lock onto, but it never finds one. This not only prevents you from taking a picture but also drains your precious battery life. Relying on autofocus at night is a recipe for missed shots and disappointment.
The Manual Focus Method
The solution is to switch to manual focus (MF) and use your camera’s Live View screen. This method is incredibly accurate and reliable, giving you complete control. It’s the standard technique used by virtually all seasoned night photographers.
- Switch to Manual: First, locate the AF/MF switch on your lens and set it to MF. Some camera bodies also have a focus mode setting that needs to be switched to MF.
- Engage Live View: Turn on your camera’s Live View mode so the scene is displayed on the rear LCD screen. The screen will likely be noisy and dark, but this is normal.
- Find a Bright Point: Pan your camera to find the brightest distant point of light you can. This could be a bright star (like Polaris or Sirius), the moon, or a streetlight or building light on the horizon.
- Magnify the View: Use the zoom-in button on your camera (this is a digital zoom for focusing, it doesn’t change your lens’s focal length) to magnify that point of light on your screen, usually by 5x or 10x.
- Adjust the Focus Ring: Now, carefully and slowly turn the focus ring on your lens. Watch the point of light on your screen. You will see it go from a blurry blob to a tiny, sharp pinprick, and then back to a blurry blob. Your goal is to adjust the ring until the light is as small and crisp as possible. Once you’ve achieved this, you’ve nailed your focus for distant objects like stars.
After achieving perfect focus, it’s wise to take a test shot and zoom in on the image to confirm everything is sharp. To prevent accidental bumps, some photographers even use a small piece of gaffer tape to lock the focus ring in place for the rest of the shoot.
Hyperfocal Distance Explained
For more advanced landscape photographers who want to ensure sharpness from a nearby foreground element all the way to the distant stars, understanding hyperfocal distance is key. In simple terms, the hyperfocal distance is the closest point at which you can focus your lens to keep the background (infinity) acceptably sharp, while maximizing the depth of field in front of your focus point.
Instead of focusing on a star at infinity, you focus on a specific, calculated distance. When you focus at this hyperfocal point, everything from half that distance to infinity will fall within your depth of field. For example, if your hyperfocal distance is calculated to be 10 feet, everything from 5 feet away from your camera all the way to the distant mountains and stars will be sharp.
This isn’t something you guess. You determine the correct distance using a hyperfocal distance chart or, more commonly, a smartphone app like PhotoPills or Photographer’s Ephemeris. You input your camera model, focal length, and chosen aperture, and the app tells you the precise distance to focus on. You can then go out and manually focus on an object at that exact distance to achieve maximum sharpness throughout your entire landscape scene.
Composition Tips for Compelling Night Photos
Once you’ve mastered the technical settings, the next step is to create an image that tells a story. Composition in the dark follows many of the same principles as daytime photography, but it requires a more deliberate approach. A powerful composition can elevate a technically good photo into a truly breathtaking one.
Find a Strong Subject or Anchor Point
A sky full of stars is beautiful, but without a point of reference, the image can lack scale and context. A strong subject acts as an anchor point, grounding the scene and giving the viewer’s eye a place to rest. Look for elements that can add interest and a sense of place to your photograph.
- Natural & Man-Made Structures: A solitary tree, a dramatic mountain silhouette, a rustic barn, or a distant city skyline can all serve as powerful subjects. They contrast with the vastness of the night sky and add a narrative layer to your image. Consider exploring landscape photography for inspiration.
- Compelling Foreground: Don’t neglect what’s right in front of you. Including a compelling foreground element is one of the most effective ways to create depth. This could be anything from interesting rock formations and reflective pools of water to a winding path that leads the eye into the frame.
Incorporating Light Sources Creatively
Instead of seeing artificial lights as a problem, learn to use them as creative tools. Streetlights, passing cars, and illuminated buildings can become integral parts of your composition, adding color, mood, and visual interest. This is particularly relevant in night city photography.
- Use Light as an Element: A distant streetlight can illuminate a patch of foreground, a string of lights can serve as a leading line, and the warm glow from a cabin window can create a sense of welcome and mystery. Think of these lights not just as illumination, but as subjects in their own right.
- Create a Starburst Effect: You can transform point light sources like street lamps or distant city lights into beautiful, multi-pointed stars. To achieve this starburst effect, you need to use a smaller aperture (a higher f-number), such as f/11 or f/16. The shape and number of points in the star are determined by the number of aperture blades in your lens. Mastering this is part of advanced exposure control.
Capturing Motion and Energy
One of the most magical aspects of night photography is the ability to capture movement that is invisible to the naked eye. By using a long shutter speed, you can paint with time, turning dynamic scenes into serene and artistic images. This is the essence of long exposure photography.
- Light Trails: Position your camera overlooking a busy road to capture the headlights and taillights of moving vehicles as vibrant streaks of red, white, and yellow. This technique infuses a static cityscape with a palpable sense of energy and flow. Learning to capture motion is key.
- Silky Water: A long exposure of 15 seconds or more can transform the choppy surface of a lake, river, or ocean into a smooth, misty, or glass-like plane. This creates a beautiful contrast between the soft, ethereal water and the sharp, solid elements like rocks, piers, or bridges.
- Streaking Clouds: On a windy night, a long exposure can capture the movement of clouds as they drift across the sky. This adds a dramatic, painterly effect, especially when the clouds are illuminated by the moon or the glow from a nearby city.
Popular Night Photography Subjects to Try
Once you’re comfortable with your gear and settings, a whole new world of creative possibilities opens up after sunset. The night offers a unique canvas for photographers to explore. Here are some of the most popular and rewarding subjects to start with.
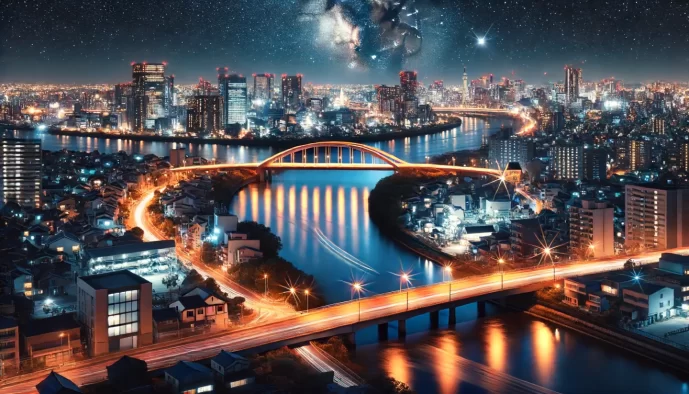
Urban and Cityscape Photography
Cities transform at night, with artificial lights painting the landscape in vibrant colors. The key to a stunning cityscape is finding the right perspective. Seek out elevated vantage points like observation decks, bridges, or hilltop overlooks that provide a clear view of the skyline. These spots allow you to capture the grand scale of the city and the intricate web of lights below.
For the most dramatic results, plan your shoot during the “blue hour.” This is the brief period just after sunset when the sun is below the horizon, but its residual light fills the sky with a deep, rich blue. This ambient light provides a beautiful contrast to the warm, artificial lights of the city, creating a perfectly balanced and colorful scene that is often more compelling than a pitch-black sky. The Blue Hour Photo Guide can help you maximize this time.
Astrophotography: Stars and the Milky Way
Capturing the cosmos is one of the most awe-inspiring pursuits in night photography. The absolute first step is to escape urban light pollution. The darker your location, the more stars your camera will be able to see. Use a dark sky map online to find designated dark-sky parks or remote areas far from city centers.
To keep your stars as sharp points of light rather than blurry streaks, you need to limit your shutter speed. A helpful guideline is the 500 Rule: divide 500 by your lens’s focal length to get the maximum exposure time in seconds. For example, with a 20mm lens, you could shoot for up to 25 seconds (500 / 20 = 25). For even greater precision, especially with high-resolution cameras, many photographers now prefer the more complex NPF Rule, which also accounts for aperture and sensor size. Understanding shutter speed is crucial for this. You can also explore long exposure photography for capturing faint light.
Success in astrophotography relies heavily on planning. Powerful apps like PhotoPills and Stellarium can help you visualize the position of the Milky Way, constellations, and meteor showers at any given time and location. Combining these with a Dark Sky Map ensures you’ll be in the right place at the right time for the best possible shot.
Light Painting and Steel Wool Spinning
This playful technique involves using a handheld light source to “paint” light onto a subject or into the frame during a long exposure. With your camera on a tripod and the shutter open, you can walk through the scene with a flashlight, colored LED wand, or even your phone screen to selectively illuminate objects or draw shapes in the air. The camera records the path of the light, allowing for endless creative expression. This is a creative application of long exposure photography.
A more dramatic variation is steel wool spinning, which creates a shower of fiery sparks. This involves placing fine-grade steel wool into a metal whisk, attaching it to a rope, igniting it, and spinning it in a circle. While the visual effect is spectacular, this technique carries significant risks. Always take safety precautions:
- Shoot in a wet or non-flammable location, far from dry grass, trees, or buildings.
- Wear protective gear, including safety glasses, a hat, and non-synthetic clothing.
- Have a fire extinguisher and a spotter with you at all times.
Lunar Photography
The moon is a beautiful but tricky subject. Because it is so intensely bright compared to the dark sky, your camera’s meter will often be fooled, leading to an overexposed, detail-less white circle. The key is to expose for the moon’s surface, not the sky. Switch to manual mode and start with settings similar to what you might use in daylight, such as an aperture of f/8 or f/11 and a relatively fast shutter speed (e.g., 1/125s), then adjust from there. Mastering advanced exposure control is essential for this.
While a close-up shot of a full moon can be stunning with a telephoto lens, the moon often has more compositional impact when included as part of a wider landscape. Try capturing a rising moon behind a mountain silhouette, framed by a tree, or reflecting over a body of water. This approach provides context and scale, turning a simple portrait of the moon into a captivating narrative scene. You might also find inspiration in landscape photography guides for composition.
Post-Processing: Bringing Your Night Shots to Life
Capturing the shot is only half the battle. The magic of night photography truly reveals itself in post-processing, where you can refine the raw data from your camera sensor into a stunning final image. This is where you balance the deep shadows with brilliant highlights and correct the subtle color casts that are common in low-light scenes. A thoughtful editing process can elevate a good shot into a spectacular one.
The Importance of Shooting in RAW
If there is one non-negotiable rule for night photography, it’s to shoot in RAW format. While JPEGs might look good straight out of the camera, they are compressed and processed files with limited editing potential. A RAW file, on the other hand, is the digital equivalent of a film negative—it contains all the uncompressed data captured by your camera’s sensor, giving you maximum flexibility.
- Greater flexibility in exposure and white balance: A RAW file retains a much wider range of tonal and color information. This means you can significantly adjust brightness, recover details from shadows that look completely black in a JPEG, and pull back highlights without losing information. You also have complete control over the white balance, allowing you to correct unnatural color casts from city lights with precision.
- More effective noise reduction and detail recovery: Digital noise is an unavoidable part of high-ISO and long-exposure photography. RAW files provide cleaner data for editing software like Adobe Lightroom or Capture One to work with. This allows their sophisticated algorithms to reduce noise much more effectively while preserving fine details, something that is nearly impossible with a pre-sharpened, compressed JPEG.
Essential Adjustments in Editing Software
Once you’ve imported your RAW file into your preferred editing software, a few fundamental adjustments form the foundation of any great night photo edit. The goal is to create a balanced, clean, and impactful image that reflects the mood of the scene.
- Correcting white balance: Auto white balance often struggles in the dark, leading to strong orange, yellow, or blue color casts. Start by adjusting the Temperature (blue/yellow) and Tint (green/magenta) sliders to find a neutral, natural-looking base. Aim for clean whites and neutral grays in your scene.
- Lifting shadows and recovering highlights: Night scenes are defined by their high dynamic range. Use the Shadows slider to gently brighten the darkest parts of your image and reveal hidden details. Simultaneously, use the Highlights slider to pull back any light sources that are too bright, like streetlights or the moon, to recover their texture and color. This is an important aspect of HDR photography, where managing extreme light differences is key.
- Applying targeted noise reduction: Almost every night shot will benefit from some noise reduction. Modern software is excellent at this. Apply Luminance noise reduction to smooth out the grainy texture in the shadows and sky, and use Color noise reduction to eliminate distracting red, green, and blue speckles. Be careful not to overdo it, as excessive reduction can make the image look soft and artificial.
Advanced Editing Techniques
To take your images to the next level, you can employ more targeted techniques that give you precise control over the final look and feel of your photograph. These methods help guide the viewer’s eye and enhance the drama of the scene.
- Using layer masks: Often, the sky and the foreground require different adjustments. For example, you might want to increase the contrast in the Milky Way while simultaneously brightening the details in a mountain range below it. Using layer masks or local adjustment tools (like radial and graduated filters) allows you to edit these areas independently for a perfectly balanced final image. This is crucial for achieving the desired look in landscape photography.
- Dodging and burning: This is a classic darkroom technique adapted for the digital age. “Dodging” refers to selectively brightening parts of an image, while “burning” means selectively darkening them. You can use this to enhance the glow of city lights, add dimension to a landscape, or subtly guide the viewer’s attention to your main subject. This technique is also useful for creating depth in night city photography.
- Sharpening techniques for night images: Proper sharpening adds a final touch of clarity. However, sharpening can also accentuate noise. The best approach is to use a masking feature while you sharpen. This allows you to apply the effect only to the edges and details in your photo (like stars or architectural lines) while leaving the smooth areas (like the night sky) untouched, resulting in a crisp image without added grain.
