Solo Travel Photo Tips
Master solo travel photography with tips on selfies, gear, and creative angles!
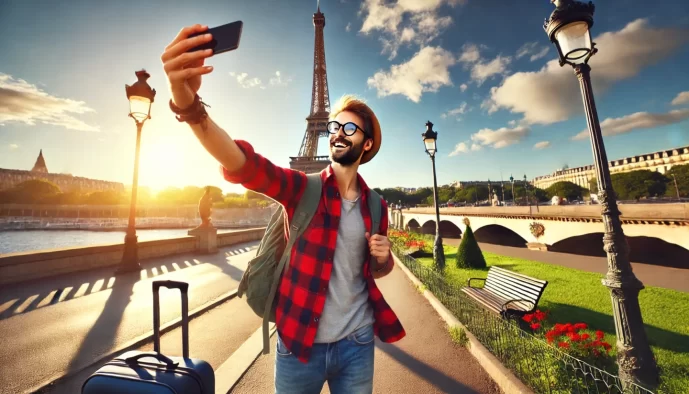
Dreaming of capturing breathtaking travel memories, but find yourself always behind the lens? Embarking on a solo adventure means you're the director, the subject, and the photographer. This guide is designed to help you master solo travel photography, transforming your trips into a visual story you'll be proud to share.
We'll dive into the essential gear that makes capturing stunning shots easier, explore techniques for taking incredible solo photos without a tripod, and unlock the secrets to compelling composition that goes far beyond the basic selfie. Get ready to elevate your travel photography game and document your solo journeys like a pro.
Essentials
Essential Gear for the Solo Photographer
While the most important tool is your creative eye, a few key pieces of equipment can transform your solo travel photos from simple selfies into compelling, well-composed images. Investing in the right gear doesn’t mean carrying a heavy, cumbersome bag; it means choosing smart, lightweight tools that empower you to capture the moments you envision.
The Tripod: Your Most Reliable Companion
For a solo traveler who wants to be in their own photos, a tripod is not a luxury—it’s an absolute necessity. It provides the stability and freedom to compose shots that would otherwise be impossible. It allows you to step out from behind the lens and become part of the scene, all without relying on a shaky stack of books or a precarious wall ledge. With a tripod, you can take sharp photos in low light, create long-exposure effects with flowing water or light trails, and most importantly, frame yourself perfectly against a stunning backdrop.
When selecting a tripod for travel, prioritize these features:
- Lightweight: Look for models made from carbon fiber or aluminum that won’t weigh you down as you explore.
- Compact: It should fold down small enough to fit inside or strap securely to your daypack.
- Stable: While it needs to be light, it also needs to be sturdy enough to hold your camera steady, even in a light breeze.
You’ll generally encounter two main types. A traditional tripod offers maximum stability and height, which is ideal for landscape shots. For ultimate versatility, consider a flexible tripod, like a Gorillapod. Its pliable legs can wrap around tree branches, railings, or posts, opening up a world of creative angles that a standard tripod can’t achieve.
The Remote Shutter: Your Secret Weapon
A remote shutter is the small, inexpensive tool that solves the most undignified part of solo photography: the frantic dash from your camera back to your pose before the timer goes off. Using a remote allows you to trigger the shutter calmly and discreetly from your position within the frame. This simple device gives you the control to wait for the perfect moment—for a cloud to pass or for a crowd to thin—before taking the shot, resulting in more relaxed and natural-looking photos.
Several convenient options are available:
- Bluetooth Remotes: These small, keychain-sized devices pair easily with any smartphone and are incredibly simple to use.
- Wireless Remotes: Most dedicated cameras have compatible wireless remotes, offering reliable control from a greater distance.
- Your Smartwatch: Many modern smartwatches can pair with your phone’s camera app, allowing you to see a live preview of the shot on your wrist and trigger the shutter with a simple tap.
Your Camera: Smartphone vs. Dedicated Camera
The debate over the best travel camera is ongoing, but the truth is that the best camera is the one you have with you. Modern smartphone cameras are incredibly powerful, with advanced sensors, multiple lenses, and sophisticated software that can produce stunning, high-quality images suitable for both social media and printing. For many travelers, a phone is more than enough.
However, you might consider a dedicated camera if you want more creative control, better performance in low light, or the ability to use different lenses. For travel, compact and mirrorless cameras are excellent choices. They offer much of the power and image quality of larger DSLRs but in a significantly smaller and lighter body, making them far more practical for carrying around all day. If you’re considering a new camera, reading reviews can help you find the perfect fit.
If you do opt for a dedicated camera, look for these travel-friendly features:
- Flip Screen: A fully articulating or tilting screen is invaluable for a solo traveler, as it allows you to see yourself and perfect your composition without running back and forth to the camera.
- Wi-Fi Connectivity: This feature lets you transfer photos directly to your phone for quick editing and sharing, and often allows you to use your phone as a remote shutter and live viewfinder.
- Interval Timer: An intervalometer, or built-in interval timer, allows you to set the camera to take a series of photos automatically at set intervals. This is a fantastic way to capture candid movement as you walk through the frame.
Mastering the Art of the Solo Shot
Once your gear is sorted, the real creative work begins. Capturing a compelling photograph of yourself in a new place requires a blend of technical skill and creative thinking. It’s about more than just being in the picture; it’s about telling the story of your presence there. These techniques move beyond the simple arm’s-length selfie to create images with depth, context, and a natural feel. This is a key aspect of travel photography.
Technique 1: The Self-Timer and Burst Mode
The self-timer is the solo traveler’s most dependable tool. It gives you complete creative control over the final image, from composition to focus. To make the most of it, however, requires a bit more finesse than simply pressing a button and running into the frame.
- Set the Scene First: Before you even think about the timer, compose your shot. Decide exactly where you want to stand or sit. Check the background for any distracting elements and adjust your tripod’s position and angle until the framing is perfect.
- Pre-focus on Your Spot: Your camera needs to know where to focus. The easiest way to do this is to place an object, like a backpack or a water bottle, exactly where you plan to be. Focus on that object, and then, if your camera allows, switch to manual focus to lock it in. This prevents the camera from refocusing on the background while you’re moving into place. For smartphones, simply tap the screen where you will be to set the focus point. For tips on using your mobile device, check out Travel Photography: Maximizing your mobile device while traveling.
- Embrace Burst Mode: Setting a 10-second timer and using burst mode (or continuous shooting) is a game-changer. This is a great technique to capture motion. Instead of getting one static, often stiff-looking photo, you’ll get a series of 10-20 images. This allows you to move naturally, walk through the frame, or try subtle variations in your pose. Later, you can scroll through the sequence and select the perfect, candid-looking moment.
Technique 2: The Art of Asking a Stranger
Sometimes, a tripod isn’t practical or allowed. In these moments, entrusting your camera to a stranger is your best option. While it can feel daunting, a strategic approach can yield fantastic results and even lead to a pleasant interaction. This is part of the how to take pictures of people when you travel.
The key is choosing the right person and making their job as easy as possible.
- Who to Ask: Look for fellow travelers, especially those already taking photos with a dedicated camera. They are more likely to understand the basics of framing and be happy to help a fellow photographer. Families or couples on holiday are also often a good choice.
- How to Ask for the Photo You Want: To avoid disappointment, don’t just hand over your camera and hope for the best. Guide them to success.
- Frame the Shot Perfectly First: Before you approach anyone, compose the image exactly as you envision it. Walk over to your chosen person and show them the screen, saying something like, “Could you please take a photo for me? I’ll stand right over there.”
- Provide a Sample Photo: The most effective method is to take a photo of the scene without you in it, showing them precisely what you want. This visual guide is far clearer than verbal instructions and removes any guesswork.
- Request Multiple Photos: Politely ask them to take several pictures. A simple, “Would you mind taking a few?” is usually all it takes. This increases the chances of capturing a shot where you aren’t blinking or in an awkward pose.
- Be Gracious: Always thank them warmly for their time and, most importantly, offer to take a photo for them in return. It’s a kind gesture that completes the exchange beautifully.
Technique 3: Using Your Environment for Stability
Forgot your tripod or found yourself in a spontaneous photo opportunity? Look around. The world is full of natural tripods if you know where to look. This technique is about creativity and resourcefulness. Learning to master travel photography often involves these kinds of skills.
You can find stability for your camera or phone in countless places. Look for flat, sturdy surfaces like rock ledges, city walls, park benches, or even the top of your backpack placed on the ground. The key is to ensure your device is secure. You can use smaller items from your bag, like a wallet, a lens cap, or even a folded scarf, to prop up your lens and get the perfect angle. For a smartphone, a phone case with a built-in stand or even leaning it against a coffee cup can work wonders. Just be certain the surface is stable and not in a place where your camera could be easily knocked over by a gust of wind or a passerby.
Composition: Beyond the Basic Selfie
A great solo travel photo is more than just proof you were there; it’s a story captured in a single frame. Moving beyond the standard centered selfie and thinking about composition will elevate your images from simple snapshots to compelling photographs. It’s about thoughtfully arranging elements to guide the viewer’s eye and evoke a specific feeling. To truly master travel photography, consider these compositional techniques.
Finding Your Place in the Frame
Where you position yourself in the photo is just as important as the background itself. Deliberate placement can transform an ordinary scene into something dynamic and artful.
- The Rule of Thirds: Imagine your screen is divided into a 3×3 grid, like a tic-tac-toe board. Instead of placing yourself directly in the center square, position yourself along one of the lines or at one of the four intersection points. This simple shift creates a more balanced and visually engaging image that allows the viewer’s eye to move naturally through the scene. Placing yourself on one side and looking across the frame invites the viewer to see what you see.
- Using Negative Space: Negative space is the empty or uncluttered area around your subject. Don’t be afraid to make yourself a small part of a much larger picture. By surrounding yourself with a vast expanse of sky, an empty beach, or a minimalist architectural wall, you create a powerful sense of scale and atmosphere. This technique is particularly effective for conveying feelings of solitude, freedom, and the grandeur of the landscape you’re exploring.
Leading Lines and Natural Framing
Use the environment to your advantage by finding natural elements that can add depth and structure to your photos, drawing attention exactly where you want it to go.
- Leading Lines: Our eyes are naturally drawn to lines. Look for paths, roads, fences, rivers, or the edge of a building that you can use to lead the viewer’s eye from the edge of the photo directly to you. Positioning yourself at the end of a winding path or along a pier creates a sense of journey and adds a three-dimensional feel to a two-dimensional image.
- Natural Framing: Create a “frame within a frame” to add depth and context. Shoot through a stone archway, a window, a doorway, or from behind the leaves of a tree. This technique makes the photo feel more intimate and considered, as if the viewer is peeking into a private moment. It draws focus to you while also telling more of the story about your location.
Changing Your Perspective
The angle from which you shoot can dramatically alter the mood and message of your photograph. Experimenting with different viewpoints is one of the easiest ways to create more interesting shots.
Shooting from a low angle, for instance, can make you appear more prominent and heroic against a vast landscape or towering architecture. It’s a simple trick to make a scene feel more expansive and grand. For more tips on capturing people, explore our guide on how to take portraits of people in natural light when you travel.
Most importantly, remember that not every photo needs to show your face to tell your travel story. Some of the most evocative images are in the details. Focus on capturing the smaller moments that define your experience:
- Your hiking boots resting on a summit with the valley below.
- Your hand holding a local pastry or a cup of coffee.
- A shot of your journal and map spread out on a café table.
- Your feet standing on unique, colorful tiles.
These detail-oriented shots provide texture and a personal narrative to your journey. They capture the feeling of a place in a way that a traditional portrait sometimes cannot, proving that a powerful travel photo is about conveying an experience, not just documenting an appearance. Consider how you might engage with locals respectfully when seeking to capture their essence, or explore how to use specific lenses like an 85mm for stunning portraits. For an in-depth look at planning, check out our pre-trip essentials and remember to practice good photo trip habits to maximize your experience.
How to Pose and Look Natural (When You Feel Awkward)
One of the biggest hurdles in solo travel photography is feeling self-conscious when the timer starts. The key to overcoming this is to stop “posing” and start “doing.” By giving yourself a simple action or point of focus, you can create images that feel authentic and effortless, even when you’re the one setting up the shot.
Interact With Your Surroundings
The easiest way to look natural is to engage with the world around you. Instead of standing stiffly and staring at the lens, make the environment part of your story. This simple shift in mindset grounds you in the moment and results in more compelling, candid-style photographs.
- Look away from the camera. Turn your gaze towards the stunning vista, an interesting architectural detail, or the bustling street scene. This creates a sense of contemplation and draws the viewer’s eye to what you’re experiencing.
- Create candid motion. Set your focus point and then walk slowly towards or away from the camera. This adds a dynamic, unposed quality to the image, as if someone just happened to capture you exploring.
- Find a point of contact. Gently touch a textured wall, lean against an old stone railing, or take a seat on a set of public steps. This small physical connection to your surroundings makes your posture more relaxed and natural.
Use Props to Your Advantage
The age-old question, “What do I do with my hands?” is easily solved with a prop. A well-chosen object not only gives your hands a purpose but also adds a layer of narrative to your photograph, offering clues about your location and experience.
Consider holding a cup of coffee from a local café, consulting a paper map (even if you’re using your phone for navigation), raising your own camera to your eye as if taking a photo, or adjusting a hat. These simple actions transform a static pose into a moment in time.
Embrace Movement
Static poses can often feel rigid and unnatural. Introducing movement is an excellent way to capture genuine energy and emotion. Don’t be afraid to be a little playful; the goal is to capture a fleeting moment of joy or action, not a perfect, still portrait.
Try walking through the frame, twirling in a dress, or even a small jump in the air. To capture these moments sharply, you may need to adjust your camera’s settings. A faster shutter speed (like 1/250s or higher) will freeze the action. Alternatively, features like the Live Photo on an iPhone are perfect for this; they capture a short video clip, allowing you to scroll through and select the single most flattering and dynamic frame afterward. You can learn more about capturing motion in our dedicated guide.
Safety First: Protecting Yourself and Your Gear
While capturing the perfect shot is a goal, your personal safety and the security of your equipment are paramount. Traveling solo requires an extra layer of awareness, but with a few sensible precautions, you can create beautiful images with peace of mind.
Situational Awareness is Key
The most effective safety tool you have is your own awareness. Before you even think about setting up your tripod, take a moment to assess your environment. A great photo is never worth compromising your safety.
- Choose your location wisely. Opt for well-populated, well-lit areas to set up your equipment, especially if you’re shooting early in the morning or around sunset. A busy plaza or a popular viewpoint is generally safer than a deserted alleyway.
- Scan your surroundings. Before placing your camera down, take a full 360-degree look around. Notice who is nearby and whether anyone seems to be paying undue attention to you or your bag. This simple habit can help you spot potential trouble before it happens.
- Avoid causing obstructions. Be mindful of where you place your tripod. Setting up in the middle of a narrow, busy sidewalk not only inconveniences others but can also draw unwanted attention and create a tripping hazard. Find a spot slightly off the main path.
Be Quick and Discreet
The less attention you draw to yourself and your expensive gear, the better. Efficiency is your friend when it comes to solo photography. The goal is to blend in as much as possible, get your shot, and move on.
- Plan your shot in advance. Know the composition you want and the settings you need before you take your camera out of the bag. Fumbling with equipment for an extended period can make you appear vulnerable and signals that you have valuable items.
- Work efficiently. Once you’ve planned the shot, the process should be smooth: set up, capture your images, and pack your gear away promptly. The longer your camera is sitting unattended on a tripod, the more opportunity you create for theft.
- Use a non-descript camera bag. A bag that is clearly branded with camera company logos can act as an advertisement for thieves. Consider a standard backpack with a camera insert or a messenger bag that doesn’t scream “expensive equipment inside.”
Trust Your Instincts
This may be the most important piece of advice. Your intuition is a powerful defense mechanism that has been honed by experience. If a particular place, person, or situation makes you feel uneasy, listen to that feeling. There is no photograph in the world that is worth risking your well-being or your equipment. If your gut tells you to leave, pack up immediately and go. Another beautiful location is always just around the corner.
Simple Editing to Make Your Photos Pop
The photograph is not truly finished when you press the shutter. A few thoughtful adjustments in post-processing can elevate a good image into a great one, refining the mood and directing the viewer’s focus. Editing is not about creating an artificial reality, but about bringing out the best qualities that were already present in the moment you captured. This is a core part of Travel Photography.
Essential Adjustments on Your Phone
Today’s smartphones are powerful editing suites. Applications like Lightroom Mobile offer professional-grade control, while Snapseed provides a remarkably intuitive and comprehensive set of tools. Mastering a few fundamental adjustments will dramatically improve your images. For more on this, check out our guide on Travel Photography: Maximizing your mobile device while traveling.
- Cropping & Straightening: This should be your first step. A crooked horizon can be distracting, and a simple straightening action brings immediate balance. Cropping allows you to refine your composition, removing unnecessary elements from the edges of the frame to strengthen the subject. This is a key step in Creative Mobile Photography Compositions.
- Adjusting Exposure: This involves managing the light and dark areas of your photo. You can brighten an image that is too dark (underexposed) or darken one that is too bright (overexposed). Fine-tuning highlights, shadows, and contrast adds depth and prevents details from being lost.
- Boosting Vibrance: While saturation increases the intensity of all colors equally, vibrance is a more subtle tool. It intelligently boosts muted colors while leaving already well-saturated tones alone, resulting in a more natural and appealing enhancement.
Creating a Consistent Style
Developing a consistent editing style gives your collection of travel photos a cohesive and professional feel. This is easily achieved by using presets—saved sets of editing adjustments that you can apply to multiple photos with a single click. Whether you prefer a bright and airy look, a moody and cinematic tone, or a warm, vintage feel, a consistent style turns individual snapshots into a compelling visual narrative. This is particularly effective for a travel series or a social media feed, creating a signature look that is instantly recognizable. This also applies to how you might approach Capturing the Essence of Destinations.
The Magic of Object Removal
Sometimes, a small, distracting element can detract from an otherwise perfect shot—a piece of trash on a pristine beach, an exit sign in a historic building, or an unintentional photobomber at the edge of your frame. Many editing apps now include remarkably effective object removal or “healing” tools. With just a few taps, you can select and erase these minor imperfections, cleaning up the scene and allowing the true subject of your photograph to shine without distraction. This ties into good habits for a Photo Trip.
