Acatenango Trek: Traveler Guide
Scale Acatenango for breathtaking views: Your journey starts here
Dreaming of witnessing a volcanic eruption from the comfort of your tent? The Acatenango Volcano Trek is an iconic Guatemalan adventure, offering unparalleled views of its fiery neighbor, Volcán Fuego. But is this challenging ascent the right fit for your travel aspirations?
This comprehensive traveler guide is designed to answer precisely that. We'll break down what the Acatenango Trek entails, help you determine if it's the adventure you're seeking, and provide essential tips for planning your unforgettable journey. Get ready to prepare for an experience that will literally take your breath away.
Essentials
What is the Acatenango Volcano Trek?
The Allure of Acatenango
Looming over the colonial city of Antigua, Guatemala, stands the majestic Acatenango volcano. Reaching an elevation of 3,976 meters (13,045 feet), this dormant giant offers one of the most sought-after adventures in Central America. The Acatenango trek is a challenging overnight hike that rewards determined travelers with an unparalleled natural spectacle: a direct, front-row view of its fiery twin, the highly active Volcán de Fuego. While demanding, the journey through diverse microclimates to a campsite perched high above the clouds is an unforgettable experience, culminating in a night spent watching the earth come alive. If you’re planning a trip, our Antigua Guatemala Travel Guide offers more insights into this incredible country.
Volcán de Fuego: The Star of the Show
The true heart of the Acatenango experience is not the summit you stand on, but the one you watch. Volcán de Fuego, or “Volcano of Fire,” is in a near-constant state of eruption, a powerful cycle of calm and chaos. From the safety of Acatenango’s slopes, you will witness Fuego’s raw power firsthand. During the day, you’ll see colossal plumes of ash billow into the sky. As night falls, the show truly begins. The darkness reveals Fuego’s fiery core, with brilliant arcs of incandescent lava blasting hundreds of meters into the air, accompanied by deep, thunderous rumbles that vibrate through the ground and your very core.
This is not a distant, passive observation. It is an immersive, sensory experience that connects you to the planet’s fundamental forces. There are remarkably few places on Earth where one can safely witness a powerful volcanic eruption with such clarity and proximity. The Acatenango trek provides a privileged vantage point for this breathtaking display, making it a pilgrimage for hikers, photographers, and anyone looking to be humbled by the sheer power of nature. For more awe-inspiring sights, check out our guide to Tikal.
Is the Acatenango Trek Right for You?
The images of Fuego’s fiery eruptions against a starry sky are undeniably captivating, but it’s important to approach this trek with a clear understanding of its demands. The Acatenango hike is a serious physical and mental undertaking. Before you commit, it’s wise to honestly assess whether this adventure aligns with your capabilities and expectations. For advice on what to bring, consult our Antigua Guatemala Travel Guide.
Assessing the Difficulty
Let’s be clear: this is not a casual walk in a park. The trek is challenging, primarily due to the relentless steepness and the effects of high altitude. The path is often composed of loose volcanic scree and uneven dirt trails, demanding constant focus.
- Physical Challenge: The trail gains approximately 1,500 meters (about 5,000 feet) in elevation over a relatively short distance. The ascent is a continuous uphill battle, and the descent can be just as demanding on the knees. The total round-trip distance is about 18 kilometers (11 miles), which feels significantly longer given the terrain and altitude.
- Mental Challenge: Beyond the physical strain, you’ll need to be prepared for basic, rustic conditions. Camping at nearly 4,000 meters means enduring temperatures that can easily drop below freezing, especially before dawn. A positive mindset and the resilience to push through discomfort are just as crucial as leg strength.
Required Fitness Level
You don’t need to be an elite athlete to conquer Acatenango, but a solid baseline of fitness is essential for a safe and enjoyable experience. The trek is best suited for individuals who are regularly active and have good cardiovascular health. If you can comfortably hike for several hours or engage in activities like running or cycling, you are likely prepared for the physical demands. For those looking to tackle challenging treks, our guide on Atitlan Lake will be invaluable.
No technical climbing skills are required; the challenge lies in pure stamina and endurance. However, due to the significant altitude and physical exertion, this trek is not recommended for individuals with serious respiratory problems, heart conditions, or other medical issues that could be exacerbated by high altitude. You can learn more about Livingston – Travel Guide (Guatemala) to ensure a well-prepared trip.
Altitude Sickness: A Real Concern
Ascending to 3,976 meters (13,045 feet) puts every hiker at risk of developing Acute Mountain Sickness (AMS), regardless of age or fitness level. Recognizing the symptoms and taking preventative measures is critical.
Common early symptoms of AMS include:
- Headache
- Nausea or dizziness
- Fatigue and loss of energy
- Shortness of breath
- Difficulty sleeping
The best way to prevent AMS is to acclimatize properly. Plan to spend at least two to three days in a high-altitude location like Antigua (1,545 m / 5,069 ft) before starting your trek. This allows your body to begin adjusting to the thinner air. During the hike, the golden rules are to stay hydrated by drinking plenty of water (at least 4 liters), maintain a slow and steady pace, and listen to your body. Ascending slowly is far more effective than rushing and becoming ill. For more on what to expect, explore our list of Antigua Guatemala Travel Guide, which includes Antigua.
Planning Your Acatenango Adventure
When is the Best Time to Go?
Deciding when to undertake the Acatenango trek involves a trade-off between weather and crowds. While the hike is offered year-round, conditions vary significantly between Guatemala’s two main seasons. It’s crucial to remember, however, that at nearly 4,000 meters, mountain weather is notoriously unpredictable and can change rapidly at any time of year.
- Dry Season (November to April): This is the most popular period to hike, and for good reason. You can generally expect clearer skies, offering unobstructed views of Fuego’s eruptions and the surrounding landscape. The trade-off is colder temperatures, especially at night, which can drop below freezing at basecamp. The trails are also more crowded during these months.
- Rainy Season (May to October): Often called the “green season,” this period sees the landscape become incredibly lush and vibrant. You’ll encounter fewer fellow hikers on the trail, leading to a more solitary experience. The primary drawback is the higher probability of rain and cloud cover, which can obscure the views of Fuego, particularly in the afternoon and evening. Mornings, however, are often clear.
Choosing a Reputable Tour Company
Selecting the right tour operator is arguably the most critical decision you’ll make when planning your trek. This choice directly impacts your safety, comfort, and the overall quality of your experience. A well-regarded company provides not just a path up the mountain, but also essential gear, knowledgeable guidance, and a support system in a challenging environment. When researching operators, consider the following factors:
- Safety Standards: Inquire about their guide-to-hiker ratio. A smaller group per guide ensures more personal attention. Ask about their emergency protocols, first-aid training, and whether they carry oxygen and communication devices.
- Quality of Gear: The cold at basecamp is intense and not to be underestimated. A good company will provide high-quality, four-season tents, warm sleeping bags with appropriate temperature ratings (-10°C or lower is ideal), and sleeping mats. Some also include warm jackets, gloves, and hats in their rental offerings.
- Inclusions: Clarify exactly what the price covers. It should typically include round-trip transportation from Antigua, all park entrance fees, a set number of meals (usually lunch and dinner on day one, breakfast on day two), and the services of a guide.
- Ethical Practices: Responsible tourism is key. Look for companies that treat their local guides and porters fairly, providing proper wages, meals, and gear. They should also adhere to Leave No Trace principles, ensuring they pack out all waste and minimize their environmental footprint.
- Reviews and Reputation: Read recent reviews from multiple sources. Look for consistent feedback regarding guide knowledge, food quality, gear condition, and overall organization. A long-standing positive reputation is often a reliable indicator of quality.
Overnight Trek vs. One-Day Hike
While both options exist, the experience they offer is vastly different. The vast majority of travelers and guides will strongly recommend the overnight trek, as it allows you to witness the volcano’s true magic while being more manageable for the body. For more on what to expect in Guatemala, check out our Guatemala Travel Guide.
The Overnight Trek (Highly Recommended)
This is the classic Acatenango experience. The ascent is broken up over the course of a day, allowing your body more time to adjust to the altitude. The true reward comes after sunset. From the vantage point of basecamp, you get a front-row seat to Volcán de Fuego’s spectacular nightly eruptions, watching red-hot lava arch across the dark sky. This is followed by a pre-dawn push to the summit for a breathtaking 360-degree sunrise. The pacing is more sustainable and the payoff is immense.
The One-Day Hike (Extremely Strenuous)
This option is only suitable for exceptionally fit and well-acclimatized hikers. It involves ascending and descending the entire volcano in a single, grueling day, often lasting 10-12 hours. While it is faster and avoids a cold night of camping, the cons are significant. You completely miss the nighttime lava spectacle, which is the primary reason most people do the trek. Furthermore, the rapid ascent dramatically increases the risk of developing severe altitude sickness, turning a potentially incredible experience into a physically punishing ordeal. For those tackling high-altitude adventures, we recommend preparing for high altitude treks.
Essential Packing List: What to Bring
Packing correctly for the Acatenango trek is fundamental to your comfort and safety. The goal is not to bring everything, but to bring the right things. You will experience a wide spectrum of conditions, from warm, sunny slopes to freezing, wind-whipped summits, all within a 24-hour period. Thoughtful preparation is key. Refer to our comprehensive What to pack for Guatemala guide for detailed advice.
Clothing: The Art of Layering
The temperature on Acatenango can fluctuate by more than 20°C (40°F) between the trailhead and the peak. Layering your clothing is the most effective strategy to adapt to these changes, allowing you to add or remove items to regulate your body temperature and stay dry.
- Base Layer: A long-sleeve, moisture-wicking shirt is the foundation of your system. Materials like merino wool or synthetics (polyester, nylon) pull sweat away from your skin. Avoid cotton, as it absorbs moisture and will leave you feeling cold and damp.
- Mid Layer: This is your insulation layer. A fleece jacket, a packable down jacket, or a synthetic insulated puffy are all excellent choices. You will rely on this for warmth at basecamp and during the cold summit push.
- Outer Layer: Your shield against the elements. A waterproof and windproof jacket and pants are crucial. The weather can turn quickly, and this layer will protect you from rain and the powerful, biting winds near the top.
- Bottoms: Comfortable hiking pants are a must. Look for materials that are durable and offer some stretch. Hiking leggings can work, but consider a windproof layer over them. Do not wear jeans; they are restrictive, heavy, and dangerously cold when wet.
- Socks: Pack at least two pairs of warm socks made from wool or a synthetic blend. A dry pair to change into at camp can make a world of difference for comfort and warmth.
- Warm Accessories: These small items are non-negotiable. A warm beanie or winter hat, a pair of gloves (water-resistant is a plus), and a scarf or buff will protect your extremities from the severe cold you’ll encounter before sunrise at the summit.
Footwear and Gear
Your primary equipment will be your direct interface with the challenging terrain. Reliable gear makes the physical demands of the trek far more manageable and safe.
- Hiking Boots: Sturdy, waterproof boots with good ankle support are your most important piece of gear. To prevent painful blisters, ensure they are well broken-in before you arrive in Guatemala.
- Backpack: A 40-50 liter backpack is generally sufficient to carry your layers, water, snacks, and personal items. Look for one with a supportive hip belt and adjustable shoulder straps to distribute the weight effectively.
- Trekking Poles: Highly recommended. A set of trekking poles will provide stability on the steep, uneven paths and significantly reduce the impact on your knees, especially during the long descent on loose scree.
- Headlamp: An absolute essential. You will need it for navigating basecamp after sunset and for the entire pre-dawn hike to the summit. Remember to pack extra batteries.
- Water: Proper hydration is critical for acclimatization and performance. You must carry a minimum of 4 liters of water per person. A hydration reservoir (like a CamelBak) is often more convenient for sipping on the move than traditional bottles.
Personal Items and Extras
These smaller essentials address personal comfort, safety, and the practicalities of the journey, ensuring you are prepared for minor issues and can fully enjoy the experience.
- Sun Protection: The sun’s UV radiation is significantly more intense at high altitude. Pack high-SPF sunscreen, sunglasses, and a hat for sun protection during the ascent.
- Personal Medications: Carry any necessary personal prescriptions. It’s also wise to have a small kit with pain relievers (ibuprofen can help with altitude-related headaches), antiseptic wipes, and blister treatment such as Moleskin or athletic tape.
- Snacks: While tour companies provide meals, your body will be burning a tremendous number of calories. High-energy snacks like nuts, trail mix, granola bars, and chocolate are perfect for maintaining your energy levels between meals.
- Power Bank: The cold temperatures will drain your phone and camera batteries much faster than usual. A fully charged portable power bank is essential if you want to capture the nighttime eruptions and sunrise.
- Cash: Bring a small amount of Guatemalan Quetzales. You may need it to rent extra gear at the trailhead, purchase a walking stick from a local vendor, or to tip your guides and porters for their excellent service.
The Trek Itinerary: A Step-by-Step Guide
The standard overnight trek is a two-day journey that packs in a lifetime of memories. While the exact timing can vary slightly between tour operators, the rhythm of the experience follows a well-trodden path. Here is a detailed breakdown of what you can expect.
Day 1: The Ascent to Basecamp
The first day is all about the challenging but beautiful climb from the trailhead to your home for the night, a rustic camp perched on the flank of Acatenango.
Your day will begin with an early morning pickup from your accommodation in Antigua. This is followed by a stop at your tour company’s office for a final briefing, gear distribution, and a chance to rent any last-minute items like trekking poles or warmer gloves. From there, it’s about an hour’s drive to the trailhead in the small mountain village of La Soledad, situated at approximately 2,400 meters (7,875 feet). After a final check, you’ll begin the ascent.
The Four Microclimates
One of the most remarkable aspects of the climb is how the landscape transforms around you. The trail takes you through four distinct environmental zones:
- Farmland: The first hour or so is a steep and dusty climb through local milpa fields. The sun can be strong here, and the path is often loose underfoot. This section serves as a potent warm-up for what’s to come.
- Cloud Forest: You’ll soon enter a cooler, more humid environment. The air grows thick with moisture, and the scenery shifts to lush, green vegetation and towering trees. This section offers welcome shade and a completely different atmosphere.
- High Alpine Forest: As you continue to gain altitude, the cloud forest gives way to a sparse forest of pine and other high-altitude trees. The air becomes noticeably thinner, and the views begin to open up, offering your first glimpses of the surrounding volcanic chain.
- Volcanic Zone: The final push to basecamp takes you above the treeline. The terrain is now dominated by dark volcanic scree and hardy, low-lying grasses. This is where you truly feel you’re on a volcano, with the summit in sight and the cone of Fuego looming nearby.
After approximately four to six hours of hiking, you will arrive at basecamp, typically situated around 3,600 meters (11,800 feet). You’ll be shown to your tent to drop your pack and take a well-deserved rest. As the afternoon light fades, the guides will prepare dinner and a warm campfire.
Then, the real show begins. As darkness falls, Volcán de Fuego awakens. The experience is profoundly sensory. You don’t just see it; you feel it. A deep, guttural rumble vibrates through the ground and into your chest, a sound that feels as old as the earth itself. Moments later, the night sky is pierced by a fountain of brilliant red and orange lava, arcing from Fuego’s crater before cascading down its slopes. Above, with minimal light pollution, the Milky Way stretches across the sky, a silent, glittering backdrop to the raw power unfolding before you.
Optional Fuego Saddle Hike
For the most adventurous and physically prepared hikers, some tour companies offer an additional hike from basecamp over to the ridge, or “saddle,” between Acatenango and Fuego. This is not a decision to be taken lightly.
This side-hike involves a steep descent of several hundred meters on loose scree, followed by an equally grueling ascent up the side of Fuego to get you perilously close to the action. The round trip can take an additional three to four hours and is typically done in the dark, guided by headlamps. The reward is an earth-shattering, front-row seat to the eruptions. The downside is the extreme physical toll it takes, which can jeopardize your ability to complete the main summit push to Acatenango the next morning. Carefully weigh the immense reward against the significant effort and risk of exhaustion before committing.
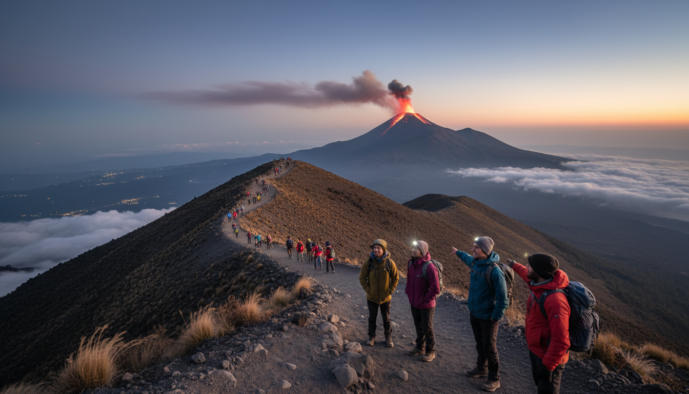
Day 2: Summit Sunrise and Descent
The second day starts long before the sun appears. The wake-up call usually comes around 4:00 AM. After a quick coffee or tea, you’ll leave your main pack at camp and begin the final ascent to the true summit of Acatenango with just the essentials.
This final summit push is arguably the most difficult part of the trek. It’s a steep, one-to-two-hour climb on deep, loose volcanic scree, often described as taking two steps forward and one step back. The hike is done in the pitch black and biting cold, with only the light from your headlamp to guide your way. It is a true test of mental and physical fortitude.
Your effort is repaid a hundredfold when you reach the summit crater at 3,976 meters. As the first light of dawn creeps over the horizon, a breathtaking 360-degree panorama is revealed. You can see the distant peaks of other Guatemalan volcanoes, including Agua, Pacaya, and even the chain stretching towards Lake Atitlán on a clear day. Below you, the cone of Fuego continues its regular performance, erupting with a plume of ash that catches the golden light of the rising sun. It is a humbling and unforgettable moment.
After soaking in the views, you’ll begin the careful descent back to basecamp, where the guides will have a warm breakfast waiting. Once you’ve refueled and packed your gear, the long descent back to La Soledad begins. The three-to-four-hour hike down can be tough on the knees, making trekking poles an invaluable asset. You’ll arrive back at the trailhead in the late morning or early afternoon, tired but triumphant, ready for the shuttle ride back to Antigua.
Practical Information and FAQs
Food and Water on the Trail
Most tour companies provide basic but hearty meals to fuel you for the hike. Typically, this includes a packed lunch for day one, a warm dinner at basecamp (often pasta or a local stew), and a simple breakfast before the final summit push. While nourishing, these meals are designed for function. It is highly recommended to supplement them with your own supply of high-energy snacks. Items like trail mix, chocolate, protein bars, and dried fruit are invaluable for quick energy boosts and can significantly lift your spirits during challenging parts of the climb.
Hydration is critical at high altitudes. The standard recommendation is to carry a minimum of 4 liters of water per person for the overnight trek. Some guides may offer a water refill at basecamp, but this is not always guaranteed. You can sometimes purchase water or other drinks in the village of La Soledad at the trailhead, but it’s safest and most economical to arrive with your full supply. A hydration bladder is convenient, but be aware that the tube can freeze on the cold summit morning.
Costs and Tipping
The price for a guided overnight trek on Acatenango can vary, generally ranging from around $50 to over $150 USD. The cost often reflects the quality of the operator, including the condition of the camping gear, the guide-to-hiker ratio, the quality of the food, and the company’s ethical standards. Cheaper options might cut corners on safety or comfort, so it’s wise to research what is included.
- Typically Included: Round-trip transportation from Antigua, local guide services, park entrance fees, three meals (lunch, dinner, breakfast), and basic camping equipment (tent, sleeping bag, mat).
- Typically Not Included: Rental of extra clothing (jackets, pants, gloves), trekking poles, backpacks, personal snacks and drinks, and tips for the guides and porters.
Tipping is customary and greatly appreciated, as it forms a significant portion of the guides’ income. A general guideline is to tip 50-75 Quetzales (approximately $7-10 USD) per hiker for the lead guide for the two-day trek. If you hire a porter, a similar amount is appropriate. It’s best to give the tip directly to your guide and porter in cash at the end of the journey.
Safety and Emergency Procedures
Your guide is your most important safety asset on the mountain. They are responsible for navigation, setting a safe pace, monitoring weather conditions, and identifying symptoms of altitude sickness or hypothermia. Reputable companies ensure their guides are trained in first aid and have established emergency protocols. Always listen to their instructions and communicate any discomfort or concerns immediately.
In the event of severe altitude sickness, a serious injury, or another emergency, the guide will make the decision to descend. Evacuation is typically done on foot, sometimes with assistance from other guides or local “taxi” services (being carried down on someone’s back for a fee). It is crucial to have travel insurance that covers high-altitude trekking.
Staying warm is a primary safety concern, especially at night and during the pre-dawn summit hike when temperatures can drop below freezing. Avoid hypothermia by dressing in proper layers, protecting your extremities with a hat and gloves, and changing out of any wet clothes as soon as you reach basecamp. Your sleeping bag is your best defense against the cold overnight; ensure it has an appropriate temperature rating for the conditions.
Photography Tips for Acatenango
Capturing the raw power of Volcán de Fuego is a highlight for many trekkers. To photograph the lava eruptions at night, you will need a camera with manual controls and a stable tripod.
- Night Eruptions: Use a long exposure to capture the glowing lava trails. Start with settings like ISO 800-1600, an aperture of f/2.8 to f/4, and a shutter speed between 5 and 15 seconds. Adjust based on the brightness of the eruption and ambient light.
- Gear Protection: The volcanic environment is harsh. Protect your camera and lenses from fine volcanic dust with a rain cover or even a simple plastic bag. In the cold, battery life drains quickly, so keep spare batteries in an inside pocket close to your body heat.
- Best Shots: Basecamp offers a fantastic, stable vantage point for the nighttime lava show. The summit at sunrise provides breathtaking 360-degree panoramas of the Guatemalan highlands, often above a “sea of clouds,” with the silhouettes of other volcanoes (Agua, Pacaya) in the distance and Fuego erupting below you.
