Dolomites for photographers : a photography destination guide
Why the Dolomites are a Photographer’s Dream
The Dolomites, a UNESCO World Heritage site nestled in the Northern Italian Alps, present a realm of unparalleled beauty that has long captivated artists and adventurers alike. For photographers, this mountainous region is more than just a picturesque backdrop; it is a dynamic canvas, offering an extraordinary confluence of elements that transform image-making into a deeply rewarding pursuit. The unique geology, the ever-shifting moods of light and weather, the surprisingly accessible grand vistas, and the distinct character of each season converge to create a destination of endless photographic potential.
Unique Alpine Landscapes
The very essence of the Dolomites’ photographic allure lies in their distinctive geological makeup. The pale carbonate rock, known as dolomite, forms breathtaking vertical walls, jagged spires, and colossal towers that rise dramatically from verdant valleys and alpine meadows. These formations, sculpted by millennia of erosion, possess a monumental quality, their sheer faces and sharp ridgelines creating powerful silhouettes against the sky. Unlike the more rounded peaks found in some other Alpine ranges, the Dolomites offer a stark, sculptural beauty. This interplay of imposing rock structures with the softer elements of forests, crystalline lakes, and flower-strewn pastures provides a rich tapestry of textures and contrasts, a constant invitation to explore composition and form.
Dramatic Light and Weather
Light in the Dolomites is a spectacle in itself. The region is renowned for “enrosadira,” a phenomenon where the dolomite peaks are bathed in hues of pink, orange, and crimson at sunrise and sunset. This ethereal glow, a result of the rock’s unique mineral composition, offers moments of sublime beauty that photographers strive to capture. Beyond these golden hours, the weather systems moving across the Alps contribute to an ever-changing atmospheric drama. Swiftly moving clouds can cast fleeting shadows, mists can rise from the valleys to shroud the peaks in mystery, and sudden storms can imbue the landscape with a raw, untamed power. This dynamism means that the same scene can offer a multitude of photographic interpretations, rewarding patience and a keen eye for the ephemeral.
Accessibility of Epic Views
One of the most compelling aspects of the Dolomites for photographers is the relative ease with which many of its most spectacular viewpoints can be reached. An extensive network of well-maintained roads, scenic mountain passes, and efficient cable car systems provides access to high-altitude locations that would otherwise require strenuous expeditions. This accessibility allows photographers of varying physical abilities to witness and capture breathtaking panoramas without necessarily undertaking challenging alpine ascents. While remote wilderness experiences are certainly available for the more adventurous, many iconic vistas are but a short walk from a car park or cable car station, democratising the opportunity to photograph these grand landscapes.
Seasonal Photographic Diversity
The Dolomites present a dramatically different, yet equally captivating, face with each passing season, ensuring a renewed sense of discovery for returning photographers. Spring sees the valleys burst into life with vibrant wildflowers and the roar of waterfalls fed by melting snow. Summer unveils lush green pastures under expansive blue skies, ideal for capturing the grandeur of the peaks during long hiking days. Autumn transforms the landscape into a painter’s palette, as larch forests turn brilliant gold against the crisp, clear air. Winter then blankets the mountains in a serene layer of snow, creating minimalist compositions and opportunities for capturing the quiet magic of snowscapes and frozen lakes. This constant transformation offers a rich and varied photographic journey throughout the year.
Planning Your Dolomites Photography Trip
A successful photography expedition to the Dolomites hinges on thoughtful planning. From choosing the optimal season to packing the right equipment, careful preparation allows you to focus on capturing the breathtaking scenery once you arrive. This section offers guidance on these crucial aspects.
Best Seasons for Photography
The Dolomites present distinct photographic opportunities throughout the year. Your choice of season will significantly influence the character of your images, the accessibility of certain locations, and the overall experience.
Spring: Wildflowers and Waterfalls
As the winter snows recede, typically from late May through June, spring breathes new life into the Dolomites. Alpine meadows burst into colour with a vibrant display of wildflowers, creating beautiful foreground interest against the still snow-capped peaks. Melting snow swells the waterfalls, offering dynamic subjects for long exposures. The light is often clear, and the valleys are less crowded than in peak summer. However, higher trails may still be inaccessible due to lingering snow, and weather can be unpredictable.
Summer: Lush Greens and Hiking Access
July and August represent the peak of summer, characterized by lush green pastures, warm temperatures, and generally stable weather, making it ideal for extensive hiking. All trails and mountain passes are usually open, providing access to high-altitude viewpoints. The longer days offer extended periods of golden hour light. The trade-off is that this is also the busiest tourist season, meaning popular spots can be crowded, and accommodation often requires booking well in advance.
Autumn: Golden Larches and Crisp Air
Many photographers consider autumn, particularly from late September to mid-October, the most visually rewarding season. The larch trees turn brilliant shades of gold and orange, contrasting beautifully with the pale Dolomite rock and often the first dustings of fresh snow on the peaks. The air is crisp, the light is often soft and ethereal, and the summer crowds have thinned. Mornings can bring atmospheric mist in the valleys. Be prepared for cooler temperatures, especially at higher elevations, and the possibility of early snowfalls closing some passes.
Winter: Snowscapes and Serenity
From December to March, the Dolomites transform into a winter wonderland. Snow blankets the landscape, creating stark, minimalist compositions and emphasizing the sculptural forms of the mountains. The low winter sun casts long shadows and provides beautiful light throughout the day. It’s a period of quiet serenity, with fewer visitors. However, access to many locations is restricted, and photography often involves snowshoeing or skiing. Roads can be challenging, and cold weather preparedness is paramount for both yourself and your equipment.
Getting To and Around the Dolomites
Reaching the Dolomites and navigating within the region requires some planning, as the area is mountainous and spread out.
Major Airports and Drive Times
The most convenient international airports for accessing the Dolomites are:
- Venice Marco Polo (VCE), Italy: Approximately 2-3 hours drive to the southern Dolomites (e.g., Cortina d’Ampezzo).
- Innsbruck (INN), Austria: Approximately 1.5-2.5 hours drive to the northern Dolomites (e.g., Val Gardena, Alta Badia).
- Verona Valerio Catullo (VRN), Italy: Approximately 2-3 hours drive to the western Dolomites.
- Treviso (TSF), Italy: A smaller airport often served by budget airlines, also around 2-3 hours from Cortina.
- Munich (MUC), Germany: Further afield, but a viable option, around 3.5-4.5 hours drive to the northern areas.
Drive times are estimates and can vary significantly based on traffic, road conditions (especially in winter), and your specific destination within the vast Dolomites region.
Renting a Car: Freedom to Explore
For photographers, renting a car is highly recommended. It offers unparalleled freedom and flexibility to chase the light, reach remote trailheads early in the morning or late in the evening, and adapt your plans based on weather conditions. Opt for a vehicle with decent ground clearance if you plan to explore smaller roads, and ensure you have appropriate tires (winter tires or all-seasons with snow chain capability) if travelling between October and April. Familiarise yourself with Italian road signs and driving customs, including ZTL (Zona Traffico Limitato – Limited Traffic Zones) in town centres.
Public Transport: Options and Limitations
While the Dolomites have a reasonably good public bus network (services like Südtirol Mobil and Dolomiti Bus), relying solely on public transport can be restrictive for photographers. Bus schedules may not align with optimal shooting times (sunrise/sunset), and access to more remote trailheads can be limited or infrequent. However, for travel between major valleys or if you prefer not to drive, it’s a viable option, particularly during the summer months when services are more frequent. Some cable cars and chairlifts also operate, providing access to higher elevations, but their operating seasons vary.
Accommodation for Photographers
The Dolomites offer a range of accommodation options to suit different preferences and photographic itineraries.
Rifugios: Mountain Hut Experiences
Staying in a *rifugio* (mountain hut) is a quintessential Dolomites experience. These huts are strategically located high in the mountains, often close to iconic viewpoints or at the start of important trails. They provide a unique opportunity to be on location for sunrise and sunset without pre-dawn hikes from valley towns. Accommodation is typically in shared dormitories or smaller private rooms, with hearty meals often included. Booking well in advance, especially for popular rifugios during peak season, is essential. Be aware that facilities can be basic, but the proximity to stunning landscapes is unmatched.
Hotels and Guesthouses in Key Valleys
The main valleys, such as Val Gardena, Alta Badia, Val di Fassa, and Cortina d’Ampezzo, offer a wide array of hotels, guesthouses (*garnis*), and bed & breakfasts. These provide more comfort and amenities than rifugios and serve as excellent bases for exploring multiple locations. Choosing a strategically located base can minimise driving times. Again, booking ahead is advisable, particularly for summer and autumn.
Camping Considerations
Camping offers a budget-friendly option and a closer connection to nature. There are official campsites in many valleys with varying levels of facilities. Wild camping is generally not permitted in the Dolomites, as much of the area is protected parkland or private property. If considering camping, research specific regulations for the areas you plan to visit and always adhere to Leave No Trace principles. Some areas may allow bivouacking (a temporary, lightweight overnight shelter) above the treeline, but rules vary and should be checked locally.
Essential Photography Gear
While the photographer’s vision is paramount, having appropriate gear will help you make the most of the Dolomites’ photographic potential.
Camera Bodies and Lenses (Wide, Mid, Telephoto)
A camera body that performs well in varying light conditions and offers manual controls is advisable. Full-frame sensors are popular for their dynamic range and low-light performance, but APS-C cameras are also perfectly capable.
- Wide-angle lens (e.g., 16-35mm, 14-24mm): Essential for capturing the grand scale of the mountain landscapes, sweeping valleys, and dramatic skies.
- Mid-range zoom (e.g., 24-70mm, 24-105mm): A versatile workhorse lens for a variety of compositions, from broader scenes to more focused details.
- Telephoto lens (e.g., 70-200mm, 100-400mm): Invaluable for isolating distant peaks, compressing perspectives, capturing details on mountain faces, and wildlife if encountered.
Tripods and Remote Shutters
A sturdy tripod is non-negotiable for landscape photography, especially for shooting in low light (sunrise, sunset, blue hour, astrophotography), for long exposures, and for techniques like focus stacking or panoramas. Ensure it’s robust enough to handle potential wind but light enough to carry on hikes. A remote shutter release (cabled or wireless) helps to avoid camera shake during exposures.
Filters: ND, Graduated ND, Polarizers
- Neutral Density (ND) Filters: Used to reduce the amount of light entering the lens, allowing for longer shutter speeds to blur water, clouds, or create a sense of motion. Strengths like 3-stop, 6-stop, and 10-stop are useful.
- Graduated Neutral Density (GND) Filters: Help to balance the exposure in scenes with a bright sky and a darker foreground. Soft and hard edge graduates are both useful depending on the horizon line.
- Circular Polarizer (CPL) Filter: Reduces glare and reflections from water and wet surfaces, enhances blue skies, and increases colour saturation in foliage. An essential filter for mountain photography.
Batteries, Memory Cards, and Power Banks
Cold temperatures can drain batteries quickly, so bring multiple spares and keep them warm (e.g., in an inside pocket). Carry ample high-capacity memory cards; shooting in RAW format (highly recommended) consumes more space. A power bank can be very useful for recharging camera batteries (if your charger supports USB), your phone, or other electronic devices, especially if staying in rifugios with limited charging points.
Weather Protection for Gear
The mountain weather is unpredictable. Protect your camera and lenses from rain, snow, and dust. A dedicated rain cover for your camera and lens is a good investment. Even a simple plastic bag can offer temporary protection in a pinch. Ensure your camera bag itself offers some level of weather resistance.
Non-Photography Essentials
Beyond your camera kit, certain items are crucial for a safe and comfortable photography trip in the mountains.
Layered Clothing and Hiking Boots
Mountain weather can change rapidly. Dress in layers to adapt to varying conditions. Start with a moisture-wicking base layer, add an insulating mid-layer (fleece or down jacket), and finish with a waterproof and windproof outer shell. Sturdy, waterproof hiking boots with good ankle support and grip are essential for navigating uneven and potentially slippery trails.
Navigation Tools (Maps, GPS, Apps)
Even on well-marked trails, it’s important to have reliable navigation tools. Carry a detailed physical map of the area (Tabacco maps are excellent for the Dolomites) and a compass, and know how to use them. A dedicated GPS device or a smartphone with a GPS app (e.g., Komoot, Gaia GPS) and downloaded offline maps can be very helpful. Do not rely solely on your phone, as batteries can die, and signal can be unreliable.
Sun Protection and Hydration
The sun’s rays are stronger at higher altitudes, even on cloudy days. Use high-SPF sunscreen, wear a wide-brimmed hat, and protect your eyes with good quality sunglasses. Dehydration can also be a significant issue; carry an adequate supply of water (at least 1.5-2 litres per person for a moderate hike) and drink regularly. Consider a water filter or purification tablets if you plan on refilling from mountain streams.
Iconic Dolomites Photography Locations
The Dolomites are punctuated by an array of celebrated locations, each offering distinct photographic narratives. These are not merely spots on a map but grand stages where light, weather, and geology conspire to create moments of profound beauty. Understanding these key areas is fundamental to planning a rewarding photographic expedition.
Tre Cime di Lavaredo (Drei Zinnen)
The three towering peaks of Tre Cime di Lavaredo are, without doubt, one of the most emblematic symbols of the Dolomites. Their sheer north faces present a formidable and captivating subject for any photographer. The area around them provides numerous vantage points, allowing for diverse compositions throughout the day and seasons.
Classic Viewpoints and Access
Access to the primary viewpoints is typically gained via a toll road leading from Misurina up to Rifugio Auronzo, situated at the base of the peaks on the southern side. From here, a well-maintained, relatively flat trail (Path 101) begins the circular route around the Tre Cime. One of the first classic views unfolds as you approach Forcella Lavaredo, looking towards the iconic north faces. Another key spot is near Rifugio Locatelli (Dreizinnenhütte), which offers a direct and imposing view of the peaks.
Best Light: Sunrise and Sunset Spots
Sunrise is particularly magical at Tre Cime. From Forcella Lavaredo, or slightly further along the path towards Rifugio Locatelli, the rising sun can illuminate the eastern faces of the peaks with a warm alpenglow. For sunset, positions to the west of Rifugio Auronzo, or even from the Cadini di Misurina viewpoint further south (though offering a different perspective of Tre Cime), can yield dramatic light on the western flanks. The changing light throughout the golden hours offers a continuous spectacle.
Hiking Routes for Varied Perspectives
The standard loop trail (paths 101 and 105) around the Tre Cime is approximately 10 kilometers and offers constantly evolving perspectives of the peaks and surrounding mountains. For more adventurous photographers, ascents to nearby summits like Sasso di Sesto (Sextner Stein) or Monte Paterno (Paternkofel) – the latter requiring via ferrata gear and experience – can provide elevated and unique angles. Exploring the trails leading away from the main circuit can also reveal less common compositions.
Seceda Ridgeline
The Seceda ridgeline, with its dramatically serrated peaks of the Odle (Geisler) group, offers one of the most instantly recognizable and breathtaking panoramas in the Dolomites. Its grassy slopes plunge sharply, creating a striking contrast with the jagged rock formations.
Reaching the Summit
The summit area of Seceda (2500m) is conveniently accessible. The most common approach is via a two-stage cable car journey from Ortisei in Val Gardena: first to Furnes, then onwards to Seceda. From the top station, it’s a short, straightforward walk to the iconic viewpoint overlooking the ridgeline and the Fermeda towers.
Compositional Opportunities
The primary draw is the view looking southwest along the ridgeline, where the peaks seem to slice the sky. The undulating grassy foreground, often adorned with wildflowers in summer, provides excellent leading lines. Panoramas are particularly effective here. Experiment with different focal lengths to isolate specific peaks or capture the grandeur of the entire scene. The cliff edge itself offers a powerful visual element.
Capturing the Odle Peaks
The Odle (Geisler) peaks, including Sass Rigais and the Furchetta, are the stars of the show. Morning light can beautifully illuminate their eastern faces, while sunset can cast a warm glow. The interplay of light and shadow across their complex structures provides endless photographic interest. Consider compositions that emphasize their verticality and rugged texture.
Alpe di Siusi (Seiser Alm)
Alpe di Siusi is Europe’s largest high-altitude alpine meadow, a vast expanse of rolling pastures, charming wooden huts, and meandering streams, all set against the dramatic backdrop of the Sassolungo (Langkofel) and Sassopiatto (Plattkofel) massifs.
Rolling Pastures and Iconic Huts
The gentle contours of Alpe di Siusi offer a softer, more pastoral photographic experience compared to the starker high peaks. The landscape is dotted with traditional wooden huts and barns, which make for compelling focal points. Look for compositions that use fences, pathways, or small streams as leading lines towards these structures or the mountains beyond. The texture of the meadows themselves can be a beautiful element.
Sassolungo and Sassopiatto Backdrops
The imposing figures of Sassolungo and Sassopiatto dominate the southern and eastern horizons of Alpe di Siusi. They provide a powerful counterpoint to the gentle foregrounds. Sunrise and sunset can paint these peaks in stunning colours, reflected in small ponds or streams if conditions are right. Their presence anchors many classic Alpe di Siusi compositions.
Seasonal Variations
Alpe di Siusi transforms dramatically with the seasons. Spring brings a carpet of wildflowers and vibrant green pastures. Summer offers lush landscapes and excellent hiking conditions. Autumn sees the larches (if present in specific areas accessible from the Alm) turn golden, and a crispness in the air. Winter covers the meadow in a thick blanket of snow, creating a serene, minimalist aesthetic ideal for photography.
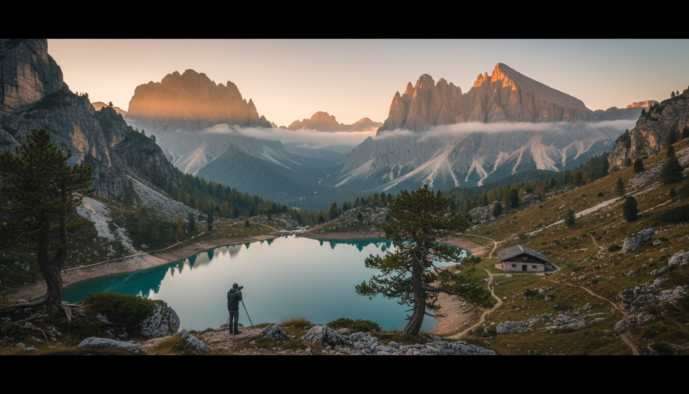
Lago di Braies (Pragser Wildsee)
Nestled in the Pragser Tal valley, Lago di Braies is renowned for its emerald waters, the iconic wooden boathouse, and the imposing Seekofel (Croda del Becco) massif that rises majestically from its southern shore. Its beauty has made it exceptionally popular.
The Famous Boathouse and Reflections
The scene of the traditional wooden rowboats moored by the rustic boathouse, with the lake reflecting the Seekofel, is perhaps one of the most photographed in the Dolomites. Achieving this shot requires calm conditions for clear reflections. Early morning, before the boats are rented out and the water is disturbed, is often preferred.
Managing Crowds for Better Shots
The popularity of Lago di Braies means it can become very crowded, especially during peak season and midday. To capture its tranquility, an early morning arrival (before sunrise) is highly recommended. Alternatively, late afternoon after many day-trippers have departed can also offer better opportunities. Visiting during the shoulder seasons (spring or late autumn) may also result in a more peaceful experience.
Alternative Angles and Trails
While the boathouse view is iconic, explore the well-maintained trail that circumnavigates the lake (approximately 1.5 hours). This path offers numerous alternative perspectives of the lake, the surrounding forests, and the Seekofel. Vantage points from the western or eastern shores can provide beautiful side-lit views, and small beaches or coves offer different foreground interest.
Lago di Carezza (Karersee)
Known as the “Rainbow Lake” (Lec de Ergobando in Ladin) due to its vibrant, changing colours, Lago di Carezza is a small but stunning alpine lake. Its waters reflect the spires of the Latemar mountain group, creating a scene of remarkable beauty.
The “Rainbow Lake” and Latemar Group
The lake’s extraordinary colours, ranging from deep blue to emerald green, are attributed to the minerals in its waters and the surrounding forest. The jagged peaks of the Latemar massif, often dusted with snow even outside of deep winter, provide a dramatic and iconic backdrop. The contrast between the dark forest, the colourful water, and the pale dolomite rock is captivating.
Accessibility and Best Times to Visit
Lago di Carezza is very easily accessible, with a large car park directly across the road and a pedestrian underpass leading to a viewing platform and a path around the lake. For the best light and reflections, early morning is ideal when the water is most likely to be calm. Late afternoon can also be beautiful as the setting sun illuminates the Latemar peaks. Due to its accessibility, it can get busy, so an early or late visit is advisable.
Passo Giau
Passo Giau is one of the highest and most scenic mountain passes in the Dolomites, offering breathtaking 360-degree panoramic views. The distinctive peak of Ra Gusela is its most immediate and recognizable feature, but the vistas extend much further.
Panoramic Vistas and Ra Gusela
From the summit of Passo Giau (2236m), the views are truly expansive. Ra Gusela stands prominently, but the panorama also includes views towards the Marmolada, Tofane, Croda da Lago, Averau, Nuvolau, and many other peaks. The vast, open landscape provides a sense of scale and grandeur. The small chapel at the pass can also serve as a foreground element.
Roadside Shots and Short Hikes
Many compelling photographs can be taken directly from the roadside at the pass or from the immediate vicinity of the Rifugio Passo Giau. For those willing to explore a little, short hiking trails radiate from the pass, offering slightly different perspectives and foreground opportunities. Even a brief walk can reveal new angles on Ra Gusela or frame distant peaks in interesting ways.
Cinque Torri
The Cinque Torri (Five Towers) are a striking group of rock formations, unique in their appearance and set within a landscape rich with World War I history. They are a popular destination for hikers, climbers, and photographers alike.
Unique Rock Formations and WWI History
The towers themselves – Torre Grande being the largest – offer fascinating subjects with their varied shapes and sheer faces. The area is also an open-air museum, with restored trenches, emplacements, and information panels detailing the fierce fighting that
Lesser-Known Gems and Off-the-Beaten-Path Spots
While the iconic locations of the Dolomites offer undeniably spectacular photographic opportunities, a true exploration reveals a wealth of lesser-known gems. Venturing beyond the most frequented viewpoints allows for a more personal connection with the landscape and the chance to capture truly unique images. This pursuit of the unfamiliar often rewards the photographer with serene beauty and a deeper appreciation for the region’s diverse character.
Discovering Hidden Valleys
The Dolomites are a complex network of valleys, many of which remain tranquil and relatively untouched by mass tourism. These hidden valleys, often branching off from their more famous counterparts, offer a glimpse into a quieter alpine world. Here, you might find traditional farmsteads, secluded chapels, and distinctive perspectives of familiar peaks, or entirely new mountain scenes altogether. Exploring these areas requires a bit more research, perhaps poring over detailed topographic maps or seeking advice from local residents. The effort, however, can lead to photographs imbued with a sense of discovery and intimacy, far from the well-trodden paths. Consider dedicating time to simply drive or hike into these less-publicised areas, allowing curiosity to guide your lens.
Exploring Smaller Mountain Passes
Beyond the grandeur of the major passes, numerous smaller, less-travelled mountain roads wind their way through the Dolomites. These routes often provide equally compelling photographic subjects, from the engineering of the roads themselves to the unexpected vistas they unveil. The journey over these passes is as much a part of the experience as the destination, offering a continuous unfolding of landscapes.
Passo Falzarego and Lagazuoi
Passo Falzarego, steeped in World War I history, offers a dramatic landscape marked by rugged peaks and remnants of wartime fortifications. The views towards the Cinque Torri and Tofane mountains are particularly noteworthy. A cable car from the pass ascends to Mount Lagazuoi, providing an exceptional vantage point. From the summit, one can access the Rifugio Lagazuoi, famous for its panoramic terrace, and explore a network of tunnels and trenches. Photographically, Lagazuoi is remarkable at sunrise and sunset, offering sweeping views across multiple mountain groups. It also serves as a gateway to high-altitude trails for further exploration.
Passo Sella and Passo Pordoi
While relatively well-known, Passo Sella and Passo Pordoi still offer numerous opportunities for photographers willing to explore beyond the immediate vicinity of the road. Passo Sella provides imposing, close-up views of the Sella Towers and the Sassolungo group, their sheer rock faces catching the light in dramatic ways. Though it can be bustling, short hikes away from the main parking areas can lead to quieter perspectives. Passo Pordoi, with its historic road and the cable car ascending to Sass Pordoi (the “Terrace of the Dolomites”), offers commanding views towards the Marmolada glacier. The hairpin bends of the pass road itself can become interesting compositional elements, especially with long exposures of light trails during twilight.
Finding Unique Compositions Beyond Postcard Views
The allure of replicating iconic photographs is understandable, yet the true artistry in landscape photography often lies in discovering a personal vision. The Dolomites, with their multifaceted beauty, are an ideal canvas for such pursuits. Strive to look beyond the obvious postcard shot. This might involve focusing on intimate details within the grand scene: the texture of weathered rock, the delicate forms of alpine flora against a mountain backdrop, or the interplay of light and shadow on a distant ridge. Experiment with different focal lengths; a telephoto lens can isolate compelling patterns and shapes, while a wide-angle, used thoughtfully with strong foreground interest, can create immersive perspectives. The key is to slow down, observe keenly, and interpret the landscape in a way that reflects your own experience and sensibility.
Tips for Scouting New Locations
Discovering your own unique photographic spots in the Dolomites can be immensely rewarding. Effective scouting is a blend of preparation and in-field observation.
- Detailed Map Study: Invest in high-quality topographic maps of the region (such as Tabacco maps). Study contour lines to understand the terrain, identify potential viewpoints, alpine lakes, interesting ridgelines, or secluded valleys that might be overlooked.
- Utilise Digital Tools: Satellite imagery from services like Google Earth can be invaluable for virtually exploring areas, assessing accessibility, and getting a sense of potential compositions. Photo-sharing platforms can offer inspiration, but aim to use them to identify areas of interest rather than specific shots to replicate. Hiking apps often feature user-submitted photos geo-tagged to trails, which can also be a source of ideas.
- Seek Local Insights: Don’t hesitate to converse with locals, such as rifugio hosts or experienced hikers. They often possess a wealth of knowledge about less-frequented spots that offer beautiful views or unique conditions.
- On-the-Ground Reconnaissance: If possible, visit a potential location without the pressure of capturing the perfect shot. This allows you to assess light at different times of day, explore various angles, and understand the logistical aspects of returning for a dedicated photo session.
- Embrace Serendipity: While planning is crucial, remain open to unexpected discoveries. Sometimes the most compelling images are found when you allow yourself to wander and respond to what the landscape presents in the moment.
Dolomites Photography Techniques and Tips
The inherent grandeur of the Dolomites provides a magnificent canvas, yet a thoughtful application of photographic techniques can elevate your images from mere snapshots to compelling visual narratives. Understanding how to harness light, time, and composition will allow you to truly capture the essence of these mountains.
Mastering Golden Hour and Blue Hour
The periods shortly after sunrise and before sunset, known as the “golden hours,” bathe the Dolomites in a warm, diffused light that accentuates textures and casts long, dramatic shadows. The pale pink and orange hues of “Enrosadira,” or alpenglow, on the dolomite rock faces are particularly magical during these times. Arrive at your chosen location well in advance to set up, and be prepared to stay after the sun has dipped below the horizon. The “blue hour,” the twilight period occurring just before sunrise and after sunset when the sky takes on a deep blue, offers a serene and often ethereal atmosphere. A sturdy tripod is indispensable for maintaining sharpness during these lower light conditions, and bracketing exposures can be beneficial to capture the full dynamic range.
Long Exposure Photography
Long exposure photography allows you to depict movement and the passage of time, transforming familiar scenes into something more abstract and artistic. This technique is particularly effective in the Dolomites for a variety of subjects. You will typically require a tripod to keep your camera perfectly still and Neutral Density (ND) filters to reduce the amount of light entering the lens, permitting longer shutter speeds even during daylight.
Waterfalls and Flowing Water
The numerous waterfalls and streams of the Dolomites lend themselves beautifully to long exposures. By using shutter speeds ranging from half a second to several seconds, you can render the water with a smooth, silky texture that conveys its movement and energy. Experiment with different durations to achieve the desired effect, from subtle motion blur to a completely ethereal flow. Compositions that include static elements like rocks or foliage alongside the moving water often create a compelling contrast.
Moving Clouds and Star Trails
For dramatic skies, a long exposure can capture the motion of clouds, streaking them across the frame and adding a sense of dynamism or profound calm, depending on their speed and your exposure time. Shutter speeds here might range from 30 seconds to several minutes. At night, under the clear alpine skies, long exposures are the key to capturing star trails. This involves either a single, very long exposure (often 30 minutes or more, requiring a dark environment and careful planning to avoid overexposure) or, more commonly, a series of shorter exposures (e.g., 30 seconds each) taken consecutively over a period of time, which are then stacked together in post-processing software.
Astrophotography in the Dolomites
The high altitudes and relatively low light pollution in many parts of the Dolomites offer excellent opportunities for astrophotography. Capturing the celestial sphere above the jagged peaks can result in truly awe-inspiring images.
Dark Sky Considerations
To make the most of astrophotography, seeking out locations away from towns and valley lights is crucial. Higher elevations generally offer darker, clearer skies. Consult light pollution maps online to identify optimal areas. Even a seemingly remote location can be affected by distant city glow, so thorough research is beneficial. Remember that your own headlamp or torch can interfere with long exposures, so use red light settings where possible and minimise their use during captures.
Planning for Milky Way and Moon Phases
The Milky Way, particularly its bright galactic core, is a popular subject. Its visibility varies throughout the year, typically being most prominent during the summer months in the Northern Hemisphere. Planning applications such as PhotoPills or Stellarium are invaluable for determining when and where the Milky Way will be positioned in the sky relative to your desired mountain backdrop. The phase of the moon is another critical factor: a new moon provides the darkest skies, ideal for capturing faint nebulae and the full glory of the Milky Way. A crescent moon, however, can subtly illuminate the foreground, adding detail to the landscape without washing out the stars.
Panorama Photography
The vast, sweeping vistas of the Dolomites are often best captured using panoramic techniques, allowing you to convey the sheer scale and breadth of the landscape that a single frame might not encompass.
Stitching Techniques
Successful panoramas require a methodical approach during shooting. Mount your camera on a tripod, ensuring it is perfectly level. Overlap each frame by approximately 20-30% to provide sufficient data for stitching software. It’s advisable to shoot in manual mode, setting focus, aperture, and shutter speed consistently across all frames to avoid variations in exposure and depth of field. For scenes with prominent foreground elements, using a panoramic head to rotate the camera around its nodal point can help prevent parallax errors. Software like Adobe Lightroom or dedicated panorama tools such as PTGui can then be used to seamlessly merge the individual images.
Vertical Panoramas
Do not overlook the possibility of vertical panoramas, often referred to as “vertoramas.” These are particularly effective for emphasising the height and grandeur of the Dolomite peaks, especially when you have an interesting foreground leading up to a towering mountain. The technique is similar to horizontal panoramas, but with the camera oriented vertically, capturing slices from bottom to top, or vice versa.
Focus Stacking for Ultimate Sharpness
Focus stacking is a technique used to achieve maximum depth of field, ensuring that your entire scene, from the nearest foreground element to the distant peaks, is tack-sharp. This is particularly useful with wide-angle lenses used close to a foreground subject, where achieving sufficient depth of field with a single shot might be impossible, even at smaller apertures (which can introduce diffraction). The process involves taking multiple shots of the same scene from a tripod, incrementally adjusting the focus point from the closest element to the furthest. These images are then blended together using specialised software like Adobe Photoshop or Helicon Focus, which selects the sharpest parts of each frame to create a single, perfectly sharp composite image.
Dealing with Challenging Light and Weather
The alpine environment of the Dolomites is characterised by rapidly changing light and weather conditions. While challenging, these can also present unique photographic opportunities for those who are prepared.
High Dynamic Range (HDR) Scenarios
Scenes in the mountains often exhibit a high dynamic range – for instance, a bright sky above deeply shadowed valleys or forests. Your camera may struggle to capture detail in both the brightest highlights and the darkest shadows simultaneously. In such situations, exposure bracketing is key. Take a series of shots (typically 3, 5, or 7) at different exposures, then merge them using HDR software in post-processing. The aim is often to create a natural-looking image that represents the scene as your eyes perceived it, rather than an overly processed or artificial result.
Shooting in Fog and Mist
Fog and mist can transform the Dolomite landscapes, adding layers of mystery, simplifying complex scenes, and isolating subjects. These conditions soften light and can create a beautiful, ethereal mood. Look for compositions where peaks emerge from a sea of clouds or where trees fade into the mist, creating a sense of depth. Exposure can be tricky in fog; your camera’s meter might underexpose, so consider adding some positive exposure compensation. Protect your equipment from moisture, and be patient, as conditions can change very quickly, revealing fleeting moments of beauty.
Responsible and Safe Photography in the Dolomites
Capturing the sublime beauty of the Dolomites is an unforgettable experience. However, this privilege comes with a profound responsibility to protect these magnificent landscapes for future generations and to ensure one’s own safety amidst their grandeur. A mindful approach to photography here is not merely a suggestion, but an essential practice.
Mountain Safety Essentials
The allure of the Dolomites’ peaks is undeniable, yet the mountain environment demands respect and careful preparation. Safety should always be the foremost consideration for any photographer venturing into these landscapes. Understanding and mitigating risks are key to a successful and enjoyable photographic expedition.
Checking Weather Forecasts
The alpine climate is notoriously fickle, capable of shifting from brilliant sunshine to severe conditions with remarkable speed. Before any excursion, it is imperative to consult reliable, local weather forecasts. Several specialised services provide detailed meteorological predictions for specific mountain areas and altitudes. Remember that forecasts offer guidance, not guarantees, and one must always be prepared for conditions to change more rapidly or intensely than anticipated, particularly at higher elevations. Pay close attention to predictions for wind speed and direction, precipitation type and intensity, temperature fluctuations, and any warnings for phenomena such as thunderstorms, hail, or sudden fog.
Being Prepared for Rapid Changes
Even on a day that commences with clear skies and benign conditions, one must be equipped for abrupt shifts in weather. This translates to carrying appropriate layers of clothing, including waterproof and windproof outerwear, a warm hat, and gloves, irrespective of the initial forecast or season. Visibility can diminish precipitously with the onset of fog or low clouds, rendering navigation difficult and potentially hazardous. It is a wise precaution to always inform someone of your planned route, your objectives, and your expected time of return, especially if venturing into more remote areas or undertaking longer hikes.
Leave No Trace Principles for Photographers
The ethos of “Leave No Trace” is fundamental to preserving the pristine character of the Dolomites. As photographers, our interaction with the environment should be that of a respectful observer, aiming to leave no sign of our passage. This philosophy extends beyond the obvious act of not littering; it encompasses a mindful approach to every decision and action taken within this sensitive ecosystem.
For photographers, this translates into several key practices:
- Pack it in, pack it out: Ensure that everything you bring into the mountains, including food wrappers, used batteries, lens cloths, and any equipment remnants, is carried back out with you.
- Travel and camp on durable surfaces: Stay on marked trails, rock, gravel, or dry grasses to avoid trampling fragile vegetation and contributing to erosion. When setting up a tripod, choose your spot carefully to minimise impact.
- Dispose of waste properly: This includes human waste. In many alpine areas, especially above the treeline, facilities are non-existent. Familiarise yourself with local guidelines for waste disposal, which often necessitate packing out human waste from sensitive zones.
- Leave what you find: Resist the temptation to alter the landscape for a composition. Do not break branches, move rocks unnecessarily, or disturb natural features. The beauty of the Dolomites lies in their natural state.
- Minimise campfire impacts: Where permitted, use established fire rings. However, it is often preferable to rely on a portable stove for cooking, as wood is scarce in alpine environments and fire risk can be high. Ensure any permitted fire is completely extinguished.
- Respect wildlife: (Covered in more detail below).
- Be considerate of other visitors: Maintain a low profile and avoid actions that might detract from others’ experience of nature’s tranquillity.
Respecting Wildlife and Flora
The Dolomites are a sanctuary for a diverse array of wildlife, from marmots and chamois to various bird species, as well as a host of delicate alpine flora. Observing these creatures in their natural habitat can be a deeply rewarding photographic experience, yet it requires patience, discretion, and profound respect. Maintain a significant and respectful distance, utilising telephoto lenses to capture your subjects rather than attempting to approach too closely. Sudden movements or loud noises can cause stress to animals and disrupt their natural behaviours. Never feed wild animals; this can alter their feeding patterns, make them dependent on human sources, and potentially lead to aggressive behaviour or health issues for the animals.
Alpine plants, with their vibrant colours and tenacity, are a hallmark of the Dolomites’ ecosystems. Many are slow-growing and highly vulnerable to disturbance. Be acutely conscious of where you place your feet and your tripod, especially in meadows, near water sources, and on fragile tundra. The temptation to get closer to a beautiful bloom should be tempered by the need to protect its delicate environment. Tread lightly, and leave the flora undisturbed for all to appreciate and for the ecosystem to continue its intricate dance.
Drone Photography Regulations and Etiquette
The use of drones, or Unmanned Aerial Vehicles (UAVs), in natural parks and protected areas such as the Dolomites is subject to stringent and evolving regulations. It is absolutely essential to thoroughly research and understand the current rules governing drone operation before considering their use. Large portions of the Dolomites fall under national park, regional park, or Natura 2000 site protections, which often prohibit or severely restrict drone flights to safeguard wildlife, preserve the natural soundscape, and ensure the safety and tranquillity of all visitors.
Beyond the letter of the law, consider the etiquette of drone use. The characteristic sound of a drone can be highly intrusive, shattering the peace that many seek in the mountains. It can also cause significant stress to wildlife, particularly nesting birds or herds of animals. If drone flight is permitted in a specific area and you choose to fly, do so with utmost discretion. Avoid flying over people, animals, or sensitive habitats. Keep flight times to a minimum and operate your drone in a way that respects the environment and the experience of others. The pursuit of an aerial perspective should never compromise the intrinsic values of the place.
Staying on Marked Trails and Respecting Private Property
The extensive network of trails in the Dolomites is meticulously planned and maintained for several crucial reasons: to guide visitors safely through often complex terrain, to protect the delicate alpine environment from erosion and widespread trampling, and to preserve the natural beauty of the landscape. Straying from marked paths can damage fragile vegetation that may take years, if not decades, to recover. It also contributes to soil erosion, particularly on steep slopes, and can inadvertently lead to disorientation or place you in hazardous, untracked terrain.
Furthermore, it is important to recognise that much of the land within the Dolomites, including many of the idyllic alpine pastures (known as ‘alms’ or ‘malghe’) and forested areas, is privately owned or managed. These lands are often working farms or forestry operations. Always respect private property. Do not climb fences, open gates without securely closing them behind you, or venture onto land where access is clearly restricted or not implicitly permitted by an established right-of-way. The iconic hay barns, rustic huts, and grazing livestock are part of this working landscape; admire them from a respectful distance unless public access to or through the property is clearly indicated.
Post-Processing Your Dolomites Images
Capturing the majestic beauty of the Dolomites is only the first part of the photographic journey. The art of post-processing is where you refine your vision, bringing forth the full potential of your images and translating the breathtaking reality into a compelling final photograph. Thoughtful editing can elevate a good shot to an exceptional one, allowing you to convey the atmosphere and emotion experienced in the field.
The Importance of Shooting in RAW
For photographers seeking the utmost quality and flexibility, shooting in RAW format is paramount. Unlike JPEGs, which are processed and compressed by the camera, RAW files contain all the unprocessed data captured by the sensor. This wealth of information provides significantly more latitude during post-processing. You gain greater control over adjustments such as exposure, white balance, highlight and shadow recovery, and colour rendition without a significant loss of image quality. While RAW files are larger and require dedicated software for editing (like Adobe Lightroom, Capture One, or DxO PhotoLab), the ability to non-destructively fine-tune every aspect of your image makes it an indispensable choice for landscape photography in a dynamic environment like the Dolomites.
Basic Adjustments: Exposure, Contrast, Highlights, Shadows
The foundational stage of post-processing involves making global adjustments to your image. These initial corrections aim to create a balanced and well-exposed starting point.
- Exposure: This slider controls the overall brightness of the image. A slight adjustment here can correct for any minor under or overexposure at the time of capture, ensuring the image is neither too dark nor too bright.
- Contrast: Contrast defines the difference between the lightest and darkest areas of your photograph. Increasing contrast can add ‘punch’ and depth, making the image more vivid, while decreasing it can create a softer, more ethereal feel. The dramatic rock formations and skies of the Dolomites often benefit from careful contrast adjustments.
- Highlights: The highlight recovery tool is crucial for bringing back detail in the brightest parts of your image, such as sunlit peaks, clouds, or snowfields. This prevents these areas from appearing as distracting, pure white patches.
- Shadows: Conversely, the shadow adjustment tool allows you to lift details from the darker areas of your image, revealing textures and information in shaded valleys or the undersides of cliffs without unnaturally brightening the entire scene.
These basic adjustments are often the first steps towards realizing the full dynamic range captured in your RAW file.
Color Correction and Grading for Mood
Once the tonal balance is established, attention turns to colour. This is a two-fold process: correction and grading.
- Color Correction: The primary goal here is to achieve accurate and natural-looking colours. This often begins with setting the correct white balance to remove any unwanted colour casts (e.g., too blue in the shade, too yellow under artificial light). The aim is to represent the scene as your eye perceived it, or as it would naturally appear.
- Color Grading: This is a more creative step where you deliberately manipulate colours to evoke a specific mood or enhance the atmosphere of your Dolomites photograph. For instance, you might enhance the warm golden hues of a sunrise or sunset, or introduce cooler, more desaturated tones to convey the crispness of alpine air or the serenity of a misty morning. Tools like HSL (Hue, Saturation, Luminance) panels, split toning, and colour balance wheels offer precise control over individual colours and tonal ranges, allowing for subtle or more pronounced stylistic choices.
Thoughtful colour work can significantly impact the emotional resonance of your images, transforming a simple record of a scene into an evocative piece of art.
Sharpening and Noise Reduction Techniques
To ensure your Dolomites images are presented with clarity and cleanliness, sharpening and noise reduction are essential final touches.
- Sharpening: This process enhances the definition of edges within an image, making it appear crisper and more detailed. Most editing software offers various sharpening tools, often with controls for amount, radius, and detail. It’s crucial to apply sharpening judiciously, as over-sharpening can introduce undesirable artefacts like halos around edges. Zooming in to 100% allows for accurate assessment. Often, selective sharpening, focusing on key elements like rock textures or distant peaks, yields more natural results.
- Noise Reduction: Digital noise, appearing as graininess or unwanted coloured speckles, can become apparent in images shot at high ISO settings (common in low light or astrophotography) or in underexposed areas that have been significantly brightened. Noise reduction algorithms help to diminish this noise. There are typically separate controls for luminance noise (grain) and colour noise. The key is to find a balance: reducing noise effectively without sacrificing too much fine detail or creating an overly smooth, artificial look.
Modern software provides sophisticated tools for both processes, often incorporating AI for more intelligent application.
Bringing Out Detail in Mountain Textures
The Dolomites are renowned for their dramatic, craggy peaks and intricate rock formations. Post-processing offers several techniques to accentuate these captivating textures and convey the sheer scale and ruggedness of the landscape.
- Clarity and Texture Sliders: Tools like ‘Clarity’ increase mid-tone contrast, which can effectively enhance the definition of rock faces and textures. The ‘Texture’ slider, often more subtle, can bring out finer surface details. Both should be used with restraint to avoid an overly processed or gritty appearance.
- Dehaze: The ‘Dehaze’ tool can be useful for cutting through atmospheric haze, thereby increasing contrast and saturation, which often reveals more texture in distant mountains. However, it can also introduce unwanted colour shifts or darkness if applied too strongly.
- Local Adjustments: Perhaps the most powerful way to enhance mountain textures is through local adjustments. Using tools like adjustment brushes, radial filters, or gradient filters, you can selectively apply sharpening, clarity, contrast, or even subtle dodging and burning (lightening and darkening specific areas) to highlight the contours, crevices, and strata of the rock. This targeted approach allows for a more nuanced and natural enhancement of detail, drawing the viewer’s eye to the geological narrative embedded in the mountainsides.
By carefully applying these techniques, you can add a remarkable sense of depth, dimensionality, and tactile quality to your images of the Dolomites, truly celebrating their unique geological character.
