Advanced Compositional Techniques in Street Photography
Explore innovative compositional strategies to elevate your street photography to an art form.
Street photography is more than just capturing a moment; it's about crafting a visual story. If you've mastered the basics and are looking to elevate your images from snapshots to compelling narratives, you're in the right place. This article dives deep into advanced compositional techniques that will transform your street photography.
We'll move beyond foundational rules to explore how to harness layers and depth for complex storytelling, master dynamic symmetry and geometry, and imbue your work with a deliberate artistic vision. Prepare to see the streets, and your camera, in a whole new light.
Essentials
Moving Beyond Foundational Rules
Why the Rule of Thirds Is a Starting Point, Not an End Goal
For any photographer, the Rule of Thirds is often the first compositional tool we learn. It’s a reliable guide that teaches us to avoid static, centered subjects and to create more visually engaging images. It provides a scaffold, a set of training wheels that helps build a foundational understanding of balance. But on the chaotic, fast-moving stage of the street, this rule can quickly become a creative straitjacket.
The street doesn’t conform to a neat three-by-three grid. A fleeting gesture, a powerful shadow, or a complex interplay between multiple people rarely aligns perfectly with intersecting lines. Forcing these organic moments into a rigid template can strip them of their raw energy. The goal of advanced composition is to move from a prescriptive, rule-based mindset to an intuitive, responsive one. It’s about developing a feel for the scene’s internal rhythm and balance, allowing you to react to the world as it unfolds, not as a textbook dictates. The rules provide a starting point, but true mastery lies in knowing when and why to break them.
Thinking in Scenes, Not Just Subjects
A common step in a photographer’s journey is learning to isolate a subject. We use a wide aperture to blur the background, making a person “pop” from their surroundings. While effective, this approach often tells an incomplete story. It presents a person on the street, but not necessarily of the street. Advanced street photography shifts this perspective from isolating a subject to capturing a holistic scene.
This is the difference between a simple portrait and an environmental one. The “scene” includes the architecture that frames the action, the secondary characters in the periphery, the quality of light filtering through the buildings, and the texture of the pavement underfoot. The background and edges of the frame cease to be distractions to be blurred away; they become essential supporting actors in the narrative. They provide context, mood, and scale, enriching the story of the main subject.
In truly masterful work, every single element within the frame has a purpose. Nothing is accidental. That out-of-focus figure in the foreground, the distant glint of a traffic light, the specific angle of a shadow—each component is either deliberately included to add depth, balance, or narrative, or it is consciously excluded. If an element does not contribute to the overall impact of the image, it actively detracts from it. This disciplined approach to seeing transforms you from someone who simply takes pictures of things to someone who builds photographs from scenes.
Harnessing Layers and Depth for Complex Narratives
A truly compelling street photograph is rarely about a single, isolated subject. It’s about the world that subject inhabits. Advanced composition involves moving from a flat, two-dimensional capture to a rich, three-dimensional scene brimming with context and story. By mastering layers and depth, you invite the viewer to step inside the frame and explore its narrative intricacies.
Foreground, Midground, and Background Storytelling
Think of your frame as a stage with multiple planes of action. The most dynamic street photos often have something interesting happening in the foreground, a main subject in the midground, and a context-setting background. The goal is to make these layers work together to tell a more complex story than any single element could on its own.
For example, a foreground might show a discarded newspaper, the midground a person waiting for a bus, and the background a billboard advertising a luxury vacation. Suddenly, you have a narrative about daily routine, aspiration, and the reality of urban life. The key is to create a visual journey for the eye.
- Create Distinction: Ensure each layer is visually separable. This can be achieved through focus, light, or subject placement. Avoid having a foreground element completely obscure a key part of the midground.
- Build Cohesion: While distinct, the layers must feel connected. This connection can be thematic (as in the example above), based on a shared color palette, or created by a leading line that travels from one layer to the next.
- Guide with Focus: Use your aperture strategically. A wider aperture (like f/2.8) can isolate your midground subject by blurring the foreground and background, but still allow their shapes and colors to provide context. A narrower aperture (like f/8 or f/11) can bring all layers into sharper focus, encouraging the viewer to read the image from front to back.
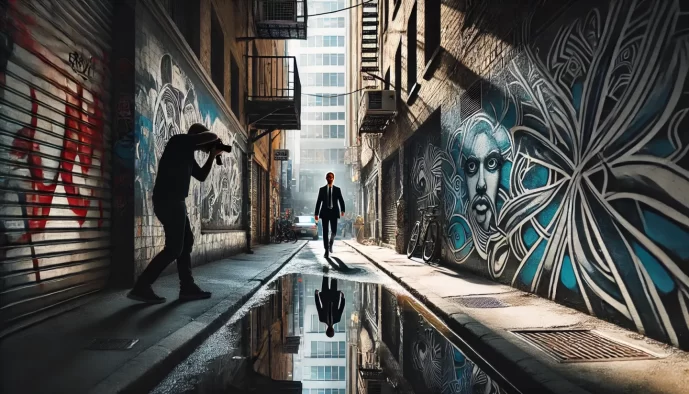
The “Dirty Frame” Technique
The “dirty frame” is a powerful technique that intentionally uses foreground elements to create a sense of voyeurism and immersion. Instead of seeking a perfectly clean, unobstructed view, you shoot through or past something. This partial obstruction places the viewer directly into the scene, as if they are peeking around a corner or looking over someone’s shoulder.
This technique breaks the fourth wall of photography, making the image feel more authentic and immediate. The out-of-focus foreground element adds a profound sense of depth and makes the in-focus subject in the midground pop with even greater clarity. Common examples include:
- Shooting past the dark silhouette of a person’s shoulder or head.
- Capturing a scene through a rain-streaked bus window or a smudged café pane.
- Framing a subject by shooting over the top of a bustling market stall or a stack of newspapers.
The key is that the foreground element should be suggestive, not distracting. It should enhance the story of the main subject without becoming the subject itself.
Scene Compression with Longer Lenses
While wide-angle lenses (like 28mm or 35mm) are the traditional workhorses of street photography for their ability to capture entire scenes, longer focal lengths offer a completely different compositional tool: compression. When you use a lens like a 70mm, 85mm, or even 135mm, it appears to flatten the space between your subject and the background.
This telephoto compression stacks elements on top of one another, creating dense, layered, and often graphically powerful compositions. A street that feels vast with a 35mm lens can become a compressed tapestry of people, signs, and architecture with an 85mm. This effect is excellent for:
- Highlighting Relationships: By making distant elements appear closer, you can create visual connections between subjects that are physically far apart.
- Creating a Sense of Scale: A lone person can be visually juxtaposed against a massive building or a sea of traffic behind them, emphasizing the feeling of the individual within the metropolis.
- Building Visual Density: Compression is perfect for conveying the chaotic energy and density of a bustling city street, filling the frame with information and eliminating empty space.
Stepping back and using a longer lens forces you to see the city not just as a wide-open space, but as a series of interconnected graphic planes waiting to be aligned.
Mastering Dynamic Symmetry and Geometry
While the Rule of Thirds provides a basic grid, the streets are rarely so orderly. Advanced composition involves seeing the underlying geometry in the chaos. By identifying and utilizing shapes, lines, and ratios, you can build images that possess a powerful, almost subliminal, sense of order and dynamism. This is about moving from placing a subject on a line to constructing the entire frame with intention.
The Power of Triangles and Diagonals
Among the most powerful geometric shapes in composition are triangles and diagonals. They are everywhere in the urban environment—formed by converging architectural lines, the posture of a group of people, or the interplay of light and shadow. Learning to see and arrange these shapes within your frame gives you incredible control over the viewer’s experience.
Triangles are masters of visual psychology. A triangle resting on its base feels stable and grounded, anchoring the scene. Think of a person standing with their feet apart. Conversely, an inverted triangle, balanced on its point, creates a sense of tension and instability, suggesting imminent action or precariousness. You can create these shapes by connecting three key points of interest in your frame—for example, the heads of three people, a subject’s eyes and hands, or a lamppost, a fire hydrant, and a pedestrian.

Diagonal lines are pure energy. They slice through the frame, pulling the viewer’s eye along with them and injecting a sense of motion and depth into an otherwise static image. Unlike horizontal or vertical lines which feel passive and stable, diagonals are dynamic. Look for them in staircases, sloping streets, long shadows cast by the sun, or even a person’s outstretched arm. By aligning the primary action or subject along a strong diagonal, you can transform a simple moment into a compelling visual journey.

The Golden Ratio and Fibonacci Spiral in the Wild
If the Rule of Thirds is arithmetic, the Golden Ratio (approximately 1.618) is calculus. It’s a more organic and sophisticated compositional guide found throughout nature and art. The ratio creates a grid where the intersecting points are closer to the center, leading to a more compact and natural-feeling composition. A visual representation of this is the Fibonacci Spiral, a swirling shape that draws the eye inward in a circular, flowing motion.
Finding these patterns on the street requires practice. Look for curved staircases, the sweep of a crowd turning a corner, or the way a person’s body curls as they check their phone. Instead of just placing a subject on an intersection, try to align the flow of the scene along the curve of the spiral, placing your main point of interest at its tightest point. This creates a composition that doesn’t just feel balanced, but harmoniously alive.

Creating Balance in Asymmetrical Scenes
Perfect symmetry can be powerful, but it’s often rare and can feel static. The streets are inherently asymmetrical. The key to a strong composition is not to force symmetry, but to achieve asymmetrical balance. This is the art of arranging elements of unequal “visual weight” in a way that creates a sense of equilibrium.
The most common technique is to counter-weight your main subject. If you have a large, dominant subject on one side of the frame—like a person in a brightly colored coat—you can balance it with a smaller, less significant element on the other side. This could be a distant figure, a sign, or a bird in flight. The distance and smaller size of the secondary element give it enough visual weight to offset the primary subject without competing with it.
Don’t forget that non-physical elements have weight, too. A large area of deep shadow or bright negative space can be a powerful counterweight to a solid subject. A person walking out of a vast, dark doorway, for instance, is balanced by the sheer volume of the shadow itself. By learning to balance your frames asymmetrically, you create compositions that are both dynamic and satisfyingly complete.
The Art of Juxtaposition and Contrast
Beyond geometry and layers, some of the most powerful street photographs derive their meaning from comparison. Juxtaposition is the art of placing two or more elements in a frame to create a relationship between them—often a relationship built on tension, irony, or commentary. It transforms a simple observation into a statement, inviting the viewer to think more deeply about what they are seeing. This is a key element in many street photography styles and genres.
Conceptual Juxtaposition
This is storytelling at its most potent. Conceptual juxtaposition isn’t just about what you see, but about the ideas the visual elements represent. By placing contrasting themes side-by-side, you create a narrative that sparks a conversation in the viewer’s mind. It’s about finding the friction between two worlds coexisting in a single moment.
Look for compelling pairings that reveal something about society, culture, or the human condition:
- Old vs. New: A person in traditional clothing talking on a futuristic smartphone, or a centuries-old monument framed by modern glass skyscrapers.
- Wealth vs. Poverty: A luxury car driving past a homeless encampment, or a high-fashion advertisement looming over a struggling market vendor.
- Nature vs. Industry: A single, resilient tree growing out of a crack in a concrete factory floor, or birds nesting on a tangle of electrical wires.
- Motion vs. Stillness: A person meditating on a park bench as a blur of frantic commuters rushes past, or a statue that seems to be watching the chaotic flow of traffic. This ties into understanding how to capture motion.
Visual Juxtaposition
While conceptual juxtaposition engages the intellect, visual juxtaposition appeals directly to the senses. It uses contrasting visual elements to create a dynamic, engaging, and often beautiful image. This technique is less about a specific narrative and more about creating visual impact and energy within the frame.
Train your eye to spot these powerful visual pairings:
- Light vs. Shadow (Chiaroscuro): This is a classic technique where dramatic contrasts between bright highlights and deep shadows create mood, depth, and form. A subject half-lit by a sliver of light from an alleyway is a prime example. Learning to master manipulating light and shadows is crucial.
- Rough textures vs. Smooth surfaces: The tactile quality of an image can be enhanced by placing different surfaces together. Think of the peeling paint of an old wall behind a person in a sleek, modern raincoat, or the rough pavement against a polished metal bench.
- Complementary or clashing colors: Use color theory to your advantage. A subject in a red coat walking past a green wall creates a powerful complementary color contrast that makes the subject pop. Similarly, intentionally clashing colors can create a sense of energy and chaos, much like exploring color theory for photographers.
Fishing for Moments
Juxtaposition often feels like a product of pure luck, but advanced photographers know how to manufacture their own luck. “Fishing” is a deliberate technique where you find one element of your potential juxtaposition—a compelling background—and wait patiently for the right subject to enter the frame and complete the story. This is a vital part of mastering street photography.
The process involves identifying a stage: a provocative advertisement, an interesting mural, a stark patch of light, or a piece of ironic graffiti. You then compose your shot, set your focus, and wait. The key is pre-visualizing the missing piece. Are you waiting for an elderly person to walk past a youth-focused ad? A businessperson to rush past a sign that says “Relax”? This patient approach transforms you from a passive observer into an active director, waiting for your perfect actor to step onto the stage you’ve already set. Understanding framing & timing is essential for this approach.
Composing with Light, Shadow, and Color
Light is the raw material of photography, but in street photography, it’s also a primary compositional tool. Advanced photographers don’t just find good light; they wield it. They use light, its absence (shadow), and its spectrum (color) to build mood, direct attention, and add layers of meaning to their images. Moving beyond simply exposing a scene correctly means learning to see light and color as subjects in their own right.
Sculpting with Hard Light
While beginners are often taught to avoid the harsh midday sun, seasoned street photographers know this is when the city offers its most dramatic and graphic potential. Instead of fighting hard light, you can learn to sculpt with it, turning challenges into opportunities for bold, high-contrast imagery. This is a great way to explore manipulating light and shadows.
The key is to stop seeing shadows as mere dark spots and start seeing them as powerful compositional elements. Deep, well-defined shadows become shapes, lines, and frames. They can create a sense of mystery by obscuring a face, reveal the texture of a cobblestone street, or form a powerful leading line that points directly to your subject. In a busy scene, a pool of shadow can isolate a subject more effectively than any shallow depth of field.
- Look for “light pockets”: Find spots where a beam of light cuts through an otherwise shaded area, like a narrow alley or under an awning. Position yourself and wait for a subject to walk into this natural spotlight.
- Play with long shadows: In the early morning or late afternoon, long shadows stretch across the pavement. These can be used to create dynamic diagonal lines, interact with subjects, or even become the primary subject of the photograph themselves.
- Create graphic compositions: Use the stark contrast between bright sun and deep shadow to flatten a scene, emphasizing shapes and patterns over texture and detail. This approach can turn a complex urban environment into a minimalist, abstract composition.
Strategic Use of Color
In the vibrant chaos of the street, color can easily become overwhelming. An advanced approach involves using color with intent and strategy, either to create a specific mood or to direct the viewer’s eye with surgical precision. This requires observing the color palette of a scene before you even raise your camera. Understanding color theory for photographers can be incredibly beneficial here.
- Color Isolation: This powerful technique involves finding a single, dominant pop of color within a more muted or monochromatic background. Think of a person with a bright red umbrella on a grey, rainy day, or a yellow taxi in a sea of concrete buildings. This singular color acts as an anchor point, immediately drawing the viewer’s eye and holding their attention.
- Color Harmony: The opposite of isolation, harmony involves creating a composition built from a limited, cohesive color palette. You might find a scene dominated by the analogous warm tones of brick, rust, and late afternoon sun, creating a feeling of warmth and nostalgia. Or you could capture a scene with a monochromatic palette, using different shades and tints of a single color (like blue during twilight) to create a subtle and unified mood.
- Color Theory in Practice: Understanding basic color theory can transform your compositions. A key principle is that warm colors (reds, oranges, yellows) tend to advance or feel closer to the viewer, while cool colors (blues, greens, purples) tend to recede. You can use this to enhance depth by placing a warm-colored subject against a cool-colored background, making them stand out even more. This relates to our discussion on using depth & layering in your compositions.
Composing for Silhouettes
A silhouette is more than just an underexposed subject against a bright sky. A truly compelling silhouette uses shape and contour to tell a story or evoke an emotion. It strips the subject down to their essential form, leaving the details to the viewer’s imagination. The goal is to move beyond a simple black blob and create a defined, evocative shape. This is a great way to explore the importance of point of view and perspective.
To achieve this, you need a strong, recognizable outline. The subject’s gesture, posture, and any accompanying props become critically important. A person simply standing still might be uninteresting, but a person captured mid-stride, holding an open umbrella, or gesticulating during a conversation can create a dynamic and instantly readable shape. Mastering these elements is key to improving your craft in photography.
The most critical rule for powerful silhouettes is separation. If you have multiple elements in your silhouette, ensure there is negative space (bright background) between them. If two people are silhouetted but their forms overlap, they merge into a single, confusing shape. By waiting for the moment they separate, you maintain the clarity and impact of each individual form, allowing the composition to breathe and be easily understood.
Advanced Framing and Perspective
Once you’re comfortable with the core elements of a scene, the next step is to manipulate how the viewer experiences it. Framing and perspective are not just about what you include in the shot, but how you present it. By consciously controlling the viewpoint and using the environment to your advantage, you can add layers of meaning and visual sophistication to your work.
Framing Within a Frame
This classic technique is one of the most effective ways to add a sense of depth and context to a street photograph. It involves using elements within the scene to create a secondary, internal frame around your subject. This immediately draws the viewer’s eye where you want it to go, creating a more focused and deliberate composition. The frame itself adds another layer of information about the environment.
Look for natural and architectural opportunities to create these frames. Common examples include:
- Doorways, windows, and archways that perfectly isolate a person or moment.
- Reflections in puddles, shop windows, or mirrors that create a self-contained scene.
- The gap between two people in a crowd, using their silhouettes to frame a subject further down the street.
- Overhanging tree branches or structural beams that frame the upper portion of your image.
By containing the subject, a frame separates them from the surrounding chaos, making their story more intimate and pronounced. It transforms a simple observation into a curated view, as if you are offering the audience a privileged glimpse into a specific moment.
Sub-Framing and Breaking the Frame
Taking the concept further, advanced photographers often play with more complex framing ideas. Sub-framing involves dividing the entire image into multiple “cells” or zones, each containing its own subject or point of interest. Think of a scene viewed through a multi-paned window, where each pane tells a slightly different story, yet they all contribute to a single, cohesive narrative.
Conversely, breaking the frame is a powerful technique for creating dynamic tension. This involves intentionally letting elements—a person’s arm, a passing car, a sign—cut into or exit the edge of your photograph. While beginners are often taught to keep everything neatly inside the borders, this deliberate “interruption” suggests that the world of the photograph is much larger than what is shown. It implies movement and a continuing story beyond the captured moment, leaving the viewer’s imagination to fill in the blanks.
Altering Perspective for Impact
Perhaps the single fastest way to move from a simple snapshot to a composed photograph is to change your physical perspective. Most people take photos from eye level, which results in a predictable view of the world. By simply crouching down or finding a higher vantage point, you fundamentally alter the relationships between subjects, backgrounds, and the viewer.
Low-Angle Shots: Getting low to the ground and shooting upwards can have a dramatic effect. This perspective tends to make subjects appear more significant, heroic, or even intimidating. It isolates them against the sky or ceiling, removing distracting ground-level clutter. A low angle is also fantastic for emphasizing vertical lines in architecture, making buildings feel immense and powerful, dwarfing the human elements within the scene.
High-Angle Shots: Shooting from above—from a bridge, a window, or even just by holding your camera high—creates a different psychological effect. It can give the viewer a sense of omniscience or detachment, as if they are an observer watching a scene unfold on a stage. This perspective is excellent for capturing the geometry of a scene, showing the patterns of crowds, or creating a sense of scale and the individual’s place within a larger, complex environment.
